
<Printer Settings>
All the settings related to the printer are listed with descriptions. Default settings are marked with a dagger ( ).
).
).|
|
Asterisks (*)Settings marked with (*) may not be displayed depending on the model you are using.
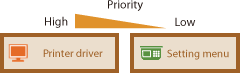
Priority of settingsIf a print setting is specified both from the printer driver and the operation panel of the machine, the specification from the printer driver overrides that from the operation panel. The specification from the operation panel becomes effective in some specific cases, such as when printing from UNIX or other operating system that does not support printer drivers.
 |
<Action When Paper Size Mismatch> 
Set whether printing goes ahead if a paper size other than the size loaded in the drawer is selected. You can also set the machine not to go ahead with printing and instead display an alert message.
|
<Force Output>
<Display Error>
|
<Menu> ( )
)  <Printer Settings> <Action When Paper Size Mismatch> Select <Force Output> or <Display Error>
) <Image Quality Settings for Mobile Print> *
Select the image processing when printing from a mobile device.
|
<Halftone>
<Gradation>
<Error Diffusion> <Priority>
<Speed Priority>
<Image Quality Priority>
|
<Menu> () <Printer Settings> <Image Quality Settings for Mobile Print> Select <Halftone> or <Priority> Select the item <Apply>
) |
|
|
When <Priority> is set to <Speed Priority>, you cannot select <Error Diffusion>.
|
<Copies> *
Set the number of copies to print.
|
1
to 999 |
<Menu> () <Printer Settings> <Copies> Set the number of copies to print <Apply> ( )
)
) )<2-Sided Printing> *
Select whether to make 2-sided printouts.
|
<Off>
<On> |
<Menu> () <Printer Settings> <2-Sided Printing> Select <Off> or <On>
) <Default Paper> *
Use this item to specify the paper size. Available Paper
<Menu> () <Printer Settings> <Default Paper> Select the paper size
) <Print Quality>
You can change settings related to print quality.
<Density> *
Adjust the toner density.
|
17 Levels
<Fine Adjust>/<Density (Fine Adjust)>
<High>
17 Levels
<Medium>
17 Levels
<Low>
17 Levels
|
|
|
|
The settings specified for <Density> are disabled when <Toner Save> is enabled.
|
<Menu> () <Printer Settings> <Print Quality> <Density> Adjust the density <Apply>
) <Toner Save>
You can save toner consumption when printing from a mobile device. Select <On> when you want to check the layout or other appearance characteristics before proceeding to final printing of a large job.
|
<Off>
<On> |
<Menu> () <Printer Settings> <Print Quality> <Toner Save> Select <Off> or <On>
) <Resolution> *
Specify the resolution to be used for print data processing.
|
<1200 dpi>
<600 dpi>
|
<Menu> () <Printer Settings> <Print Quality> <Resolution> Select <1200 dpi> or <600 dpi>
) <Density Fine Adjustment> *
Finely adjust the density. You can specify this setting only when <1200 dpi> is selected in <Resolution>.
|
<-1>
<0> <+1> |
<Menu> () <Printer Settings> <Print Quality> <Density Fine Adjustment> Specify the density
) <Layout> *
Specify the page layout settings such as binding position.
<Binding Location>
If you are binding the printouts with a binding tool such as a stapler, use this item to specify whether to bind on the long or short edge.
|
<Long Edge>
<Short Edge>
|
<Menu> () <Printer Settings> <Layout> <Binding Location> Select <Long Edge> or <Short Edge>
) 
<Long Edge>
Specify this to bind on the long edge of paper.
Specify this to bind on the long edge of paper.
<Short Edge>
Specify this to bind on the short edge of paper.
Specify this to bind on the short edge of paper.
<Timeout> *
Set the time period after which the current print job is automatically canceled in the case of a print data reception interruption.
|
5 to 15
to 300 (sec.) |
<Menu> () <Printer Settings> <Timeout> Set the time period <Apply> ()
) )<PCL> *
Specify the PCL printing settings such as page layout and print quality.
<Paper Save>
Select whether to save paper by not outputting blank pages in documents. By selecting <On>, the machine will not output blank pages. To output all your document data when printing, including any blank pages that you have inserted in your document, select <Off>.
|
<Off>
<On> |
<Menu> () <Printer Settings> <PCL> <Paper Save> Select <Off> or <On>
) <Orientation>
Select <Portrait> (vertical orientation) or <Landscape> (horizontal orientation) for the page orientation.
|
<Portrait>
<Landscape>
|
<Menu> () <Printer Settings> <PCL> <Orientation> Select <Portrait> or <Landscape>
) <Font Number>
Specify the font to use by selecting a corresponding font ID number. You can print the PCL font list with font samples from the operation panel. PCL Font List
|
0
to 54 |
<Menu> () <Printer Settings> <PCL> <Font Number> Select the font number <Apply> ()
) )<Point Size>
Set the font size in points, adjustable in 0.25 increments. You can specify this setting only when a proportionally-spaced scalable font is selected in <Font Number>.
|
4.00 to 12.00
to 999.75 (point) |
<Menu> () <Printer Settings> <PCL> <Point Size> Specify the point size <Apply> ()
) )<Pitch>
Set the font pitch, or cpi (characters per inch), adjustable in 0.01 increments. You can specify this setting only when a fixed-pitch scalable font or a bitmap font is selected in <Font Number>.
|
0.44 to 10.00
to 99.99 (cpi) |
<Menu> () <Printer Settings> <PCL> <Pitch> Specify the pitch value <Apply> ()
) )<Form Lines>
Set the number of lines printed on one page from 5 to 128. This setting is automatically changed according to the settings specified in <Default Paper Size> and <Orientation>.
|
5 to 64
to 128 (lines) |
<Menu> () <Printer Settings> <PCL> <Form Lines> Specify the number of lines <Apply> ()
) )<Character Code>
Select the character code that is most suited for the computer you send print data from. The specified setting is ignored when the character code is controlled by the font specified in <Font Number>.
|
<Menu> () <Printer Settings> <PCL> <Character Code> Select the character code
) <Custom Paper>
Select whether to set a custom paper size. Select <On> to set the dimensions of the paper in <X dimension> and <Y dimension>.
|
<Off>
<On> |
<Menu> () <Printer Settings> <PCL> <Custom Paper> Select <Off> or <On>
) <Unit of Measure>
Select the unit of measurement to use to set a custom paper size.
|
<Millimeters>
<Inches>
|
<Menu> () <Printer Settings> <PCL> <Unit of Measure> Select <Millimeters> or <Inches>
) <X dimension>
Specify the horizontal dimension (short edge) of the custom paper.
|
77 to 215
(mm) |
<Menu> () <Printer Settings> <PCL> <X dimension> Specify the dimension <Apply> ()
) )<Y dimension>
Specify the vertical dimension (long edge) of the custom paper.
|
127 to 355
(mm) |
<Menu> () <Printer Settings> <PCL> <Y dimension> Specify the dimension <Apply> ()
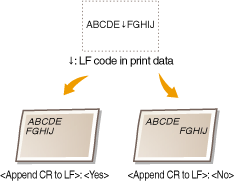
) )<Append CR to LF>
Select whether to append a carriage return (CR) when the machine receives a line feed code (LF). If <Yes> is selected, the print position moves to the beginning of the next line when the machine receives an LF code. If <No> is selected, the print position moves to the next line, just under the received LF code.
|
<Yes>
<No>
|
<Menu> () <Printer Settings> <PCL> <Append CR to LF> Select <Yes> or <No>
) <Enlarge A4 Print Width>
Select whether to expand the width of the printable area of A4 size paper in portrait orientation to that of LTR size.
|
<Off>
<On> |
<Menu> () <Printer Settings> <PCL> <Enlarge A4 Print Width> Select <Off> or <On>
) <Halftones>
You can select the printing method to reproduce halftones (the intermediate range between the lighter and darker areas of an image) for optimal image quality. For each document, you can make settings by type of image.
|
<Text>
<Color Tone>
<Gradation>
<Resolution>
<Graphics>
<Color Tone>
<Gradation>
<Resolution>
<Image>
<Color Tone>
<Gradation>
<Resolution>
|
<Menu> () <Printer Settings> <PCL> <Halftones> Select the type of image Select the halftone reproduction method
) 
 Type of image
Select the object for which to change the setting. <Text> represents letters and characters, <Graphics> represents lines and figures, and <Image> represents photos and images.
 Setting value
<Color Tone>
Produces a sharp print with strong contrast of lightness and darkness. It is suitable for printing image data such as photo image data.
Produces a sharp print with strong contrast of lightness and darkness. It is suitable for printing image data such as photo image data.
<Gradation>
Produces a print with smooth gradation or smooth edges. It is suitable for printing figures or graphs containing gradation areas.
Produces a print with smooth gradation or smooth edges. It is suitable for printing figures or graphs containing gradation areas.
<Resolution>
Produces a fine print with clear edges of text. It is suitable for printing characters and fine lines.
Produces a fine print with clear edges of text. It is suitable for printing characters and fine lines.
<Feed A5 Horizontally>
Enable or disable horizontal feeding when printing A5 size.
|
<Off>
<On> |
<Menu> () <Printer Settings> <PCL> <Feed A5 Horizontally> Select <Off> or <On>
)