
Basic Operations for Sending Faxes
This section describes the basic operation procedure used to fax an original.
 |
|
You need to complete some procedures before using fax functions. Configuring Initial Settings for Fax Functions
|
1
Place the original(s). Placing Originals
2
Select <Fax> in the Home screen. Home Screen
If the login screen appears, specify the user name, the password, and the authentication server. Logging in to Authorized Send
3
Select <Reset> in the Fax Basic Features screen. Fax Basic Features Screen
If the destinations set by the previous user are still selected, this can cause transmission errors. Always reset the settings before sending.
4
Specify the destination.
Specifying from Address Book
Specifying from Coded Dial Numbers
Entering Destinations Directly
Specifying Destinations in an LDAP Server
Specifying from Address Book
 |
|
The Address Book enables you to specify a destination by selecting from a list of registered destinations or by searching by name for destinations with recipient names.
|
 |
|
You need to register destinations in the Address Book before using this feature. Registering Destinations
|
1
Select <Address Book>.
2
Select an index. Index

3
Select the check box for the desired destination, and select <Apply>.
 |
|
If a destination is selected from <Address Book> in the Home screen, the Fax Basic Features screen can be displayed while the selected destination remains being specified.
|
Back to Top
Specifying from Coded Dial Numbers
 |
|
Three-digit numbers (coded dial numbers) are assigned to addresses in the Address Book. You can specify an address simply by entering its coded dial number.
|
 |
|
To use coded dial numbers, the destination must be registered in the Address Book beforehand. Registering Destinations
|
1
Select <Coded Dial> in the <Specify Destination> tab.
2
Enter a three-digit number.
If you have entered an incorrect value, use  to clear it.
 to clear it.
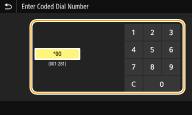

If a confirmation screen appears
When <Confirm When Coded Dial TX> is set to <On>, a screen is displayed that shows the destination and the name for the number. (For Group Dial, the destination name and the number of destinations are shown.) Check the contents and if everything is correct, select <OK>. To specify a different destination, select <Cancel> and then re-enter the three-digit coded dial number. Displaying Destinations in Address Book
Back to Top
Entering Destinations Directly
For a destination that is not registered in the Address Book, specify it by entering a fax number.
1
Enter the fax number in the <Enter Dest.> tab.
If you have entered an incorrect value, use  to clear it.
 to clear it.
 |
Adding a destinationTo enter a second or subsequent destination, select <Next Dest.>.
If a confirmation screen appearsWhen <Confirm Entered Fax Number> is set to <On>, the input screen reappears so that you can confirm the destination (Confirming the Entered Fax Number). Enter the destination again.
Sending a fax abroadEnter the international access code, the country code, and the fax number to specify the destination. If you are not able to successfully connect to a recipient, select <Pause> and insert a pause between numbers.
|
Back to Top
Specifying Destinations in an LDAP Server
 |
|
If your office has an LDAP server installed, you can specify a destination using user information in the server. Access the LDAP server via the machine to search for the appropriate user information and specify it as destination.
|
 |
|
You need to specify the settings for connecting to an LDAP server beforehand. Registering LDAP Servers
|
1
Select <LDAP Server> in the <Specify Destination> tab.
2
Select the LDAP server you are using.
3
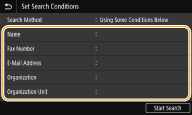
Select conditions for user information to be searched.
Name, fax numbers, e-mail addresses, organization names, and organization unit are available criteria for searching destinations.
4
Enter the search target character string, and select <Apply>.
On how to enter text, see Entering Text.
To specify multiple search criteria, repeat steps 3 and 4.
5
Select <Search Method>.
6
Select conditions to display the search result.
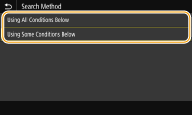
<Using All Conditions Below>
Searches and displays the users that meet all the search criteria specified in steps 3 and 4.
Searches and displays the users that meet all the search criteria specified in steps 3 and 4.
<Using Some Conditions Below>
If users that meet even one of the criteria specified in steps 3 and 4 are found, displays all those users.
If users that meet even one of the criteria specified in steps 3 and 4 are found, displays all those users.
7
Select <Start Search>.
The users meeting your search criteria are displayed.

If the authentication screen appears when you select <Start Search>, enter the user name of the machine and the password registered in the LDAP server, and select <Apply>. Registering LDAP Servers
8
Select the check box for the user that you want to specify as destination, and select <Apply>.
Back to Top

Adding a destination
To send a fax to multiple destinations at a time (sequential broadcast), repeat the appropriate steps to enter all destinations.
You can also recall previously used destinations. Recalling Previously Used Settings for Sending (Recall Settings)
 To delete destinations
If you specified multiple destinations, you can delete destinations as necessary.
|
1
|
Select <Confirm Destination>.
|
|
2
|
Select the check box for the destination to be deleted, and select <Remove from Dest.>.
If you select the Group Dial check box, you can view the destinations registered in the group by selecting <Details>
 <Destination>. <Destination>. |
|
3
|
Select <Yes>.
|
5
Specify the scanning settings as necessary.
Adjusting Image Quality
Scanning 2-Sided Originals
Adjusting Image Quality
 |
|
You can select the resolution suitable for your original type. The higher the resolution is, the clearer the image becomes, but the longer it takes to send. Selecting Resolution
|
 |
|
You can adjust the density of the fax if the text or images in an original are too light or dark. Adjusting Density
|
 |
|
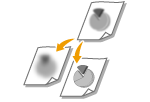
You can adjust the sharpness of the image. Increase the sharpness to sharpen blurred text and lines, or decrease the sharpness to improve the appearance of magazine photos. Adjusting Sharpness
|
Select <Resolution> in the <TX/RX Settings> tab  Select the resolution
 Select the resolution
Select <Density> in the <TX/RX Settings> tab  Adjust the density
  <Apply>
 Adjust the density
  <Apply>
Select <Sharpness> in the <TX/RX Settings> tab  Adjust the sharpness
  <Apply>
 Adjust the sharpness
  <Apply>
Example: If you want to sharpen text and lines written in pencil

Example: If you want to improve the appearance of magazine photos

Back to Top
Scanning 2-Sided Originals
 |
|
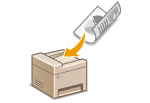
The machine can automatically scan the front and back sides of originals in the feeder.
|
 |
|
The machine cannot scan both sides of originals automatically when the originals are placed on the platen glass or when the machine is set to Manual Sending.
|
Select <2-Sided Original> in the <TX/RX Settings> tab  Select <Book Type> or <Calendar Type>
 Select <Book Type> or <Calendar Type>
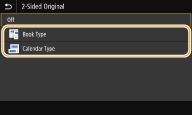
<Book Type>
Select for originals whose images on the front and back sides face the same direction.
Select for originals whose images on the front and back sides face the same direction.
<Calendar Type>
Select for originals whose images on the front and back sides face in opposite directions.
Select for originals whose images on the front and back sides face in opposite directions.
Back to Top
6
Select <Start>.
If the <Confirm Destination> screen is displayed, check whether the destination is correct, and then select <Start Scanning>.
Scanning of the original starts.
If you want to cancel, select <Cancel>  <Yes>. Canceling Sending Faxes
 <Yes>. Canceling Sending Faxes
 When placing originals in the feeder in step 1
When scanning is complete, the faxes are sent.
 When placing originals on the platen glass in step 1
When scanning is complete, follow the procedure below.
|
1
|
Select the original size.
When there is only one page to be scanned, proceed to step 3.
|
|
2
|
Place the next original on the platen glass, and select <Scan Next>.
Repeat this step until you finish scanning all of the pages.
|
|
3
|
Select <Start Sending>.
The faxes are sent.
|
 |
|
If you always want to send faxes with the same settings: Changing the Default Settings for Functions
If you want to register a combination of settings to use when needed: Registering Frequently Used Settings
If you want to sound an alarm when the handset is off the hook: <Off-Hook Alarm>
|