Automatic Color Tone Correction
You can recalibrate the machine when you notice irregularities in the color of the copies or prints, such as when copies turn out to be different from the original in color.
This is a precise recalibration that is made to the color settings of the machine. The procedure involves making test pages and placing them on the platen glass for scanning. Once this is complete, the machine automatically corrects the irregularities.
IMPORTANT |
Make sure to perform this function in the stable room environment (i.e. temperature and humidity). The color may become unstable due to the rapid changes in room environment, especially soon after staring up an air conditioner during summer or winter season. Make sure to perform "Automatic Gradation Adjustment (Full Adjust)" to correct gradation and density settings before starting "Auto Correct Color Tone" to correct color settings. For more information on Automatic Gradation Adjustment (Full Adjust), see "Automatic Gradation Adjustment." This machine adjusts the toner and print speed according to the paper type. To make effective adjustments, select the correct paper type. Make sure that you place the test pages properly. Accurate recalibrations of the color settings of the machine cannot be made if the test pages are not scanned correctly. |
NOTE |
Test pages are not counted as part of the copy or print total page counts. |
Automatic Color Tone Correction
1.
Press  (Settings/Registration).
(Settings/Registration).2.
Press [Adjustment/Maintenance] → [Adjust Image Quality] → [Auto Correct Color Tone Settings].
3.
Press [Auto Correct Color Tone].
4.
Press [Yes] when a message appears prompting you to confirm that you already performed automatic gradation adjustment (Full Adjust).
NOTE |
Press [No] to perform automatic gradation adjustment. (See "Automatic Gradation Adjustment.") |
5.
Press [Start Correcting].
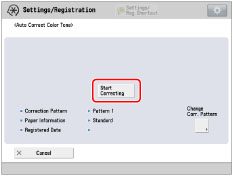
This procedure corrects color using the default correction pattern.
NOTE |
To correct color using the registered correction pattern, press [Change Corr. Pattern] → select the registered correction pattern → press [OK]. For more information on correction pattern, see "Registering Correction Pattern." |
6.
Select the paper source that contains Hammermill Color Copy Digital (28lb. (105 g/m2)) or paper to adjust → press [OK].
IMPORTANT |
If you correct color tone using the registered correction pattern, you can only select the paper source that contains the same type of paper as you used for test page when registering the selected correction pattern. |
NOTE |
The name of the paper is subject to change without notice. For more information, contact your local authorized Canon dealer. |
7.
Press [Start Printing].
Test page is output.
8.
Place the test page face down on the platen glass → press [Start Scanning].
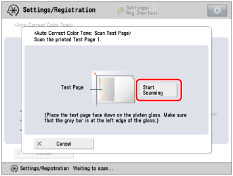
Place the test page face down, with the gray bar along the left edge of the platen glass.
9.
Remove the test page from the platen glass.
Registering Correction Pattern
You can create and register correction patterns for desired paper type.
IMPORTANT |
To perform the procedure described in this section, you must log in to the machine as an administrator. (See "Logging In to the Machine as an Administrator.") |
1.
Press (Settings/Registration).
(Settings/Registration).2.
Press [Adjustment/Maintenance] → [Adjust Image Quality] → [Auto Correct Color Tone Settings].
3.
Press [Register Correction Pattern].
4.
Press [Yes] when a message appears prompting you to confirm that you already performed automatic gradation adjustment (Full Adjust).
NOTE |
Press [No] to perform automatic gradation adjustment. (See "Automatic Gradation Adjustment.") |
5.
Select the registration destination for new correction pattern → press [Next].
IMPORTANT |
Be careful not to overwrite the correction pattern registered by the local service representative when this machine was installed. |
NOTE |
You can register up to four correction patterns and overwrite existing correction patterns. When you overwrite the correction pattern, the previous correction pattern is deleted. |
6.
Select paper type to use for test page → press [Next].
You can select the paper type from the simple or detailed setting screen. For paper types that are not displayed on the simple setting screen, press [Detailed Settings] → select the paper type from the detailed setting screen.
IMPORTANT |
You can use the following paper size and paper type other than Hammermill Color Copy Digital (28lb. (105 g/m2))*: Size: A3, A4, 11" x 17", and LTR Basis weight/finish/whiteness: Thin 1, Plain 1, Plain 2 or Heavy 1 to Heavy 6/Uncoated that has the same whiteness of the Hammermill Color Copy Digital (28lb. (105 g/m2)) Custom paper type whose basis weight/finish/whiteness is equivalent to above * The name of the paper is subject to change without notice. For more information, contact your local authorized Canon dealer. This machine adjusts the toner and print speed according to the paper type. To make effective adjustments, select the correct paper type. |
NOTE |
If paper type you want to use for test page for correction is not listed in the detailed settings screen, you can register paper type in the list. For more information on registering custom paper type, see "Overview of This Function." While you are registering the custom paper type as a correction pattern, the paper type settings are protected and you cannot change the detailed information for custom type or delete the custom type in [Paper Type Management Settings] in [Preferences] (Settings/Registration). |
7.
Select the paper source that contains the correct paper to use for the test page → press [OK].
8.
Press [Start Printing].
Test page is output.
9.
Place the test page face down on the platen glass → press [Start Scanning].
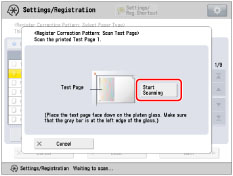
Place the test page face down on the platen glass, with the gray bar along the left edge of the platen glass.
10.
Remove the test page from the platen glass.
NOTE |
When performing [Auto Correct Color Tone], corrections of color tone are applied to copy/print jobs. Corrections can be applied separately for copy job or print job. If you do not want to change the color tone of either copy or print job, set [Off] for the job type you do not want to apply to in [Job Type to Apply To]. |