Shading Correction
This mode enables you to correct the slightly uneven densities that occur in the halftone density area of a printed image.
The following three types of shading correction can be made:
Densitometer Correction:
This mode enables you to correct uneven densities by gauging the output results of the test page using a densitometer, and entering the displayed values for density adjustment.
Visual Correction:
This mode enables you to correct uneven densities by viewing the output results of the test page and adjusting the density manually. Select this mode to correct uneven densities if the densitometer is unavailable or the densitometer correction is unsatisfactory. Note that sufficient experience in detecting slightly uneven densities is required to manually adjust the density.
Print Server Correction:
This mode enables you to correct uneven densities using the data received from the print server.
IMPORTANT |
13" x 19", 12 5/8" x 17 16/11", 12" x 18", 11" x 17", or LTR plain paper can be used for test pages. Make sure that a sufficient supply of paper is loaded in the paper source before starting this procedure. |
NOTE |
[Print Server Correction] is displayed only when the imagePRESS Server is installed. |
1.
Press  (Settings/Registration).
(Settings/Registration).2.
Press [Adjustment/Maintenance] → [Adjust Image Quality] → [Correct Shading].
3.
Select the method for correct shading.
To perform densitometer correction:
Press [Densitometer Correction] → [Start Printing].
Test page 1 with marks from 0 to 8 is output.
Test Page 1
NOTE |
The marks 0 and 8 may not be shown, depending on the paper width. |
Gauge the mark on the output test page 1 using the densitometer.
Press [Fine Adjust] of the color you want to adjust.
Select the number → enter the gauged density value from the test page → press [OK].
IMPORTANT |
The density adjustment is performed based on all the density values of marks from 0 to 8. If all marks from 0 to 8 are shown on the test page, make sure to gauge and enter the density values for all imprinted marks. If the marks 0 and 8 are not shown on the test page, gauge and enter the density values for all the imprinted marks from 1 to 7 and make sure that the density values for the marks 0 and 8 are set to ‘0’. If you enter the density values other than ‘0’ for the marks 0 and 8, you cannot perform density adjustment precisely. |
Press [Output Test Page] → [Start Printing].
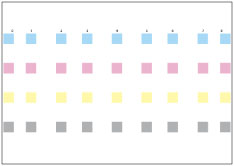
Test page 2 with marks from -7 to +6 after adjustment is output.
Test Page 2

View the output test page 2 and confirm that there is no uneven density.
Press [Store and Finish].
To perform visual correction:
Press [Visual Correction] → [Output Test Page] → [Start Printing].
Test page 2 with marks from -7 to +6 is output.
View the output test page → press [Fine Adjust] of the color you want to adjust.
Select the number to adjust → press [+] for a heavy density or [-] for a light density → [OK].
Press [Output Test Page] → [Start Printing].
Test page 2 with marks from -7 to +6 after adjustment is output.
View the output test page 2 and confirm that there is no uneven density.
Press [Store and Finish].
The display returns to the screen of step 2. Repeat steps for visual correction until the shading is improved.
To perform print server correction:
Press [Print Server Correction] → [Start Printing].
Test page is output.
Gauge the mark on the output test page using the densitometer that is attached to the imagePRESS Server, and forward the adjustment values to the main unit.
Press [Output Test Page] → [Start Printing].
Test page 2 with marks after adjustment based on the transferred data is output.
View the output test page 2 and confirm that there is no uneven density.
Press [Store and Finish].
IMPORTANT |
For more information on the print server correction, see the instruction manual of the imagePRESS Server. |
NOTE |
The marks -7 and +6 may not be shown on the output test page 2, depending on the paper width. Although the mark -7 may be shown on the output test page 2, the numbers you can adjust values for are from -6 to +6. You cannot adjust values for -7. |