Sending a File in the Memory RX Inbox
1.
Press  (Main Menu) → [Fax/I-Fax Inbox] → [Memory RX Inbox].
(Main Menu) → [Fax/I-Fax Inbox] → [Memory RX Inbox].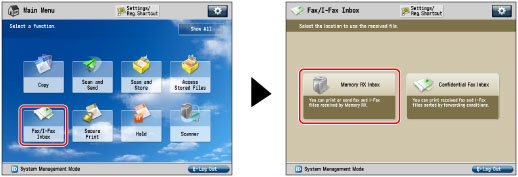
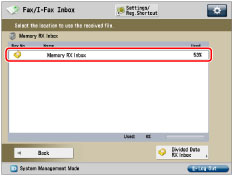
2.
Press [Memory RX Inbox].
3.
Select the file that you want to send → press [Send].
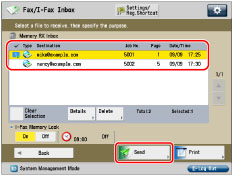
To select all of the files (up to a maximum of 32 files from the top), press [Select All (Max 32 Files)]. (If you select a file, this key changes to [Clear Selection].)
NOTE |
A maximum of 32 files can be selected and sent at the same time. A maximum of 999 pages can be sent simultaneously. |
4.
Specify the destination.
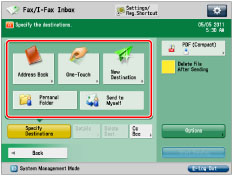
If the destination is stored in the Address Book: | Refer to the following, depending on the type of address book. Scan and Send: Fax: |
If the destination is stored in a One-Touch button: | E-Mail, I-Fax, File Server: Fax: |
If the destination is not stored in the Address Book: | Refer to the following detailed procedures, according to the address or server to specify. |
If the destination is stored in Favorite Settings: | |
If you want to specify your personal folder as the destination: | |
If you want to specify your own e-mail address as the destination: | |
If you want to specify Cc and/or Bcc addresses: |
IMPORTANT |
If you set an address type to 'On' in [Limit New Destination], you cannot enter new destinations of that type. Select a stored destination by using the Local Address Book, Remote Address Book, LDAP Server in [Address Book], or by pressing a one touch button in [One-Touch]. (See "Restricting the Send Function.") |
NOTE |
You can specify and send to up to 256 destinations at the one time. However, if a group address is specified for the destination, each address stored in that group is counted as one destination. If you try to send to a file server for which [Confirm Before Sending] is set to 'On', a screen appears prompting you to enter a password. In this case, enter the server password. However, you cannot send to a group address including a file server in which [Confirm Before Sending] is set to 'On'. (See "Registering a File Server Address.") If you want to automatically delete the selected file after it is sent, press [Delete File After Sending]. You cannot print or store the file in a mail box while it is being sent. If the selected destination is a group address which contains a mail box, the file you are sending will not be sent to (or stored in) that mail box. |
5.
Press the file format button → select a file format → press [OK].
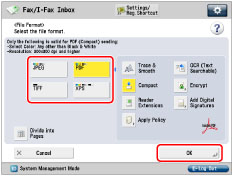
This step is unnecessary if you selected Fax or I-Fax destinations.
IMPORTANT |
Some file formats require optional products. For information on the optional products required to use this function, see "Optional Products Required for Each Function." |
NOTE |
For more information on file formats, see "Setting the File Format." |
6.
Press [Options] → specify the desired option → press [Close].
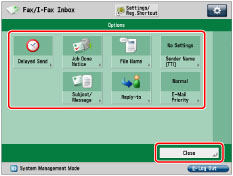
NOTE |
For more information on option modes, see "Scan and Send" or "Sending a Fax." |
7.
Press [Start Sending].