Overview of This Function
If you press [Scan and Send] on the Main Menu screen, the Scan and Send Basic Features screen appears. The Send function enables you to scan documents and send them to specified destinations via e-mail or I-fax, save them to a file server, or store them in a mail box for later use. You can send documents to multiple destinations simultaneously using various sending methods, such as e-mail and I-fax.
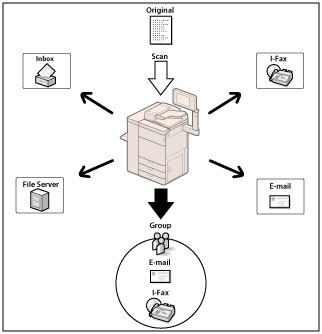
You can also send a fax from [Scan and Send].
To send a fax from [Scan and Send], set <Enable Fax in Scan and Send Function> in [Display Fax Function] to 'On'. (See "Display Fax Function.")
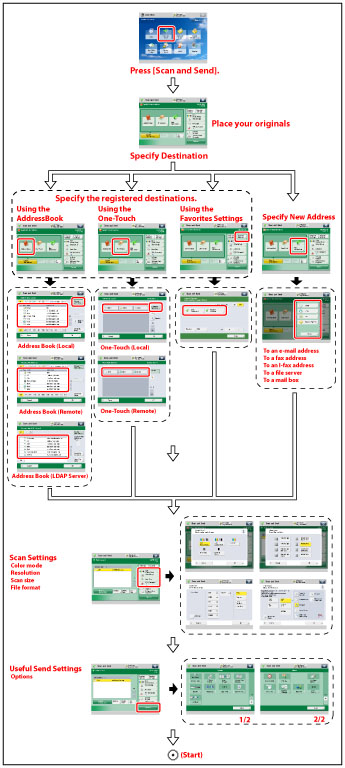
The basic flow of operations for sending is as follows:
Scan and Send Basic Features Screen
The screen below, which appears when you select [Scan and Send] on the Main Menu screen, is called the Scan and Send Basic Features screen.
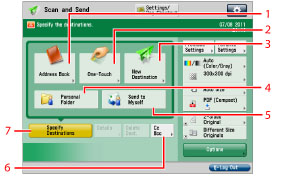
1 | [Address Book] Press to select a destination from the Address Book. |
2 | [One-Touch] Press to display the screen for registering/specifying one-touch buttons. Press [To Remote Add. Book] to specify destinations registered in the one-touch buttons of a server machine by accessing from a client machine on the network. For more information, see "Specifying Destinations from the One-Touch Buttons of a Server Machine." |
3 | [New Destination] Press to enter a destination. |
4 | [Personal Folder] Press to specify your personal folder as the destination. For instructions on setting personal folders, see "Specifying Personal Folders." The administrator can restrict destination for file transmission to the operator's personal folder. (See "Restricting Destination for File Transmission.") |
5 | [Send to Myself] Press to specify your own e-mail address as the destination. The administrator can restrict general users to send e-mail only to their addresses. (See "Setting Limited Destination for Sending E-Mail.") |
6 | [Cc Bcc] Press to specify Cc or Bcc addresses. |
7 | [Specify Destinations] Press to display the methods for specifying destinations or the destination list. |
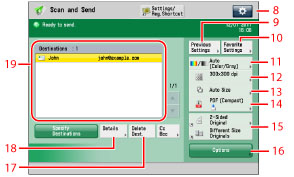
8 |  Press to specify the following settings: Register Favorite Settings Edit Favorite Settings Register to Quick Menu (See "Quick Menu.") Change Default Settings Register Options Shortcuts Change Default LDAP Search Conditions Register/Edit Information for Each User [Register/Edit Information for Each User] appears only if you are managing users by login service, such as SSO-H. For more information, see "Authentication Method Settings for Sending Operations." |
9 | [Previous Settings] Press to recall the last three send jobs, including the destinations, scan settings, and send settings. |
10 | [Favorite Settings] Press to register frequently used send settings. You can also recall registered settings. |
11 | Select Color Press to select the color mode. |
12 | Resolution Press to specify the resolution. |
13 | Scan Size Press to select the size of the original. |
14 | File Format Press to select the file format. |
15 | Shortcuts to Options Press to display several shortcuts to modes in [Options]. [2-Sided Original] and [Different Size Originals] are displayed as default. (See "Assigning Shortcuts.") |
16 | [Options] Press to select and use other modes available for scanning and sending. Set useful send functions such as sending different sized originals together or sending 2-sided originals. |
17 | [Delete Dest.] Press to delete a destination displayed in the destination list. |
18 | [Details] Press to check or change the destination information selected from the destination list. |
19 | Destination List Press to display a list of destinations. |
IMPORTANT |
You must specify network settings to be able to send scanned documents to an e-mail address, I-fax address, or file server. (See "Common Communication Settings for E-Mail/I-Fax.") |
NOTE |
[Personal Folder] appears if you are managing users by login service, such as SSO-H. [Send to Myself] appears only if you register a user's e-mail address when you are using authentication by SSO-H. To display [Fax] when [New Destination] is selected, set <Enable Fax in Scan and Send Function> for [Display Fax Function] to 'On'. (See "Display Fax Function.") |
Address Book Screen
You can use various methods to search for destinations from the Address Book on the screen for selecting destinations. You can also search using a combination of these methods.
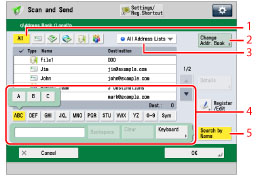
1 | Specify Type of Destination button Press [All],  (E-Mail), (E-Mail),  (Fax), (Fax),  (I-Fax), (I-Fax),  (File), (File),  (Group) to display destinations registered in each type. (Group) to display destinations registered in each type. |
2 | [Change Addr. Book] Press [Change Addr. Book] to switch the display to the [Local], [Remote], or [LDAP Server] address book. |
3 | Address List drop-down list Press the Address List drop-down list to display a list of Address Lists 1 to 10 or one-touch buttons. Address lists categorize the addresses stored in the Address Book. |
4 | Search Initial Letter button Press the alphanumeric keys (e.g., [ABC]) to display the individual keys for each letter or number. You can select a letter or number to restrict the displayed range of entries. Press [All] to return to the full address list. |
5 | [Search by Name] Press [Search by Name] to display the search screen for a destination name. You can narrow the search by entering multiple consecutive characters, starting with the first character of the destination name. You can also narrow the addresses displayed by using the [Keyboard] to enter multiple letters. 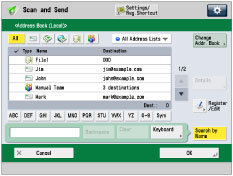 [ABC] - [Sym] Press to display the characters you can enter. The range of letters or the symbols you can enter appear. [Keyboard] Press to display the keyboard on the touch panel. [Clear] Press to delete all of the text entered. [Backspace] Press to delete the last letter entered. |
NOTE |
Press [Search by Name] again to close the screen for narrowing the address book and return to the previous screen. If you select [All], destinations registered in one-touch buttons also appear. However, you cannot delete destinations registered in one-touch buttons. For instructions on deleting one-touch buttons, see "Storing/Editing/Deleting One-Touch Buttons." To cancel a selected destination, select the destination again. To display [Access No.], set [Manage Address Book Access Numbers] to 'On'. (See "Managing the Address Book with Access Numbers.") To display the fax destination, set <Enable Fax in Scan and Send Function> for [Display Fax Function] to 'On'. (See "Display Fax Function.") |