Storing/Editing/Deleting One-Touch Buttons
NOTE |
You cannot register new destinations in a group destination that is stored in a one-touch button. The destinations must be registered in the one-touch buttons beforehand. |
Storing/Editing One-Touch Buttons
1.
Press  (Main Menu) → [Scan and Send] → [One-Touch].
(Main Menu) → [Scan and Send] → [One-Touch].
2.
Press [Register] → select a one-touch button to store or change → press [Register/Edit].
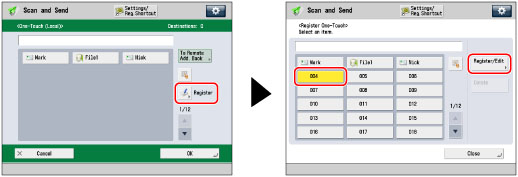
If you know the three digit number for the one-touch button, you can press  → enter the three digit number of the desired one-touch button using
  -
-  (numeric keys).
→ enter the three digit number of the desired one-touch button using - (numeric keys).If you select a one-touch button in which a destination is already stored, proceed to step 3.
NOTE |
The following icons are displayed to indicate the stored destination type for one-touch buttons in which a destination is already stored:  (E-Mail) (E-Mail) (Fax) (Fax) (I-Fax) (I-Fax) (File server) (File server) (Group) (Group) |
3.
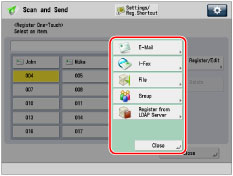
Select the type of destination to register.
NOTE |
For instructions on registering a fax number in a one-touch button, see "Storing New Addresses." |
If you select [E-Mail]:
Press [E-Mail].
Enter a name for the address [Name] in accordance with steps 5 and 6 of "Registering an E-Mail Address."
Press [One-Touch Name].
Enter a name → press [OK].
Press [E-Mail Address].
Enter the e-mail address → press [OK].
Select one of the following for <Divide Data> as necessary → press [OK].
For details on Divide Data, see step 4 of "Specifying a Destination by Entering an E-mail Address."
If you select [I-Fax]:
Press [I-Fax].
Enter a name for the address [Name] in accordance with steps 5 and 6 of "Registering an I-Fax Address."
Press [One-Touch Name].
Enter a name → press [OK].
Specify the I-fax address in accordance with steps 8 to 14 of "Registering an I-Fax Address."
If you select [File]:
Press [File].
Enter a name for the address [Name] in accordance with steps 5 and 6 of "Registering a File Server Address."
Press [One-Touch Name].
Enter a name → press [OK].
Specify the file server address in accordance with steps 8 to 17 of "Registering a File Server Address."
If you select [Group]:
Press [Group].
Enter a name for the address [Name] in accordance with steps 5 and 6 of "Registering a Group Address."
Press [One-Touch Name].
Enter a name → press [OK].
Press [Add from One-Touch] → select a destination to store in the group address → press [OK].
You can only select destinations that are already stored in one-touch buttons to be part of a one-touch button group address.
If you know the three digit number for the desired one-touch button, you can press → enter the three digit number of the desired one-touch button using - (numeric keys).
→ enter the three digit number of the desired one-touch button using - (numeric keys).If you want to also store the data to be sent in a mail box, press [Store in Mail Box] → select the desired mail box → press [OK].
You can register only one mail box in a group address.
Press [OK].
If you select [Register from LDAP Server]:
Press [Register from LDAP Server].
Specify the address by using LDAP server in accordance with steps 4 to 9 of "Specifying Destinations Using the Address Book (LDAP Server)."
Select the destination from the search results → press [Next].
You cannot select multiple destinations at the same time.
NOTE |
To cancel a specified destination, select the destination you want to register again. |
Press [One-Touch Name].
Enter a name → press [OK].
IMPORTANT |
The information that can be obtained via the LDAP server consists of only names, e-mail addresses, and fax numbers. |
Press [OK].
4.
Press [Close] → [OK].
Deleting One-Touch Buttons
1.
Press (Main Menu) → [Scan and Send] → [One-Touch].
(Main Menu) → [Scan and Send] → [One-Touch].2.
Press [Register] → select the one-touch button to delete → press [Delete].
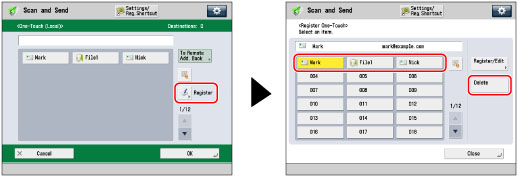
If you know the three digit number for the desired one-touch button, you can press → enter the three digit number of the desired one-touch button using - (numeric keys).
→ enter the three digit number of the desired one-touch button using - (numeric keys).NOTE |
The following icons are displayed to indicate the stored destination type for one-touch buttons in which a destination is already stored: (E-Mail) (Fax) (I-Fax) (File server) (Group) |
3.
Press [Yes].
4.
Press [Close] → [OK].
IMPORTANT |
If you set [Switch Language/Keyboard On/Off] to 'On', the host name and folder path of the file server destination may not appear correctly, and you may not be able to browse them. (See "Enabling the Language/Keyboard Switch.") |
NOTE |
Destinations stored in one-touch buttons also appear in the Local Address Book. For instructions on registering/editing a fax number, see "Storing New Addresses." |