Specifying a File Server Using the Keyboard
You can specify a file server as the destination directly from the keyboard displayed on the touch panel display. Press [Host Name], [Folder Path], [User Name], or [Password] to specify the file server settings.
1.
Press  (Main Menu) → [Scan and Send] → [New Destination].
(Main Menu) → [Scan and Send] → [New Destination].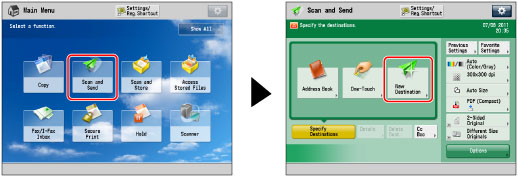
2.
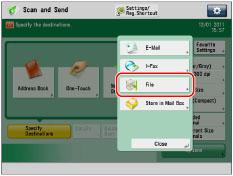
Press [File].
3.
Press the drop-down list → select the desired server protocol.
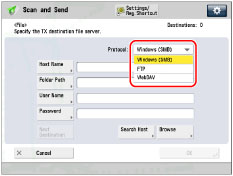
For information on the protocols that can be used, see "System Environment."
4.
Specify each setting.
Item | Description |
Host Name | A host name is a name assigned to a host computer that provides services on the network. In this entry box, enter the name of the file server on the network as the destination of the send job. If you select [FTP] or [WebDAV] as the server protocol, you can also specify a port number after the host name address by entering a colon (:) followed by the port number. Example: 192.168.100.50:21000 When sending to an IPv6 host, specify the following settings for [Host Name]: [IPv6 Address]:<Port Number> Example: [5aed:90a0:bc05:01d2:568a:2fc0:0001:12ee]:21000 Make sure to enter the same port number for the Host Name as the one specified for the FTP server or WebDAV server to which you are sending your documents. |
Folder Path | A folder path is a series of characters that signify the location of the folder. Specify a folder in the file server as the destination of the send job. |
User Name | The login user name for the file server. To enter the user name only: Example: user_name Maximum 20 characters To enter the user name and the domain name: Example: domain_name\user_name Domain name: Maximum 15 characters User name: Maximum 20 characters To enter a UPN (User Principal Name): Example: user_name@domain_name.com Maximum 128 characters |
Password | The login password for the file server. |
To add another destination, press [Next Destination] → repeat the procedure above.
If you select [Windows (SMB)] as the server protocol, you can specify the file server by pressing [Browse]. For instructions on using the [Browse] key, see "Specifying a File Server Using the Browse Key (Windows (SMB))."
If you select [Windows (SMB)] as the server protocol, you can specify the file server by pressing [Search Host]. For instructions on using the [Search Host] key, see "Specifying a File Server Using the Search Host Key (Windows (SMB))."
NOTE |
If you select [WebDAV] as the server protocol in [Host Name], the HTTP protocol is used if you specify 'HTTP://' as the scheme at the start of the host name. The TLS + HTTP (HTTPS) protocol is used if you specify 'HTTPS://' as the scheme at the start of the host name. Specifying 'HTTPS://' as the scheme enables TLS communications between the server and the machine. You can confirm whether the TLS server certificate is valid when sending with WebDAV by setting [Confirm TLS Certificate for WebDAV TX] to 'On'. You can only use UPN (User Principal Name) if you are sending to a computer belonging to a domain operated with Active Directory. When sending to a file server on the Internet using WebDAV, proxy server settings may be required, depending on the environment of the destination. (See "Settings Common to TCP/IPv4 and TCP/IPv6.") |
5.
Press [OK].