Operations for Files Stored in a Mail Box
You can add, delete, move, duplicate, merge, and insert/delete pages for files stored in a mail box.
Deleting a File
1.
Press  → [Access Stored Files] → [Mail Box].
→ [Access Stored Files] → [Mail Box]. 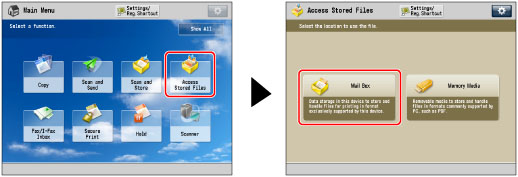
2.
Select the desired Mail Box → select the desired file → press [Edit File].

3.
Press [Delete].

4.
Press [Yes].
Merging Multiple Files
IMPORTANT |
You cannot use the Merge Multiple Files mode if the resolutions of the selected files differ. You can set the Merge Multiple Files mode only for files in the same mail box. If there are 1,500 files in all of the mail boxes, you cannot perform the Merge Multiple Files mode. If there is insufficient memory available, you cannot perform the Merge Multiple Files mode. |
1.
Press → [Access Stored Files] → [Mail Box].
→ [Access Stored Files] → [Mail Box]. 2.
Select the desired Mail Box → select the desired files in the order in which you want to merge them → press [Edit File].

3.
Press [Merge Multiple Files].

4.
Press [File Name].

5.
Enter a file name → press [OK] → [Start Merging].
If the memory is full while you are merging and saving, a message informing you that you cannot merge is displayed.
NOTE |
If you create a file without assigning it a name, the machine automatically assigns the file a name using the year, month, day, and time the file was created. For example, if a merged file is created at 1:35 PM, 41 seconds, on January 15, 2016, its name will be <20160115133541>. If print settings have been stored for the selected files, the settings are not carried over to the new file. |
Moving/Duplicating a File
1.
Press → [Access Stored Files] → [Mail Box].
→ [Access Stored Files] → [Mail Box]. 2.
Select the desired Mail Box → select the desired file → press [Edit File].
3.
Press [Move/Duplicate].

4.
Press [Mail Box].
NOTE |
For instructions on moving/duplicating a file to the Hold Queue, see "Moving/Duplicating a Job into the Mail Box." |
5.
Select the desired mail box → select the desired operation.
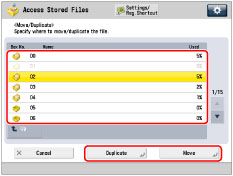
To duplicate a file, press [Duplicate].
To move a file, press [Move].
You cannot move or duplicate a file to multiple mail boxes at once.
If the file cannot be moved or duplicated to the selected mail box, a message appears telling you that the move or duplication cannot be performed.
If the file cannot be moved or duplicated to the selected mail box, it remains in the original mail box.
If an error occurs while multiple files are being moved or duplicated, the number of files that are moved or duplicated successfully is displayed.
NOTE |
The name of the moved or duplicated file is the same as that of the original file. If the machine enters the Sleep mode while files are being moved or duplicated, only those files that have been processed up to the time when the machine enters to the Sleep mode, are moved or duplicated successfully. |
Inserting a File into Another File
IMPORTANT |
You cannot use the Insert Pages mode if the resolutions of the selected files differ. You can set the Insert Pages mode only for files in the same mail box. If there are 1,500 files in all of the mail boxes, you cannot set the Insert Pages mode. If there is insufficient memory available, you cannot perform the Insert Pages mode. |
1.
Press → [Access Stored Files] → [Mail Box].
→ [Access Stored Files] → [Mail Box]. 2.
Select the desired Mail Box → select the desired file → press [Edit File].
3.
Press [Insert Pages].

NOTE |
If you select multiple files and press [Insert Pages], the selected (highlighted) file becomes the file that is inserted. |
4.
Select the file to insert.

NOTE |
You cannot select multiple files at the same time. |
5.
Enter the pages to insert using  -
-  (numeric keys).
- (numeric keys).You can check images stored in the file in which you are inserting by pressing [Display Image].
6.
Press [Next].
7.
Press [File Name After Insert.].
8.
Enter a file name → press [OK] → [Start Inserting].
If memory is insufficient while you are using the Insert Pages mode, a message informing you that you cannot insert the file is displayed.
NOTE |
If you create a file without assigning it a name, the machine automatically assigns the file a name using the year, month, day, and time the file was created. For example, if a merged file is created at 1:35 PM, 41 seconds, on January 15, 2016, its name will be <20160115133541>. If print settings have been stored for the selected files, the settings are not carried over to the new file. |
Changing a File Name (Change File Name)
1.
Press → [Access Stored Files] → [Mail Box].
→ [Access Stored Files] → [Mail Box].2.
Select the desired Mail Box → select the desired file → press [Edit File].
3.
Press [Change File Name].

NOTE |
If you select multiple files and press [Change File Name], the selected (highlighted) file name will be changed. |
4.
Enter a file name → press [OK].

Deleting Part of a File
This mode enables you to delete pages from a file that is stored in a mail box.
NOTE |
If you select all the pages of a file, the entire file is erased. |
1.
Press → [Access Stored Files] → [Mail Box].
→ [Access Stored Files] → [Mail Box]. 2.
Select the desired Mail Box → select the desired file → press [Edit File].
3.
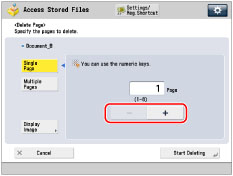
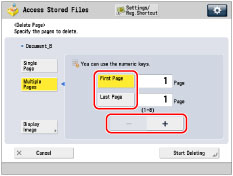
Press [Delete Page].

NOTE |
If you select multiple files and press [Delete Page], the selected (highlighted) file becomes the file pages will be deleted from. |
4.
Specify the pages you want to delete.
You can check images stored in the selected file by pressing [Display Image].
If you select [Single Page]:
Press [Single Page].
Press [-] or [+] to specify the page you want to delete.
If you select [Multiple Pages]:
Press [Multiple Pages].
Press [First Page] and [Last Page] → specify the first and last pages to be deleted using [-] or [+].
5.
Press [Start Deleting] → [Yes].
Adding a File (Scan and Store)
You can scan an original and store it as a file.
1.
Place your originals.

NOTE |
For instructions on placing originals, see "Placing Originals." |
2.
Press → [Access Stored Files] → [Mail Box].
→ [Access Stored Files] → [Mail Box]. 3.
Select the desired Mail Box → press [Edit File].

4.
Press [Add Files (Scan and Store)].

5.
Specify the desired scan settings.
6.
Press  .
.
.If the following screen is displayed, after the last batch of originals is scanned, press [Start Storing].

If you place your original on the platen glass, press to scan each original.
to scan each original.