Connecting to an SMB/CIFS Network and Configuring a Shared Folder
It is recommended that you consult the administrator for the network you are using when configuring the file server.
The number of users or clients that can access a server running Windows Server 2008/7/Server 2008 R2/8.1/Server 2012/10 is limited. After this number of users or clients is reached, it is not possible to send to a server running Windows Server 2008/7/Server 2008 R2/8.1/Server 2012/10.
In the following procedures, items displayed on the screens for Windows 8.1 are used. Depending on your environment, the items you see on the screen may differ.
1.
Log on to Windows with administrator privileges.
2.
Display the window for setting the network connection.
Windows Server 2008: From the [Start] menu, right-click [Network] → select [Properties] → click [Manage network connections].
Windows 7/Server 2008 R2/8.1: From the [Start] menu, right-click [Control Panel] → select [Network and Internet] → click [Network and Sharing Center].
Windows Server 2012: Place the cursor on the top right (bottom right) of the desktop → select [Settings] → [Control Panel]. Select [Network and Internet] → click [Network and Sharing Center].
Windows 10: Place the cursor on the bottom left of the desktop and right-click → select [Control Panel] → click [Network and Sharing Center].
3.
Click the <Connections> local area network name → select [Properties].
If you are using Windows Server 2008, right-click the [Local Area Connection] icon → select [Properties].
If you are using Windows 7/Server 2008 R2/8.1/Server 2012/10, click [Local Area Connection] → [Properties].
4.
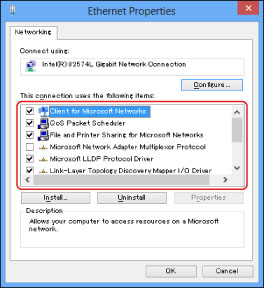
Select [Client for Microsoft Networks], [File and Printer Sharing for Microsoft Networks], and [Internet Protocol (TCP/IP)]/[Internet Protocol Version 4 (TCP/IPv4)].
5.
Double-click [Internet Protocol (TCP/IP)]/[Internet Protocol Version 4 (TCP/IPv4)].
6.
In the [Internet Protocol (TCP/IP) Properties]/[Internet Protocol Version 4 (TCP/IPv4) Properties] dialog box, click [Advanced] on the [General] sheet → click the [WINS] tab.
7.
On the [WINS] sheet, select [Enable NetBIOS over TCP/IP].
8.
Click [OK] repeatedly to close the dialog box.
9.
Restart the computer if prompted.
10.
Confirm the computer name.
If you are using Windows Server 2008/7/Server 2008 R2/8.1/:
From the [Start] menu, right-click [Computer] → select [Properties] → click [Change settings] for <Computer name, domain, and workgroup settings>.
In the [System Properties] dialog box, on the [Computer Name] sheet, click [Change].
In the [Computer Name/Domain Changes] dialog box, click [More].
Confirm [NetBIOS computer name] in the dialog box that appears.
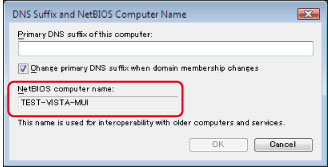
Click [Cancel] repeatedly to close the dialog box.
If you are using Windows Server 2012:
Place the cursor on the top right (bottom right) of the desktop → select [Settings] → [PC info]/[Server Info] → click [Change settings] for <Computer name, domain, and workgroup settings>.
In the [System Properties] dialog box, on the [Computer Name] sheet, click [Change].
In the [Computer Name/Domain Changes] dialog box, click [More].
Confirm [NetBIOS computer name] in the dialog box that appears.
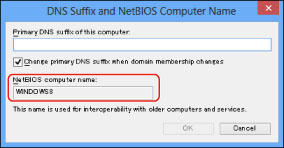
Click [Cancel] repeatedly to close the dialog box.
If you are using Windows 10:
Place the cursor on the bottom left of the desktop and right-click→ select [System].
Click [Advanced system settings].
In the [System Properties] dialog box, on the [Computer Name] sheet, click [Change].
In the [Computer Name/Domain Changes] dialog box, click [More].
Confirm [NetBIOS computer name] in the dialog box that appears.
11.
Set the user and password for accessing the shared folder.
Display the window for managing the computer.
Windows Server 2008/7/Server 2008 R2/8.1: From the [Start] menu, right-click [Computer] → select [Manage].
Windows Server 2012: Place the cursor on the bottom left of the desktop and right-click → select [Computer Management].
Windows 10: Place the cursor on the bottom left of the desktop and right-click → select [Computer Management].
Double-click [Local Users and Groups] for [System Tools] in the [Computer Management] window.
If you are using Windows Server 2008/Server 2008 R2, double-click [Configuration] under [Server Manager].
Right-click the [Users] folder → click [New User].
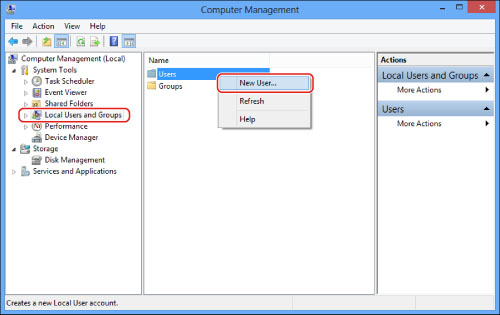
In the [New User] dialog box, enter the user name in [User name] → enter the password in [Password] → re-enter the password in [Confirm Password] → click [Create].
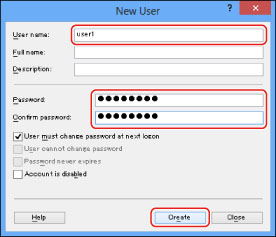
Enter a user name not longer than 20 alphanumeric characters, and a password not longer than 14 alphanumeric characters.
If you select [User must change password at next logon], any new users added must change their passwords in order to send data from the machine. (You cannot change the password from the control panel.)
Close the [Computer Management] window.
NOTE |
In the Active Directory environment, the procedures for setting up users differ from the above. For more information, see the Windows manual. When a computer that one or more users log on to is restricted by the administrator in an Active Directory environment, the name of the computer must be registered in the Active Directory. Set the computer name in the user account properties dialog box to "CANON + the last 8 digits of the MAC address of the computer + 00". For example, if the MAC address of the computer you are using is "00:00:11:22:33:44", set "CANON1122334400". |
12.
Select the folder to share in Windows Explorer, etc. → right-click the folder → select [Properties].
13.
Enter the share name.
If you are using Windows Server 2008/7/Server 2008 R2/8.1/Server 2012/10:
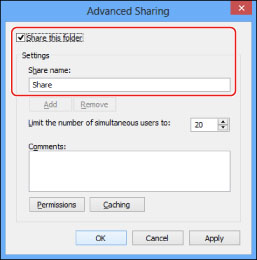
On the [Sharing] sheet, select [Advanced Sharing].
Select [Share this folder] → enter the share name in [Share name].
14.
Set permissions.
To create a shared folder on a FAT or FAT32 format disk (If the [Security] tab is not displayed):
Click [Permissions].
In the dialog box that appears, select or add the users or groups to whom you want to give access to the shared folder → in the list for setting the access permissions, select [Allow] for both [Change] and [Read] → click [OK].
To create a shared folder on an NTFS format disk:
Click the [Security] tab.
Select the users or groups to whom you want to give access to the shared folder → press [Add]/[Edit] → in the list for setting the access permissions, set [Allow] for access permissions [Write] and [Read & Execute] or higher.
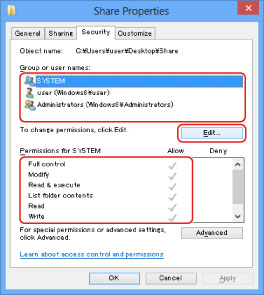
For data in the folder, check [Allow] for both [Write] and [Read], or a higher access authority.
NOTE |
In the Active Directory environment, the procedures for specifying the security settings of the shared folder differ from above. For more information, see the Windows manual. |
Click [OK].
15.
Set a recipient address using the control panel.
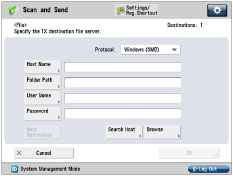
There are three methods for specifying the recipient address; selecting the desired address from the list that appears when you press [Browse], searching for the address by pressing [Search Host], or entering the address using the keyboard on the touch panel display.
Sample recipient settings:
Server side settings (set and confirmed in the above step.):
[Computer Name]/[NetBIOS computer name]: | swan |
[Share name]: | share |
Create a folder called 'Images' within share, and then specify Images as the recipient for sending.
The machine's address settings:
<Protocol:>: | Windows (SMB) |
[Host Name]: | \\swan\share (Shared folder path) |
[Folder Path]: | \Images |
[User Name]: | User name entered in the above step |
[Password]: | Password for the above user |
IMPORTANT |
If you want to specify each item from the list on the Browse screen, make sure you press [Browse] after the expiration of the time specified in "Setting the Waiting Time for Connection at Startup." Up to 128 alphanumeric characters can be entered for [Host Name] on the control panel. Also, up to 255 alphanumeric characters can be entered for [Folder Path]. Specify the server settings within the character limit. If you change the language of the touch panel display, [Host Name] and [Folder Path] may not appear correctly, or you may not be able to browse the directories. If the language of the touch panel display differs from the computer used as a master browser, [Host Name] and [Folder Path] may not appear correctly, or you may not be able to browse the directories. |
NOTE |
You can send data using the following formats. A DNS server is required for the latter case: \\192.168.2.100\share \\host_name.organization.company.co.jp\share You can send data using the following formats. domain_name\user_name (up to 15 alphanumeric characters for the domain name, and up to 20 for the user name) If you specify the user name in this format, the user authority for the specified domain is applied to SMB communication. user_name@organization.company.com (up to 128 characters in total) Note that the latter is only applicable when sending to a Windows Server 2008/7/Server 2008 R2/8.1/Server 2012/10 computer that belongs to a domain containing Windows Server 2008/7/Server 2008 R2/8.1/Server 2012/10 domain controllers. |
Mac OS X 10.5/10.6
NOTE |
Screenshots and item names from Mac OS X 10.6 is used for the procedures common to each OS. When changing your computer's settings, it may be necessary to unlock the computer by clicking the key icon. |
1.
Log in to macOS as an administrator.
2.
Set the user and password for sending the data.
From Dock or the apple menu, select [System Preferences] → [Accounts]/[Users & Groups].
In the [Accounts]/[Users & Groups] window, enter the name of the user to whom you want to send data from the machine through macOS → enter the password.
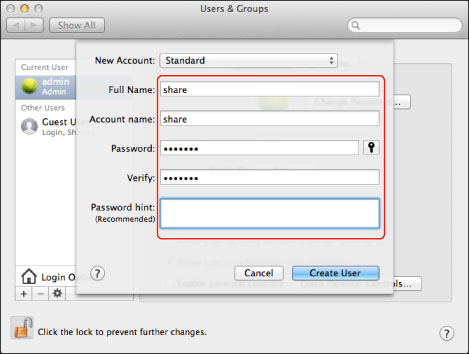
Click [Show All] on the toolbar.
3.
Start the SMB service on macOS.
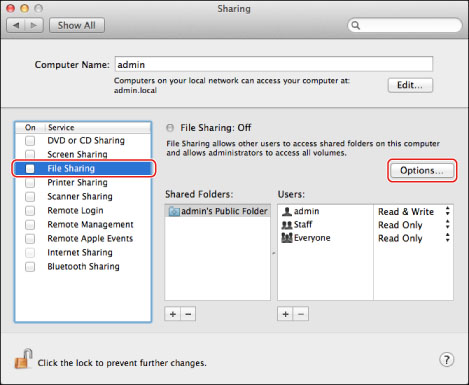
Click [Sharing] in the [System Preferences] window.
Select [File Sharing] → click [Options].
Select [Share files and folders using SMB (Windows)].
Select the account to be used.
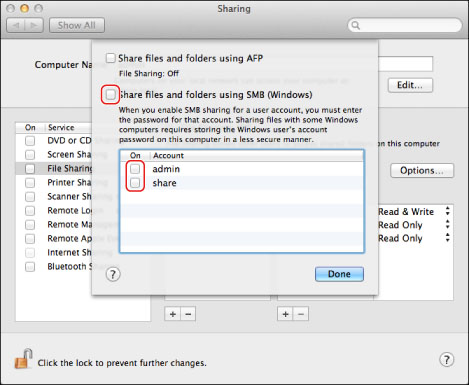
Enter the account password → click [OK] → [Done].
4.
Create a shared folder to which files are to be sent.
Sample setting:
Create a folder named "SMB_Folder" (customizable) in [Go] - [Home] - logged in user name - [Public] - [Drop Box].
5.
Set the access permissions for the shared folder created in step 4.
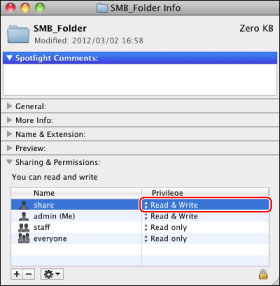
With the shared folder selected, click [Get Info] from the [File] menu.
Display [Sharing & Permissions].
Allow Read & Write for <Privilege>.
6.
Set a recipient address using the control panel.
There are three methods for specifying the recipient address; selecting the desired address from the list that appears when you press [Browse], searching for the address by pressing [Search Host], or entering the address using the keyboard on the touch panel display.
Sample recipient settings:
Server side settings (set using the above procedure):
Create a folder named "SMB_Folder" in the [Public] folder in the [Home] folder of the user named "share," and then specify the SMB_Folder as the folder to which files are sent.
The machine's address settings:
<Protocol:>: | Windows (SMB) |
[Host Name]: | \\<IP address of Mac>\Public |
[Folder Path]: | \Drop Box\SMB_Folder |
[User Name]: | User name entered in the above step |
[Password]: | Password for the above user |
For a sample screen, see the example of Windows Server 2008/7/Server 2008 R2/8.1/Server 2012/10 screen.
IMPORTANT |
If you want to specify each item from the list on the Browse screen, make sure you press [Browse] after the expiration of the time specified in "Setting the Waiting Time for Connection at Startup." Up to 128 alphanumeric characters can be entered for [Host Name] on the control panel. Also, up to 255 alphanumeric characters can be entered for [Folder Path]. Specify the server settings within the character limit. If you change the language of the touch panel display, [Host Name] and [Folder Path] may not appear correctly, or you may not be able to browse the directories. If the language of the touch panel display differs from the computer used as a master browser, [Host Name] and [Folder Path] may not appear correctly, or you may not be able to browse the directories. |
Samba (UNIX/Linux)
Samba 2.2.8a or later is supported.
In some environments, detailed settings may be required in order to use the Samba. For details, consult the administrator for the network you are using.
1.
Set up the users who access the Samba shared folder, and their passwords.
Set a user name not longer than 20 alphanumeric characters, and a password not longer than 14 alphanumeric characters.
Log in to a workstation as a superuser → set the user name and password.
2.
Set a recipient address using the control panel.
There are three methods for specifying the recipient address; selecting the desired address from the list that appears when you press [Browse], searching for the address by pressing [Search Host], or entering the address using the keyboard on the touch panel display.
Sample recipient settings:
Server side settings:
Computer name: | swan |
Share name: | share |
Create a folder called 'Images' within share, and then specify Images as the recipient for sending.
The machine's address settings:
<Protocol:>: | Windows (SMB) |
[Host Name]: | \\swan\share (Shared folder path) |
[Folder Path]: | \Images |
[User Name]: | User name entered in the above step |
[Password]: | Password for the above user |
For a sample screen, see the example of Windows Server 2008/7/Server 2008 R2/8.1/Server 2012/10 screen.
IMPORTANT |
If you want to specify each item from the list on the Browse screen, make sure you press [Browse] after the expiration of the time specified in "Setting the Waiting Time for Connection at Startup." Up to 128 alphanumeric characters can be entered for [Host Name] on the control panel. Also, up to 255 alphanumeric characters can be entered for [Folder Path]. Specify the server settings within the character limit. If you change the language of the touch panel display, [Host Name] and [Folder Path] may not appear correctly, or you may not be able to browse the directories. If the language of the touch panel display differs from the computer used as a master browser, [Host Name] and [Folder Path] may not appear correctly, or you may not be able to browse the directories. |
NOTE |
You can send data using the following formats. A DNS server is required for the latter case: \\192.168.2.100\share \\host_name.organization.company.co.jp\share You can send data using the following formats. domain_name\user_name (up to 15 alphanumeric characters for the domain name, and up to 20 for the user name) If you specify the user name in this format, the user authority for the specified domain is applied to SMB communication. |