Registering a Security Policy
This section describes the procedure for registering a new security policy.
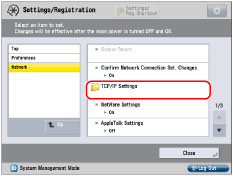
1.
Press  .
.
. 2.
Press [Preferences] → [Network] → [TCP/IP Settings].
3.
Press [IPSec Settings] for [TCP/IP Settings] → [On] for <Use IPSec>.
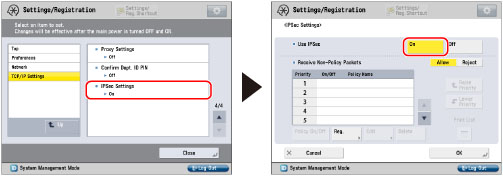
Press [Off] for <Use IPSec> if you do not want to use IPSec.
4.
Press [Allow] or [Reject] for <Receive Non-Policy Packets> → [Reg.].
[Allow] for <Receive Non-Policy Packets>: Allows the sending/receiving of packets that are not encrypted because they do not correspond to the security policy set on the IPSec Settings screen, in plain text.
[Reject] for <Receive Non-Policy Packets>: Rejects the sending/receiving of packets that do not correspond to the security policy set on the IPSec Settings screen.
5.
Press [Policy Name].
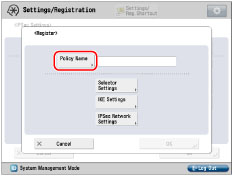
6.
Enter the name of the security policy to register → press [OK].
7.
Press [Selector Settings] → specify the local IP address to apply the registered security policy to.
When receiving IP packets, the registered security policy is applied if the destination IP address in the packets matches the local IP address specified in this procedure. When sending IP packets, the registered security policy is applied if the source IP address in the packets matches the local IP address specified in this procedure.
IMPORTANT |
If the link local address is set to a local IP address in this procedure for IPSec communication, the remote IP address set in step 8 should be a link local address. |
Applying a Security Policy to All Sent and Received IP Packets:
Press [All IP Addresses] for <Local Address>.
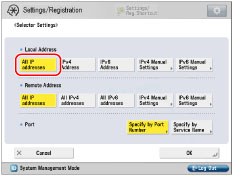
Applying a Security Policy to the IP Packets Received from and Sent to the IPv4 Address Held By the Machine:
Press [IPv4 Address] for <Local Address>.
Applying a Security Policy to the IP Packets Received from and Sent to the IPv6 Address Held By the Machine:
Press [IPv6 Address] for <Local Address>.
Applying a Security Policy to the IP Packets Received from and Sent to the Specified IPv4 Address or IPv4 Network Address:
Select [IPv4 Manual Settings] for <Local Address> → specify the IPv4 address → press [OK].
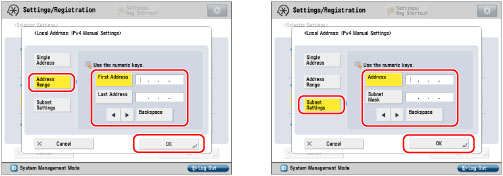
To specify a single IPv4 address: Press [Single Address] → enter an IPv4 address.
To specify a range of IPv4 addresses: Press [Address Range] → press [First Address] → enter the first IPv4 address → press [Last Address] → enter the last IPv4 address.
To set the subnet: Press [Subnet Settings] → press [Address] → enter the IPv4 address → press [Subnet Mask] → enter the subnet mask.
Applying a Security Policy to the IP Packets Received from and Sent to the Specified IPv6 Address or IPv6 Network Address:
Select [IPv6 Manual Settings] for <Local Address> → specify the IPv6 address → press [OK].

To specify a single IPv6 address: Press [Single Address] → press [Address] → enter an IPv6 address → press [OK].
To specify a range of IPv6 addresses: Press [Address Range]. Press [First Address] → enter the first IPv6 address → press [OK]. Press [Last Address] → enter the last IPv6 address → press [OK].
To specify the IPv6 address prefix: Press [Specify Prefix]. Press [Address] → enter the IPv6 address prefix → press [OK]. Enter the prefix length for the IPv6 address in [Prefix Length].
8.
On the Selector Settings screen, specify the remote IP address to apply the registered security policy to.
When receiving IP packets, the registered security policy is applied if the source IP address in the packets matches the remote IP address specified in this procedure. When sending IP packets, the registered security policy is applied if the destination IP address in the packets matches the remote IP address specified in this procedure.
IMPORTANT |
If the remote IP address is set to a local IP address in this procedure for IPSec communication, the local IP address set in step 7 must be a link local address. |
Applying a Security Policy to All Sent and Received IP Packets:
Press [All IP Addresses] for <Remote Address>.
Applying a Security Policy to the IP Packets Received from and Sent to All IPv4 Addresses Held By the Machine:
Press [All IPv4 Addresses] for <Remote Address>.
Applying a Security Policy to the IP Packets Received from and Sent to All IPv6 Addresses Held By the Machine:
Press [All IPv6 Addresses] for <Remote Address>.
Applying a Security Policy to the IP Packets Received from and Sent to the Specified IPv4 Address or IPv4 Network Address:
Select [IPv4 Manual Settings] for <Remote Address> → specify the IPv4 address → press [OK].
To specify a single IPv4 address: Press [Single Address] → enter an IPv4 address.
To specify a range of IPv4 addresses: Press [Address Range] → press [First Address] → enter the first IPv4 address → press [Last Address] → specify the last IPv4 address.
To set the subnet: Press [Subnet Settings] → press [Address] → enter the IPv4 address → press [Subnet Mask] → enter the subnet mask.
Applying a Security Policy to the IP Packets Received from and Sent to the Specified IPv6 Address or IPv6 Network Address:
Select [IPv6 Manual Settings] for <Remote Address> → specify the IPv6 address → press [OK].
To specify a single IPv6 address: Press [Single Address] → press [Address] → enter an IPv6 address → press [OK].
To specify a range of IPv6 addresses: Press [Address Range]. Press [First Address] → enter the first IPv6 address → press [OK]. Press [Last Address] → enter the last IPv6 address → press [OK].
To specify the IPv6 address prefix: Press [Specify Prefix]. Press [Address] → enter the IPv6 address prefix → press [OK]. Enter the prefix length for the IPv6 address in [Prefix Length].
9.
On the Selector Settings screen, specify the remote IP address to apply the registered security policy to.
When receiving IP packets, the registered security policy is applied if the destination port in the packets matches the port number specified in this procedure. When sending IP packets, the registered security policy is applied if the source port in the packets matches the port number specified in this procedure.
Applying a Security Policy to the IP Packets Received from and Sent to the Local Port and Remote Port Specified By Port Number:
Press [Specify by Port Number] for <Port> → specify <Local Port> and <Remote Port> → press [OK].
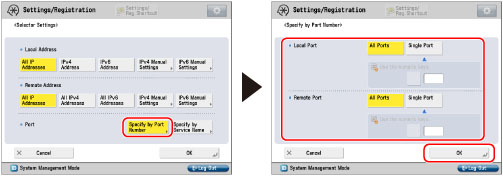
[All Ports]: Select to specify all the local ports or all the remote ports.
[Single Port]: Select to specify a single local port or remote port according to the port number.
Press [OK].
Applying a Security Policy to the IP Packets Received from and Sent to the Port Specified By Assigned Application:
Press [Specify by Service Name] for <Port>.
Select a displayed service name → press [Service On/Off] → press [OK].
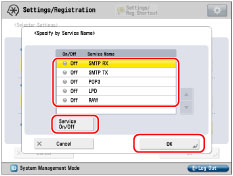
Press [OK].
10.
Press [IKE Settings] → select the mode to use for IKE phase 1.
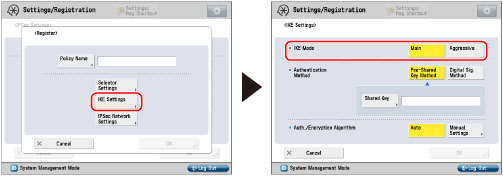
[Main] for <IKE Mode>: Select to set the Main mode. This mode has strong security because the IKE session itself is encrypted.
[Aggressive] for <IKE Mode>: Select to set the Aggressive mode. This mode speeds up IKE sessions because they are not encrypted.
11.
Specify the authentication method to use for IKE phase 1.
If you want to select the pre-shared key method, prepare a pre-shared key. To select a digital signature method, register the CA certificate in advance (see "Registering/Editing a CA Certificate File"), and install the key pair file and certificate file (see "Installing a Key Pair File and Server Certificate").
Setting the Pre-Shared Key Method:
Press [Pre-Shared Key Method] for <Authentication Method> → [Shared Key].
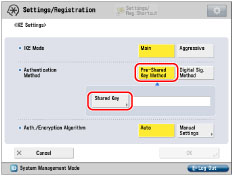
Enter the pre-shared key → press [OK].
Setting the Digital Signature Method:
Press [Digital Sig. Method] for <Authentication Method> → [Key and Certificate].
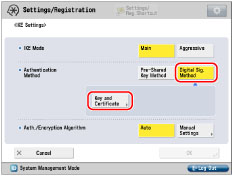
Select the key pair you want to use for IPSec → press [Set as the Default Key] → [OK].
You cannot specify 'Device Signature Key' (used for key pairs for adding digital signatures to PDF or XPS) or 'AMS' (used for key pairs for access restrictions) as the name for the key pair.
IMPORTANT |
If you select a key pair that is using the RSA-MD5 or RSA-MD2 signature algorithm, when you set IPSec communication to comply with FIPS (Federal Information Processing Standards) 140-2, policies with this key pair set are disabled. (See "Using an Encryption Method That Complies with FIPS 140-2.") |
NOTE |
You can check the content of a certificate by selecting a key pair on the Key and Certificate screen, and pressing [Certificate Details]. On the Certificate Details screen, you can press [Verify Cert.] to verify the certificate. You can check what a key pair is being used for by selecting a key pair with 'Used' displayed for <Status> on the Key and Certificate screen, and pressing [Display Use Location]. |
12.
Select the algorithm for the authentication and encryption to use for IKE phase 1.
Specifying the Authentication and Encryption Algorithm:
Select [Manual Settings] for <Auth./Encryption Algorithm> → specify the authentication and encryption algorithm to apply to the IKE SA → press [OK].
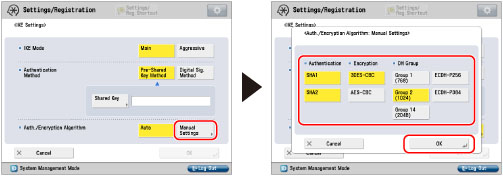
[SHA1] for <Authentication>: Select to set SHA1 (Secure Hash Algorithm 1) for the authentication algorithm. 160-bit hash values are supported.
[SHA2] for <Authentication>: Select to set SHA2 (Secure Hash Algorithm 2) for the authentication algorithm. 256-bit and 384-bit hash values are supported.
[3DES-CBC] for <Encryption>: Select to set 3DES (Triple Data Encryption Standard) for the encryption algorithm, and CBC (Cipher Block Chaining) for the encryption mode. 3DES takes longer to process because it performs DES three times, but enables increased encryption strength. CBC links the encryption result of the previous block with the next block to make it harder to decipher the encryption.
[AES-CBC] for <Encryption>: Select to set AES (Advanced Encryption Standard) for the encryption algorithm, and CBC for the encryption mode. AES supports encryption keys with a key length of 128, 192, or 256 bits. As the supported key lengths are long, it enables increased encryption strength. CBC links the encryption result of the previous block with the next block to make it harder to decipher the encryption.
[Group 1 (768)] for <DH Group>: Select to set Group 1 for the DH (Diffie-Hellman) key exchange method. In Group 1, 762-bit MODP (Modular Exponentiation) is supported.
[Group 2 (1024)] for <DH Group>: Select to set Group 2 for the DH (Diffie-Hellman) key exchange method. In Group 2, 1024-bit MODP is supported.
[Group 14 (2048)] for <DH Group>: Select to set Group 14 for the DH key exchange method. In Group 14, 2048-bit MODP is supported.
[ECDH-P256] for <DH Group>: Select to set the ECDH (Elliptic Curve Diffie Hellman) key exchange method with a 256-bit key length.
[ECDH-P384] for <DH Group>: Select to set the ECDH key exchange method with a 384-bit key length.
Press [OK].
Automatically Setting the Authentication and Encryption Algorithm:
Press [Auto] for <Auth./Encryption Algorithm> → [OK].
The priority for the authentication and encryption algorithms is indicated below.
Priority | Authentication Algorithm | Encryption Algorithm | DH Key Exchange Method |
1 | SHA1 | AES (128-bit) | Group 2 |
2 | SHA2 (256-bit) | ||
3 | SHA2 (384-bit) | ||
4 | SHA1 | AES (192-bit) | |
5 | SHA2 (256-bit) | ||
6 | SHA2 (384-bit) | ||
7 | SHA1 | AES (256-bit) | |
8 | SHA2 (256-bit) | ||
9 | SHA2 (384-bit) | ||
10 | SHA1 | 3DES | |
11 | SHA2 (256-bit) | ||
12 | SHA2 (384-bit) |
13.
Press [IPSec Network Settings] → specify the SA validation time and validation type, and PFS (Perfect Forward Security).
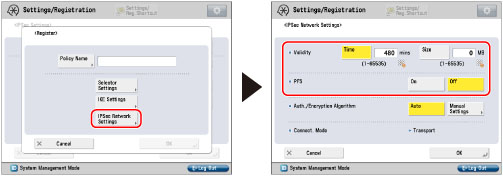
[Time] and [Size] for <Validity>: Specify the validation period for the generated IKE SA and IPSec SA. In IPSec communications to which a valid security policy is applied, packets can be sent and received without conducting key exchange negotiations. Make sure to set either [Time] or [Size]. If you set both, the SA becomes invalid when the value set for either [Time] or [Size] is reached.
[On] for <PFS>: If you enable the PFS function, you can increase the confidentiality because even if one encryption key is exposed to a third party, the problem does not spread to other encryption keys.
[Off] for <PFS>: If one encryption key is exposed to a third party when the PFS function is disabled, other encryption keys may be able to be guessed. If you set <PFS> to 'On', the destination for PFS communication must also have PFS enabled.
14.
Select the algorithm for the authentication and encryption to use for IKE phase 2 → press [OK].
Specifying the Authentication and Encryption Algorithm:
Press [Manual Settings] for <Auth./Encryption Algorithm> → set the algorithm for the authentication method → press [OK].
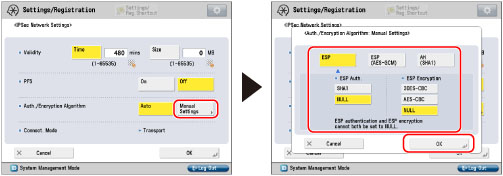
The authentication and encryption algorithms you can set are indicated below.
Authentication Method | Description |
[ESP] | <ESP Auth.> [SHA1]: Select to set SHA1 as the algorithm for the ESP authentication method. 160-bit hash values are supported. [NULL]: Select to not set the algorithm for the ESP authentication method. |
<ESP Encryption> [3DES-CBC]: Select to set 3DES for the ESP encryption algorithm, and CBC for the encryption mode. 3DES takes longer to process because it performs DES three times, but enables increased encryption strength. CBC links the encryption result of the previous block with the next block to make it harder to decipher the encryption. [AES-CBC]: Select to set AES for the ESP encryption algorithm, and CBC for the encryption mode. AES supports encryption keys with a key length of 128, 192, or 256 bits. As the supported key lengths are long, it enables increased encryption strength. CBC links the encryption result of the previous block with the next block to make it harder to decipher the encryption. [NULL]: Select to not set the algorithm for the ESP encryption method. | |
[ESP (AES-GCM)] | Select to set the AES-GCM (Advanced Encryption Standard - Galois Counter Mode) algorithm with a key length of 128, 192, or 256 bits. AES-GCM is an algorithm that performs both encryption and authentication at the same time. |
[AH (SHA1)] | Select to set SHA1 as the algorithm for the AH authentication method. 160-bit hash values are supported. |
IMPORTANT |
If you set IPSec communication to comply with FIPS 140-2, policies with [ESP (AES-GCM)] set for the authentication method are disabled. At the same time, the authentication algorithm for this policy is automatically changed to SHA1 and the encryption algorithm for this policy is automatically changed to 3DES-CBC. (See "Using an Encryption Method That Complies with FIPS 140-2.") |
Automatically Setting the Authentication and Encryption Algorithm:
Press [Auto] for <Auth./Encryption Algorithm>.
The ESP authentication/encryption methods are set. The priority for the authentication and encryption algorithms is indicated below.
Priority | Algorithm for ESP Authentication Method | Algorithm for ESP Encryption Method |
1 | SHA1 | AES (128-bit) |
2 | SHA1 | AES (192-bit) |
3 | SHA1 | AES (256-bit) |
4 | SHA1 | 3DES |
15.
Press [OK] → [OK].
NOTE |
You can register up to 10 security policies. The registered security policies appear in order of their priority. |