The Staple Finisher-AC and Booklet Finisher-AC are equipped with the following finishing modes: Collate, Group, Offset, Staple, Staple-Free (Eco) and Manual Staple.
The Booklet Finisher-AC is also equipped with the Saddle Stitch mode and Saddle Fold Mode.
Staple Finisher-AC/Booklet Finisher-AC/2/4 Hole Puncher Unit-A/4 Hole Puncher Unit-A
If the 2/4 Hole Puncher Unit-A/4 Hole Puncher Unit-A is attached, the Hole Punch mode can also be used.
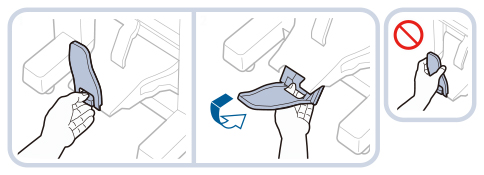
 CAUTION CAUTION |
Do not place your fingers or hands on the finisher when the finisher is in use. Doing so may result in personal injury or damage to the finisher. 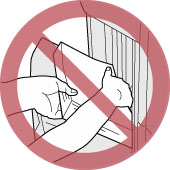 When removing paper from the tray of the finisher, do not place your hands on the output tray of the finisher. The tray may move upward and your hands may get caught. Do not place your hand in the part of the tray where stapling is performed (near the rollers) if a finisher is attached, as this may result in personal injury. |
IMPORTANT |
Do not place anything other than output paper in the trays of the finisher, as doing so may damage the trays. Do not place anything under the trays of the finisher, as doing so may damage the trays. 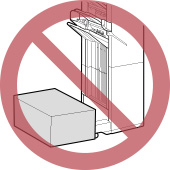 |
NOTE |
The name of the puncher unit may differ according to the regions. |
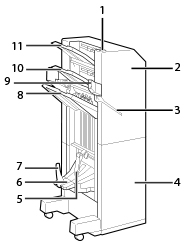
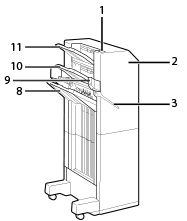
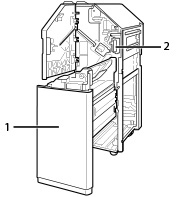
Parts and Their Functions
External View
 |  |
Booklet Finisher-AC | Staple Finisher-AC |
1. | Staple Button Press this button when you manually staple paper (Manual Stapling). You can also staple paper without pressing the button. You can specify the time period for the paper to be stapled after inserting the paper. (See "Stapling Start Time in the Staple Mode.") | ||||
2. | Front cover (upper) Open to remove jammed paper, clear a staple jam in the stapler unit, or replace the staple cartridge. If "2/4 Hole Puncher Unit-A/4 Hole Puncher Unit-A" is installed, open to discard punch waste. | ||||
3. | Slit Insert paper to manually staple the paper. | ||||
4. | Front Cover (lower) Open to remove jammed paper, clear a staple jam, or replace the staple cartridge in the saddle stitcher unit. | ||||
5. | Booklet Tray (Booklet Finisher-AC Only) Prints that are saddle stitched or saddle folded are output to this tray. | ||||
6. | Lock Release Lever (Booklet Finisher-AC Only) Pull down the lever to unlock the paper stopper. | ||||
7. | Paper Stopper (Booklet Finisher-AC Only)
| ||||
8. | Tray C Prints are output to this tray. You can set the Tray Designation mode to designate this tray for outputting prints when using certain functions. (See "Output Tray Designation.") | ||||
9. | Finisher Jogger Kit-A(Optional) If the Finisher Jogger Kit-A is attached, output paper can be automatically aligned. | ||||
10. | Tray B Prints are output to this tray. You can set the Tray Designation mode to designate this tray for outputting prints when using certain functions. (See "Output Tray Designation.") | ||||
11. | Tray A Prints are output to this tray. You can set the Tray Designation mode to designate this tray for outputting prints when using certain functions. (See "Output Tray Designation.") |
NOTE |
When attaching the Long Sheet Tray-B (optional), the extension output tray is attached to the head of Tray C. |
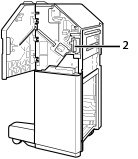
Internal View
 |  |
Booklet Finisher-AC | Staple Finisher-AC |
1. | Saddle stitcher unit (Booklet Finisher-AC only) Pull out to remove jammed paper or clear a staple jam in the saddle stitcher unit, or to replace the staple cartridge. (See "Clearing Paper Jams.") |
2. | Punch waste tray (2/4 Hole Puncher Unit-A/4 Hole Puncher Unit-A) Pull out to discard punch waste. (See "Removing Punch Waste (2/4 Hole Puncher Unit-A/4 Hole Puncher Unit-A).") |
Finishing Modes
The Staple Finisher-AC and Booklet Finisher-AC are equipped with the following finishing modes:
Collate Mode
The prints are automatically collated into sets arranged in page order.
Group Mode
All prints of the same original page are grouped together into sets.
Offset Mode
The print output is shifted alternately to the front and back of the tray.
The paper is output in a vertical (portrait) or horizontal (landscape) orientation, depending on the orientation of your originals. For example, for A4R originals, the paper is output in the horizontal direction. For A4 originals, the paper is output in the vertical direction.
The paper is output in a vertical (portrait) or horizontal (landscape) orientation, depending on the orientation of your originals. For example, for A4R originals, the paper is output in the horizontal direction. For A4 originals, the paper is output in the vertical direction.
Staple Mode
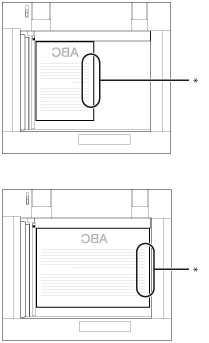
The prints are automatically collated into sets arranged in page order and stapled. Prints are stapled in the following places:
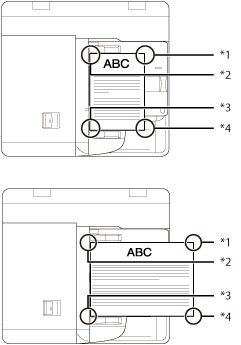
If an original is placed on the platen glass:
Corner Staple Area | Double Staple Area | |
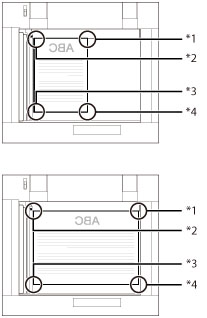 |  | |
*1 Upper Left *2 Upper Right *3 Lower Right *4 Lower Left | *5 Left Side *6 Right Side |
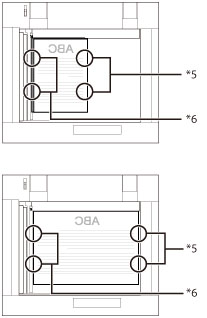
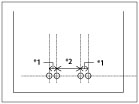
If originals are placed in the feeder:
Corner Staple Area | Double Staple Area | |
 | 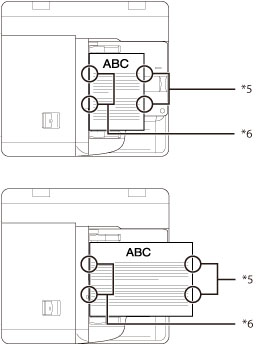 | |
*1 Upper Right *2 Upper Left *3 Lower Left *4 Lower Right | *5 Right Side *6 Left Side |
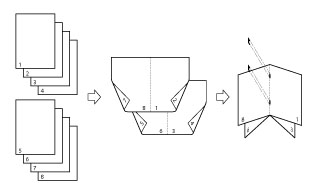
Saddle Stitch Mode
Prints are made into booklets, consisting of pages folded and stapled in the center.
Staple Free
The printouts are crimped and bound without using a staple. You can easily split the paper by pressing the crimped part with your fingers. This function is useful for saving staples and also binding printouts briefly.
NOTE |
You cannot specify the staple position in Staple Free. Only one crimped part is made on either top left or top right depending on the size and direction of originals. |
Manual Stapling
You can manually staple printed paper by inserting paper in the slit. As an example of use, you can remove staples bound to the document, copy or scan it, and then staple the document again.
1.
Place the desired bundle of paper into the slit in the Staple Finisher-AC/Booklet Finisher-AC.
Insert the corner of the paper bundle where you want it stapled straight into the slit, with the front side of the paper facing down.
When the paper bundle is sensed, the staple button starts to blink and automatic stapling is performed.

NOTE |
You can set the time in seconds to elapse before stapling is executed. (See "Stapling Start Time in the Staple Mode.") You can perform stapling without waiting for the specified stapling start time to come. While holding the paper bundle with one of your hands, use the other hand to press the staple button. 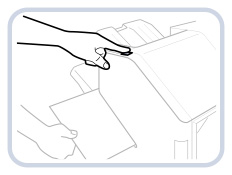 |
2.
Pull out the paper bundle.
Wait for the staple button to turn off, and then pull out the paper bundle.
NOTE |
You cannot perform manual stapling while outputting of printed paper continues. |
Hole Punch Mode
Two to four holes are punched in the printed sheets.
The hole punched areas are as shown in the illustration below.
Platen Glass | Feeder |
 | 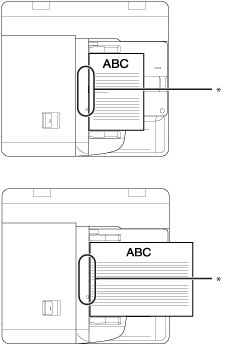 |
* Hole Punched Area |
The distance between the punch holes is shown in the illustration below.
2/4 Hole Puncher Unit-A
 | 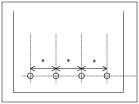 |
2 Holes | 4 Holes |
* 80 mm (3 1/8") |
4 Hole Puncher Unit-A
 |
4 Holes |
*1 21 mm (7/8") *2 70 mm (3/4") |
Saddle Fold Mode
The machine folds paper into half its size.
IMPORTANT |
The following paper sizes can be stapled: A3, A4, or A4R You cannot staple heavy 6, 1-sided coated 6, 2-sided coated 6, matte coated 6, 1-sided coated 7, 2-sided coated 7, matte coated 7, 1-sided coated 8, 2-sided coated 8, matte coated 8, textured 8, vellums, clear film, transparencies, labels, or envelopes. The following paper sizes can be saddle stitched: 305 mm x 457 mm, A3, A4R, or Custom Size (195 mm x 270 mm to 304.8 mm x 457.2 mm) You cannot saddle stitch heavy 6, 1-sided coated 6, 2-sided coated 6, matte coated 6, 1-sided coated 7, 2-sided coated 7, matte coated 7, 1-sided coated 8, 2-sided coated 8, matte coated 8, textured 8, vellums, clear film, transparencies, pre-punched paper, tab paper 1, tab paper 2, labels, or envelopes. The following paper sizes can be hole punched: When the 2/4 Hole Puncher Unit-A is attached A3 and A4 When the 4 Hole Puncher Unit-A is attached A3, A4, and A4R You cannot punch holes in paper which is 300 g/m2 or more. The following paper sizes can be saddle folded: 305 mm x 457 mm, A3, A4R, or Custom Size (195 mm x 270 mm to 304.8 mm x 457.2 mm) You cannot saddle fold heavy 6, 1-sided coated 6, 2-sided coated 6, matte coated 6, 1-sided coated 7, 2-sided coated 7, matte coated 7, 1-sided coated 8, 2-sided coated 8, matte coated 8, textured 8, vellums, clear film, transparencies, pre-punched paper, tab paper 1, tab paper 2, labels, or envelopes. |
NOTE | ||||||||||||||||
For instructions on maintenance for the finisher, such as replacing staples, see "Maintenance." For information on clearing paper or staple jams, see "Problem Solving." If the Collate or Group mode is set, the output trays move downward as the stack of paper that is output increases in quantity and thickness. Once an output tray has reached its stacking limit, subsequent prints are automatically delivered to the next available tray. If all of the available trays have reached their stacking limits, printing stops. Remove all of the output paper from the trays. The trays move upward, and printing resumes. If you press [Offset] when either the Collate or Group mode is set, each set of prints is shifted approximately 30 mm alternately to the front and back of the tray before it is delivered to the output tray. If the Staple mode is set, the output tray moves downward as the stack of paper that is output increases in quantity and thickness. Once an output tray has reached its stacking limit, printing and stapling stop. When all of the stapled prints from the output tray are removed, printing and stapling resume. When you are using the Staple mode, do not remove the stack of paper from the output tray during the job. Remove the stack of paper when the job has been completed. The maximum numbers of sheets that can be stapled are as follows: A4: 65 sheets of paper (52 to 91 g/m2), 50 sheets of paper (91 to 105 g/m2) A3: 40 sheets of paper (52 to 91 g/m2), 25 sheets of paper (91 to 105 g/m2) A4R only: 40 sheets If the machine stops while stapling and the message <Load staples into the stapler unit.> appears, almost all of the staples have been used, and the staple cartridge must be replaced. To proceed, replace the staple cartridge. (See "Maintenance.") The Saddle Stitch mode is available only if the Booklet Finisher-AC is attached. The maximum number of sheets that can be saddle stitched differs depending on the paper weight and type (including one cover sheet (maximum 256 g/m2)).
The accuracy of folds created in the Saddle Stitch mode may vary depending on the paper type and the number of sheets. The Hole Punch mode is available only if the 2/4 Hole Puncher Unit-A/4 Hole Puncher Unit-A is attached. The Saddle Fold mode is available only if the Booklet Finisher-AC is attached. The paper is saddle folded with 1 to 3 sheets (80 g/m2), and then output. The maximum number of bindable sheets may not be possible, depending on the paper type. In this case, change the paper type, or reduce the number of sheets to bind. For information on the paper sizes that can be used for Staple Free, see "Staple Finisher-AC," and "Booklet Finisher-AC." Depending on the usage environment and paper type, the crimped part likely to be split. |
Paper Sizes that can be Output
The paper sizes that can be output from the output trays of the Staple Finisher-AC or Booklet Finisher-AC are indicated below. However, some paper sizes may not be output depending on the set functions.
 : Available
-: Unavailable
Paper Size | Tray A | Tray B | Tray C | Booklet Tray | |
330 mm x 483 mm | | | | - | |
SRA3 | | | | - | |
305 mm x 457 mm | | | | | |
A3 | | | | | |
A4 | | | | - | |
A4R | | | | | |
A5R | | | | - | |
Custom Size (98.4 mm x 148 mm to 330.2 mm x 487.7 mm) | | | | - | |
Custom Size (Long Sheet) (210 mm x 487.8 mm to 330.2 mm x 1,300 mm) | - | - | * | - | |
Envelope | No.10(COM10) | | | | - |
Monarch | | | | - | |
DL | | | | - | |
ISO-C5 | | | | - | |
Nagagata 3 | | | | - | |
Yougatanaga 3 | | | | - | |
Kakugata 2 (horizontally placed/vertically placed) | | | | - | |
Custom Size (98.4 mm x 148 mm to 330.2 mm x 487.7 mm) | | | | - | |
* When the Long Sheet Tray-B is attached.
NOTE |
The Booklet Tray can only be used when the Booklet Finisher-AC is attached. |