Managing Mail Boxes
1.
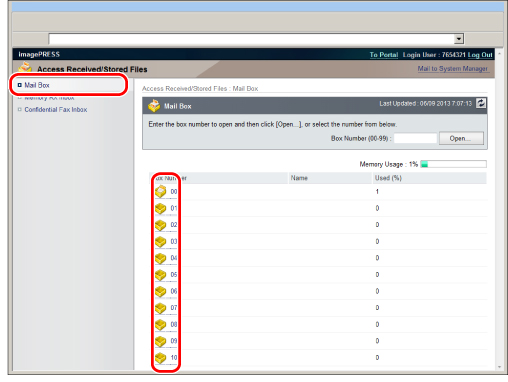
Click [Access Received/Stored Files] → select [Mail Box] → click the number of the desired mail box.
If the desired inbox is set with a PIN, enter the PIN → click [OK].
You can also select the desired mail box by entering its number next to Inbox Number (00-99) → click [Open...].
2.
Change the settings of the selected mail box, or select an operation to be performed for a document in the mail box.
You can change the order of documents displayed by clicking [File Name] or [Date/Time].
To change the settings of the selected mail box:
Click [Settings...] → specify the desired settings → click [OK].
NOTE |
For more information on mail boxes, see "Scan and Store" and "Access Stored Files." |
To print documents:
Select the documents that you want to print → click [Print].
Change the print settings → click [Start Printing].
By selecting a document and clicking the buttons under Document Order, you can change the order in which the documents are printed.
[Move to Top]: Moves to the top
[Move Up]: Moves up one level
[Move Down]: Moves down one level
[Move to Bottom]: Moves to the bottom
If you want the documents to be automatically deleted after they are printed, select [Delete File After Printing].
To change the print settings:
Select the documents that you want to change the print settings for → click [Print] → [Change Print Settings].
To change the print settings:
If you want to discard any changes you made and return to the previous screen to print with the original settings, click [Restore Settings...].
Specify the desired settings → click [Start Printing].
If you try to specify settings that cannot be set together, an error dialog box appears and you will not be able to print. When this happens, start the procedure from the beginning.
NOTE |
[Store Settings] enables you to store the settings changed by clicking [Change Print Settings], when you select one document. For more information on each mode, see "Access Stored Files." The settings that appear on the Print Settings screen vary depending on the optional equipment attached to the machine. |
To send documents:
Select the documents that you want to send → click [Send...].
Specify desired settings → click [OK].
By selecting a document and clicking the buttons under Document Order, you can change the order in which the documents are sent.
[Move to Top]: Moves to the top
[Move Up]: Moves up one level
[Move Down]: Moves down one level
[Move to Bottom]: Moves to the bottom
If you want documents to be automatically deleted after they are sent, select [Delete After Sending].
Click [Select Destination] under Address Settings to display a list of destinations from which you can select the desired destination.
You can delete an address from the list by selecting it → click [Delete].
NOTE |
For more information on send settings, see "Scan and Send." |
To duplicate documents to another mail box:
Select the documents that you want to duplicate → click [Duplicate...].
Select the destination mail box → click [Start].
To delete documents:
Select the documents that you want to delete → click [Delete].
IMPORTANT |
Once a document is deleted, it cannot be retrieved. |
To merge and save documents:
Select the documents that you want to merge and save → click [Merge Files...].
Specify the desired settings → click [Start].
By selecting a document and clicking the buttons below, you can change the order in which the documents are merged.
[Move to Top]: Moves to the top
[Move Up]: Moves up one level
[Move Down]: Moves down one level
[Move to Bottom]: Moves to the bottom
To insert a document into another document:
Select the documents that you want to insert → click [Insert Pages...].
Specify the document that you want to insert the first document into → click [Next].
Specify the desired settings → click [Insert].
If you want to return to the previous document insertion screen, click [Back].
To print a list of the documents:
Click [Print List] → [OK].
To display the details of a document:
Click the document name.
You can also click [ ] (Type) to display the document details.
] (Type) to display the document details.NOTE |
A color icon (  ) is displayed for documents scanned in the Full Color mode. ) is displayed for documents scanned in the Full Color mode. |
If you want to display the image file of the document, click [] (Size).
] (Size).For more information on icons, see "Types of Mail Box Icons" (Scan and Store) and "Types of Mail Box Icons" (Access Stored Files).
NOTE |
Image files can be displayed for documents stored in mail boxes. A color icon ( ) is displayed for documents scanned in the Full Color mode.[ ] (Size) does not appear for documents whose images cannot be displayed.If the size of the image is larger than 1 MB, the message <The data size of the selected image is 1 MB or more. It may take time to display it. Are you sure you want to display it?> appears. To display the image file, click [OK]. To cancel displaying the image file, click [Cancel]. |
To change the name of a document:
Select the document name → [Change File Name...].
Enter the new document name → click [OK].
To delete one page from a document:
Select the document → select the page to delete.
If the number of pages exceeds 100 and the page number that you want to delete is not displayed, you can select a range of pages from the [1-100] drop-down list.
Click [Delete Page] → [OK].
To delete consecutive pages from a document:
Select the document name → click [Delete Pages Consecutively...].
Enter the range of pages that you want to delete → click [OK].