Flow of Secure Print Operations
To print from the Secure Print screen, follow the steps below.
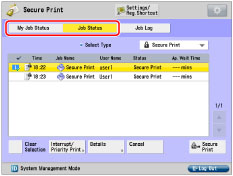
You can press either [My Job Status] or [Job Status] on the Secure Print screen to check the print job status.
[My Job Status] is displayed when you are using the SSO-H login service, and only jobs for the user currently logged in to the machine can be checked on the My Job Status screen. For instructions on using the SSO-H login service, see "Overview of Login Services."
If you press [Job Status], you can check the jobs for all users.
IMPORTANT |
Only the currently logged-in user can print secured documents and encrypted secured documents. You can set secured documents and encrypted secured documents to be automatically erased, even if not printed. You can change the time until auto erase in [Function Settings](Settings/Registration) → [Printer] → [Printer Settings] → [Custom Settings] → [Secure Print Delete Time]. (See "Secure Print Delete Time.") For information on the optional products required to use the Encrypted Secure Print function, see "Optional Products Required for Each Function." If you are using the imagePRESS Server, you cannot use the Encrypted Printing Software. To display [My Job Status] when you are using the SSO-H login service, the user name entered when you assign a PIN/password at the computer and the user name entered when you log in must match. |
NOTE |
If you are managing users by login service, such as SSO-H, you can specify the following settings. (See "Simple Authentication Settings for Secure Print.") Printing secured documents without PIN Excluding domain name to determine my job |
1.
Press  → [Secure Print].
→ [Secure Print].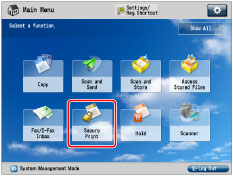
If the desired function is not displayed on the Main Menu screen, press [Show All].
2.
Press [My Job Status] or [Job Status].
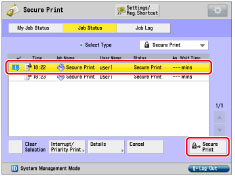
3.
Select the document that you want to print → press [Secure Print].
To display only secured documents (including encrypted secured documents) in the [Job Status] list, select [Secure Print] in the type selection drop-down list.
To select all of the jobs, press [Select All]. (If a destination is already selected, this key changes to [Clear Selection].)
IMPORTANT |
If print job is not displayed, press [Restrict Printer Jobs] in [Function Settings] (Settings/Registration) and check the setting. (See "Restricting Printer Jobs.") You can set this machine to receive only encrypted print jobs by selecting [On] for [Only Allow Encrypted Print Jobs] in [Function Settings] (Settings/Registration). The job will be canceled and an error message displayed if a print job other than an encrypted secure print job is received. (The default setting is 'Off'.) (See "Accepting Only Encrypted Secure Printing.") |
NOTE |
You can cancel a selection by selecting the job again. To cancel all selections, press [Clear Selection]. ([Clear Selection] changes to [Select All].) You cannot print a secure print job and encrypted secure print job at the same time. |
4.
Select and print the document (print data).
To print a secured document:
Enter the PIN using  -
-  (numeric keys).
- (numeric keys).Press [OK].
Printing starts when you press [OK].
Select [Cancel] if you do not want to print it.
To print an encrypted secured document:
Enter the password → press [OK].
Press [OK].
Enter the same password (alphanumeric characters) that you originally assigned to the document at the computer. Once the correct password is entered, the machine is ready to print the document.
If the password you enter is incorrect, the message <There are no jobs to authenticate.> appears. Confirm and enter the correct password.
If you select multiple jobs and the password you enter does not match all of the selected jobs, the message <Authentication process of XX/XX of the selected jobs was successful> appears, and only the jobs which the password matched are printed.
Printing starts when you press [OK].
Select [Cancel] if you do not want to print it.
IMPORTANT |
Assigning a PIN/password at the computer is performed using the printer driver. Secured documents and encrypted secured documents are erased after they are printed. You cannot change the print settings of secured documents or encrypted secured documents (set using the printer driver). The number of secured documents and encrypted secured documents that can be stored at one time is 50. If the number of jobs reaches the maximum, subsequent jobs will be ignored. Make sure to read the Readme.txt file included on the CD-ROM/DVD-ROM before installing "Encrypted Secured Print Driver Add-in for Client PC." A large secure print job with many pages may be canceled by the machine. A canceled secure print job does not appear on the Print Job status screen. The machine can store up to 6,000 pages per secure print job; however, if the machine is being used for other jobs or operations, such as the storing of documents in inboxes, the actual number of pages per secure print job that the machine can process is fewer than 6,000. |
NOTE |
Secure print jobs and encrypted secure print jobs sent by other users are displayed as asterisks ('********'), and operations cannot be performed on them. If you are logged on as the SSO-H administrator, jobs sent by all users are displayed, and you can view the details of or cancel the jobs. However, secured documents and encrypted secured documents can only be printed by the user that sent them. When printing a secured document/encrypted secured document, enter the same PIN/password that you originally assigned to the document using the printer driver. If there is a current or reserved job, it will be queued for printing. If multiple or all secured documents/encrypted secured documents have the same PIN/password, you can select them and clear their PINs/passwords simultaneously. For instructions on entering characters to set a password, see "Basic Operations." If there are jobs currently being printed or waiting to be printed, the secured documents/encrypted secured documents will be printed after those jobs are completed. You cannot simultaneously select secured documents and encrypted secured documents from the job list to clear their PINs/passwords. The printer driver must be installed in the computer before installing the Encrypted Secured Print Driver Add-in for Client PC. Install the Encrypted Secured Print Driver Add-in for Client PC before using encrypted secure printing. The Encrypted Secured Print Driver Add-in for Client PC can be installed in the following printer drivers. For information on the system requirements for printer drivers, see the manual included with each printer driver. Canon PCL5e/5c Printer Driver for Microsoft Windows, Version 8.90 to Version 20.00, and Version 20.65 or later Canon PCL6 Printer Driver for Microsoft Windows, Version 6.90 to Version 20.00, and Version 20.65 or later Canon PS 3 Printer Driver for Microsoft Windows, Version 4.90 to Version 20.00, and Version 20.65 or later Canon UFR II Printer Driver for Microsoft Windows, Version 2.90 to Version 20.00, and Version 20.65 or later Canon Generic PCL6 Printer Driver for Microsoft Windows, Version 1.10 or later For information on sending encrypted secured documents from your computer, see the Readme.txt and help files included with the Encrypted Secured Print Driver Add-in for Client PC. |