Registering an E-Mail Address
1.
Press  .
.
.2.
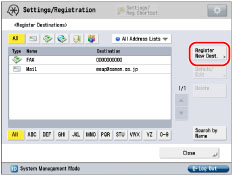
Press [Set Destination] → [Register Destinations] → [Register New Dest.].
3.
Press [E-Mail].
4.
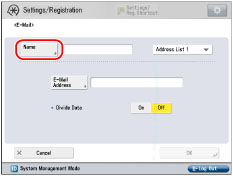
Press [Name].
5.
Enter a name for the destination → press [Next].
6.
Press the drop-down list → select an address list from Address List 1 to 10.
Address lists are a convenient way to classify destinations.
The e-mail address that you enter will be stored in the address list that you select here.
7.
Press [E-Mail Address].
8.
Enter the e-mail address → press [OK].
9.
Select one of the following for <Divide Data>.
[On]: Select [On] if the recipient's machine has a function to combine divided data that is received.
[Off]: Select [Off] if the recipient's machine does not have a function to combine divided data or if you do not want to divide the sent data.
[Off]: Select [Off] if the recipient's machine does not have a function to combine divided data or if you do not want to divide the sent data.
If the size of the data being sent exceeds the value set for [Maximum Data Size for Sending] in [Function Settings] (Settings/Registration), the data is divided when sent. If the size of the data being sent exceeds the value set for [Maximum Data Size for Sending] when the Divide Data setting is set to 'Off', the data is divided by pages and sent as multiple e-mails.
IMPORTANT |
Make sure to check the specifications of the destination's e-mail software before setting this mode. A sending error may occur if the destination's e-mail software is unable to combine divided data. |
NOTE |
For more information on the maximum data size for sending, see "Maximum Data Size for Send." |
10.
Press [OK] → [Close].
If you are performing Access Number Management for the Address Book, perform the following operation.
Press [Next] → [Access No.] → [Access No.].
Enter the access number using  -
-  (numeric keys) → press [Confirm].
- (numeric keys) → press [Confirm].Enter the access number again for confirmation → press [OK] → [OK].