Common Communication Settings for E-Mail/I-Fax
1.
Press  .
.
. 2.
Press [Function Settings] → [Send] → [E-Mail/I-Fax Settings].
3.
Press [Communication Settings] → set the e-mail server.
The machine supports POP3, and can also function as an SMTP receive server.
NOTE |
The machine can only receive I-faxes and communication error notices. |
Using the machine as an SMTP receive server:
Press [On] for <SMTP RX> → [Off] for <POP>.
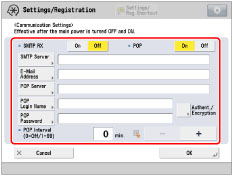
Press [E-Mail Address].
Enter the e-mail address → press [OK].
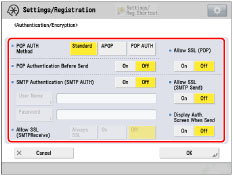
Press [Authent./Encryption] → set <Allow TLS (SMTP RX)> → press [OK].
If you select [Always TLS] for <Allow TLS (SMTP RX)>, only reception of data encrypted using TLS is allowed, and communications not using TLS from the host are rejected.
If you select [On] for <Allow TLS (SMTP RX)>, receiving TLS encrypted data may only be allowed when there is a request from the host.
If you select [On] for <Allow TLS (SMTP RX)>, receiving TLS encrypted data may only be allowed when there is a request from the host.
NOTE |
To use the SMTP receiving function, it is necessary to register the host name for the machine to the DNS server. (See "TCP/IPv4 Settings" and "TCP/IPv6 Settings.") Even if you select [On] for <Allow TLS (SMTP RX)>, the data will not be encrypted if the SMTP host does not support encryption. To select [Always TLS] or [On] for <Allow TLS (SMTP RX)> to allow TLS transmission, it is necessary to generate a key pair in advance. To generate a key pair, see "Generating a Key Pair and Server Certificate" or "Registering a Key Pair File and Server Certificate File Installed from a Computer." |
Using a POP server to receive communications:
Press [Off] for <SMTP RX> → [On] for <POP>.
Press [E-Mail Address].
Enter the e-mail address → press [OK].
Press [POP Server].
Enter the IP address or name for the POP server → press [OK].
Press [POP Login Name].
Enter the POP login name → press [OK].
Press [POP Password].
Enter the POP password → press [OK].
Specify the time interval to automatically check the POP server in <POP Interval>.
Press [Authent./Encryption] → set <POP AUTH Method>.
Set <Allow TLS (POP)> → press [OK].
If you want to send encrypted data, set <POP> to 'On'.
IMPORTANT |
If you set less than 10 minutes (excluding '0 min') for <POP Interval>, the machine will not enter a complete Sleep mode. |
NOTE |
Even if you select [On] for <Allow TLS (POP)>, the data will not be encrypted if the POP server does not support encryption. |
Logging in to a POP server before sending (POP before SMTP):
Press [Off] for <SMTP RX> → [On] for <POP>.
Press [SMTP Server].
Enter the IP address or name for the SMTP server → press [OK].
Press [E-Mail Address].
Enter the e-mail address → press [OK].
Press [POP Server].
Enter the IP address or name for the POP server → press [OK].
Press [POP Login Name].
Enter the POP login name → press [OK].
Press [POP Password].
Enter the POP password → press [OK].
Specify the time interval to automatically check the POP server in <POP Interval>.
Press [Authent./Encryption] → set <POP AUTH Method>.
Press [On] for <POP Authentication Before Send> → [Off] for <SMTP Authentication (SMTP AUTH)>.
Set <Allow TLS (POP)> → <Allow TLS (SMTP TX)> → press [OK].
If you want to send encrypted data, set <Allow TLS (POP)> or <Allow TLS (SMTP TX)> to 'On'.
NOTE |
Even if you select [On] for <Allow TLS (SMTP TX)>, the data will not be encrypted if the SMTP host does not support encryption. Even if you select [On] for <Allow TLS (POP)>, the data will not be encrypted if the POP server does not support encryption. |
Logging in to an SMTP server before sending (SMTP Authentication):
Press [SMTP Server].
Enter the IP address or name for the SMTP server → press [OK].
Press [E-Mail Address].
Enter the e-mail address → press [OK].
Press [Authent./Encryption] → [Off] for <POP Authentication Before Send>.
Press [On] for <SMTP Authentication (SMTP AUTH)> → [User Name].
Enter the user name for logging in to the SMTP server → press [OK].
If you are using a Microsoft SMTP server, enter the user name using the following format: user name@domain name. For more information, confirm the Microsoft SMTP server settings.
Press [Password].
Enter the password for logging in to the SMTP server → press [OK].
Set <Allow TLS (SMTP TX)> → <Display Auth. Screen When Send> → press [OK].
If you want to send encrypted data, set <Allow TLS (SMTP TX)> to 'On'.
If you want to display the authentication screen when sending, set <Display Auth. Screen When Send> to 'On'.
NOTE |
Even if you select [On] for <Allow TLS (SMTP TX)>, the data will not be encrypted if the SMTP host does not support encryption. |
Sending without authenticating:
Press [SMTP Server].
Enter the IP address or name for the SMTP server → press [OK].
Press [E-Mail Address].
Press [Authent./Encryption] → [Off] for <POP Authentication Before Send>.
Press [Off] for <SMTP Authentication (SMTP AUTH)>.
Set <Allow TLS (SMTP TX)> → press [OK].
If you want to send encrypted data, set <Allow TLS (SMTP TX)> to 'On'.
4.
Press [OK].