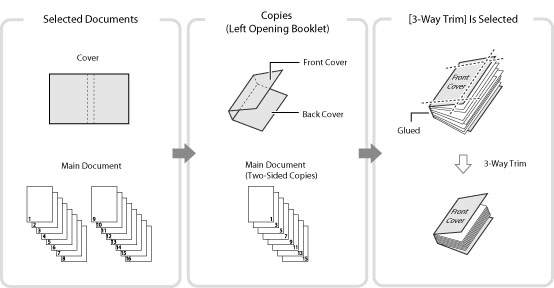
Perfect Binding
This mode enables you to copy one-sided or two-sided originals in such a way that the copies are glued together to make a booklet.
For information on the optional products required to use this function, see "Optional Products Required for Each Function."
The following paper sizes are recommended for the cover page and the main document when using the Perfect Binding mode.
Finishing Size | Main Document Size | Cover Page Size |
COM (178 mm x 229 mm) | LTR (216 mm x 279 mm) | 11" x 17" (279 mm x 432 mm) |
B5 (182 mm x 257 mm) | A4 (210 mm x 297 mm) | A3 (297 mm x 420 mm) |
A4 (210 mm x 297 mm) | 226 mm x 310 mm | SRA3 (320 mm x 450 mm) |
LTR (216 mm x 279 mm) | 9" x 12" (229 mm x 305 mm) | 13" x 19" (330 mm x 482 mm) |
The table below shows the available finishing size according to the trimming setting.
Trimming Setting | X (Horizontal) | Y (Vertical) | |
Do Not Trim | 182.0 mm to 216.0 mm | 257.0 mm to 297.0 mm | |
Specify by Finishing Size | Vertical Trim | 138.0 mm to 216.0 mm | 257.0 mm to 297.0 mm |
3-Way Trim | 138.0 mm to 216.0 mm | 203.0 mm to 297.0 mm | |
Specify by Trim Width | Vertical Trim | 6.5 mm to 49.5 mm | - |
3-Way Trim | 6.5 mm to 49.5 mm | 6.5 mm to 39.5 mm | |
The number of sheets that can be bound differs according to the type of paper used for the main document. A job is canceled if you use a number of sheets other than below. These numbers may differ according to the paper you are using.
Paper | Maximum Number of Sheets | Minimum Number of Sheets |
52 g/m2 to 63 g/m2 | 200 | 30 |
64 g/m2 to 79 g/m2 | 200 | 10 |
80 g/m2 to 105 g/m2 | 150 | 10 |
106 g/m2 to 163 g/m2 | 10 (as sheet insertions) | |
The available paper weight for the cover page differs, depending on the paper source. Use the paper shown in the table below.
Paper Source | Paper Weight |
Main Unit | 90 g/m2 to 300 g/m2 |
Document Insertion Unit-N | 90 g/m2 to 300 g/m2 |
The table below shows the custom paper sizes that you can specify for the main document and the cover page. If you enter a value outside the setting range, a message prompting you to enter an appropriate value appears on the screen.
Main Document
Trimming Setting | X (Horizontal) | Y (Vertical) | |
Do Not Trim | Width of the Finishing Size (182.0 mm to 216.0 mm) | Width of the Finishing Size (257.0 mm to 297.0 mm) | |
Specify by Finishing Size | Vertical Trim | Width of the Finishing Size + 6.5 mm to 49.5 mm (182.0 mm to 228.6 mm) | Width of the Finishing Size (257.0 mm to 297.0 mm) |
Specify by Trim Width | |||
Specify by Finishing Size | 3-Way Trim | Width of the Finishing Size + 6.5 mm to 49.5 mm (182.0 mm to 228.6 mm) | Width of the Finishing Size + 13.0 mm to 79.0 mm (257.0 mm to 320.0 mm) |
Specify by Trim Width | |||
Cover Page
Trimming Setting | X (Horizontal) | Y (Vertical) | |
Do Not Trim | 364.0 mm to Twice the Size of the Main Document + 30.5 mm (364.0 mm to 462.5 mm) | Width of the Finishing Size (257.0 mm to 297.0 mm) | |
Specify by Finishing Size | Vertical Trim | 364.0 mm to Twice the Size of the Main Document + 30.5 mm (364.0 mm to 487.7 mm) | Width of the Finishing Size (257.0 mm to 297.0 mm) |
Specify by Trim Width | |||
Specify by Finishing Size | 3-Way Trim | 364.0 mm to Twice the Size of the Main Document + 30.5 mm (364.0 mm to 487.7 mm) | Width of the Finishing Size + 13.0 mm to 79.0 mm (257.0 mm to 330.2 mm) |
Specify by Trim Width | |||
IMPORTANT |
The Perfect Binding mode can be set only if the Perfect Binder-E is attached. If the thickness of a booklet bound using the Perfect Binding mode exceeds 25 mm, a paper jam may occur. Be sure to correctly set the paper type. When copying on special types of paper, such as heavy paper, be sure to correctly set the paper type, especially if you are using heavy paper. If the type of paper is not set correctly, it could adversely affect the quality of the image. Moreover, the fixing unit may become dirty and require a service repair, or the paper could jam. Before performing perfect binding, we recommend you to check the curl state of a using paper type. You need to print out the main document and a cover to the finisher or stacker, and check that curl is within the following specified value. 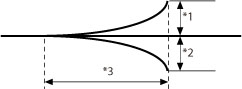 *1 Height of Curl: Less than +3 mm *2 Height of Curl: Less than -3 mm *3 Length of Curl: More than 15 mm If you use the paper type that curls easily exceeding the specified value for perfect binding, the following problems may occur: The finishing size of output is different from the specified one. Paper jam occurs. Error occurs. |
NOTE |
The stacking limit of the optional Perfect Binder-E is 1000 sheets, or 127 mm in height of paper stack. If the paper stack exceeds the limit, copying stops temporarily. Copying resumes when the output in the stacker is removed. If, however, the Perfect Binder Continuous Kit-A is attached, the output in the stacker is automatically removed. Gluing becomes possible about 440 seconds after the internal heater of the optional Perfect Binder-E is turned on. |
1.
Press  → [Copy].
→ [Copy].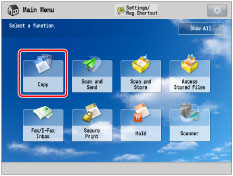
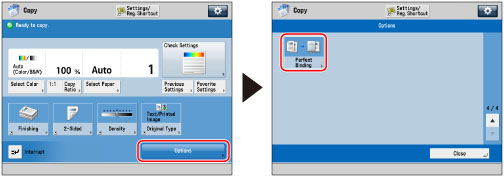
2.
Press [Options] → [Perfect Binding].
3.
Select the paper to use for the cover page and the main document.
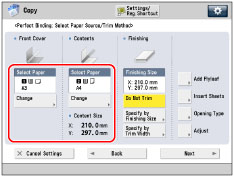
Press [Change] for <Select Paper> → select the paper to use → press [OK].
IMPORTANT |
If you are using paper from 80 g/m2 to 105 g/m2 for the main document and the output is more than 150 sheets, the booklet may not be made because of its thickness. In this case, a paper jam may occur. Reduce the number of pages in the main document. Be sure to correctly set the paper type. If the type of paper is not set correctly, the job may be canceled. Be sure to correctly set the finishing size. If the size of the cover matches either of the following conditions, a paper jam may occur. Trimmed: Trimming width of the fore edge of the cover is more than 50 mm. Not Trimmed: Length of the finishing size exceeds the width of the stacker (about 297 mm), or the depth of the finishing size exceeds the height of the stacker (about 221 mm). |
4.
Set finishing size.
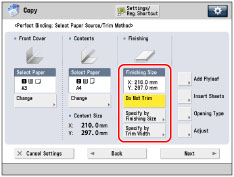
If you do not want to trim the edge of the booklet, select [Do Not Trim].
If you want to trim the edge of the booklet by specifying the finishing size, press [Specify by Finishing Size] → select [Vertical Trim] or [3-Way Trim] then input the desired finishing size → press [OK].
If you want to trim the edge of the booklet by specifying the trim width, press [Specify by Trim Width] → select [Vertical Trim] or [3-Way Trim] then input the desired trim width → press [OK].
NOTE |
If you want to register and edit the configured finishing size, press [Reg.]. |
5.
Specify the perfect binding copy settings.
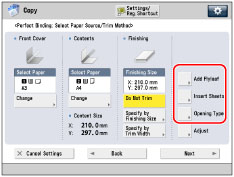
Adding Flyleaves:
Press [Add Flyleaf].
Select the copy settings in [Front Flyleaf] and [Back Flyleaf] → press [OK].
Press [Leave Blank] if you do not want to copy on the flyleaf.
If you feed paper for the flyleaf from the Document Insertion Unit-N, select [Leave Blank].
To set the paper for the flyleaf, press [Change] for <Select Paper> → select the paper source → press [OK].
If you want to select the Stack Bypass-C when a paper size/type is already selected for the current or reserved job, press [Change MP Tray Paper].
IMPORTANT |
You must select the same paper size for the cover page as that used for the main document. If you load preprinted paper to use as the cover page into the document insertion unit, you must load the paper face up. |
Inserting Sheets:
Press [Insert Sheets].
Select the type of sheet insertions → press [Add].
Specify the detailed settings for the sheet insertions → press [OK].
To select the paper for the sheet insertions, press [Change] for <Select Paper> → select the paper source → press [OK].
If you selected [Change MP Tray Paper], select the paper size and type.
IMPORTANT |
If you set a different paper size for the front flyleaf, back flyleaf, or insert sheets, the paper sizes for the other features are automatically changed to the new paper size. However, changing the paper source for a feature to a source with the same paper size does not change the settings for the other features. Before feeding paper from the Document Insertion Unit-N, load paper into the Document Insertion Unit-N and specify the paper size. To feed paper from the Document Insertion Unit-N, select [Sheet Inserter 1] or [Sheet Inserter 2]. If paper is being fed from the Document Insertion Unit-N for the current job, press [Change Insert. 1 Ppr.] or [Change Insert. 2 Ppr.] to select paper for the sheet insertions. |
NOTE |
You can insert a total of up to 100 sheet insertions. |
Press [OK].
Selecting the Finishing Format:
Press [Opening Type] → select the finishing format → press [OK].
[Left Opening]: | A booklet that opens to the left is created. |
[Right Opening]: | A booklet that opens to the right is created. |
IMPORTANT | ||||||||||
To place paper for the cover page in the optional Stack Bypass-C, load the paper as follows: If you want to copy on the cover page, place the side you want to copy on face down regardless of whether the booklet opens to the left or right. If you do not want to copy on the cover page and you select the following format:
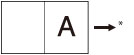
To place paper for the cover page in the optional Document Insertion Unit-N, load the paper as shown in the illustration below:
* Feeding Direction to the Sheet Inserter For instructions on loading paper into the Document Insertion Unit-N, see "Loading Paper into the Document Insertion Unit-N (Optional)." |
6.
Press [Adjust] → select the item to adjust.
If you do not want to specify the detailed settings, proceed to step 7.
Adjusting the Image Location of the Main Document:
Press [Content Img Position].
Press [-] or [+] to shift the image for the main document vertically → [OK ].
NOTE | ||||
If you enter a value other than 0, you can switch between the positive and negative adjustment amount by pressing [±].
|
Press [Close].
Adjusting the Trim Angle:
Press [Trim Angle].
Press [-] or [+] to adjust the trim angle → [OK].
NOTE | ||||
If you enter a value other than 0, you can switch between the positive and negative adjustment amount by pressing [±].
|
Press [Close].
Adjusting the Image Location of the Cover Page:
Press [Cover Image Position].
Press [-] or [+] to shift the image on the cover page → [OK].
NOTE | ||||
If you enter a value other than 0, you can switch between the positive and negative adjustment amount by pressing [±].
|
Press [Close].
Adjusting the Trim Location:
Press [Trim Position].
Press [-] or [+] to shift the trim location → [OK].
NOTE | ||||
If you enter a value other than 0, you can switch between the positive and negative adjustment amount by pressing [±].
If the amount of the trimming is between 6.0 mm to 50.0 mm, each setting can be applied. |
Press [Close].
Adjusting slightly the Finishing Size:
Press [Fine Adjust Finishing Size].
Press [-] or [+] to reduce a difference between the finishing size and the trim location that the machine performs → [OK].
NOTE | ||||
If you enter a value other than 0, you can switch between the positive and negative adjustment amount by pressing [±].
|
Press [Close].
7.
Press [Next].
8.
Specify the scanning settings for the cover page and the main document → press [Next].
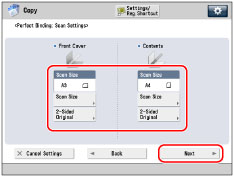
Press [Scan Size].
If the width of the original is 457.3 mm to 487.7 mm, press [Long Original].
If the original is two-sided, press [2-Sided Original] → select the type of two-sided original → press [OK].
Details of each item are shown below.
[Book Type]: | The front and back sides of the original have the same top-bottom orientation. |
[Calendar Type]: | The front and back sides of the original have opposite top-bottom orientations. |
NOTE |
If cover paper is fed from the Document Insertion Unit-N, you cannot specify scanning settings for the cover page. |
9.
Select the sides of the document to copy on → press [OK].
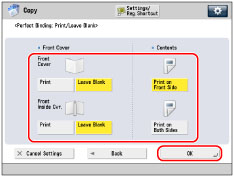
Select [Print] or [Leave Blank] for the front cover.
Select [Print on Front Side] or [Print on Both Sides] for the main document.
NOTE |
Cover Paper that is fed from the optional Document Insertion Unit-N cannot be printed on. |
10.
Press [Close].