Flow of Sending Operations
This section describes the basic flow of sending operations.
The following types of sending methods are available for the Scan and Send functions. For instructions on sending a fax, see "Sending a Fax."
Sending an E-Mail Message
You can scan a document and send it as an attached file in an e-mail message. You can send the scanned document as a JPEG, TIFF, PDF, XPS, OOXML(pptx, docx) file.
Sending an I-Fax
You can scan a document and send it to a destination via the Internet as an I-fax. There are two types of I-Fax, "Internet Fax" and "Intranet Fax." "Internet Fax" can send documents via a mail server to addresses over the internet. "Intranet Fax" does not pass through a mail server but can send documents directly.
Regardless of the distance and area, I-fax helps you to reduce transmission costs by making transactions via the Internet. You can also specify the scan settings and the settings at the destination when using I-fax.
Sending a Job to a File Server/Advanced Box
You can send scanned images to computers (file servers) and the Advanced Box of another imageRUNNER ADVANCE series machine opened as an SMB server or WebDAV server on the network.
Sending a Job to a Mail Box
You can scan a document and store it in a mail box. If you include a mail box as one of the destinations to which you are sending your document, the document is stored in the selected mail box for later use. Documents stored in a mail box can be printed and sent to other destinations.
IMPORTANT |
The send settings for the last send job may be retained. To cancel the settings, press  . .The specified destinations are not retained. |
1.
Place your originals.
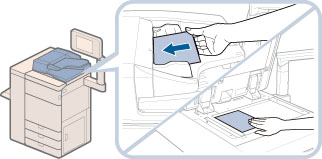
NOTE |
For instructions on placing your originals, see "Placing Originals." |
2.
Press  → [Scan and Send] .
→ [Scan and Send] .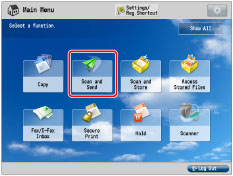
If the desired function is not displayed on the Main Menu screen, press [Show All].
3.
Specify the destination.
IMPORTANT |
If you set an address type to 'On' in [Limit New Destination], you cannot enter new destinations of that type. Select a stored destination by using the Local Address Book, the Remote Address Book, LDAP Server in [Address Book], or pressing a one touch button in [One-Touch]. (See "Restricting Sending to New Addresses.") |
NOTE |
You can specify and send to up to 256 destinations at the one time. If you specify a group address as a destination, each address stored in that group is counted as one destination. The icons that are displayed on the screen are:  : E-Mail : E-Mail : Fax : Fax : I-Fax : I-Fax : File : File : Group : Group : Mail Box : Mail Box : Bcc : Bcc : Cc : Cc |
The following methods are available for specifying destinations:

1 | If you want to specify a destination stored in an Address Book Refer to the following, depending on the type of address book. |
2 | If you want to specify a destination stored in a One-Touch button |
3 | If the destination you want to specify is not stored in an Address Book Refer to the following detailed procedures, according to the address or server to specify. |
4 | If you want to specify a destination stored in Favorite Settings |
5 | If you want to specify your personal folder as the destination |
6 | If you want to specify your own e-mail address as the destination |
7 | If you want to specify Cc and/or Bcc addresses |
4.
Specify the desired scan settings.
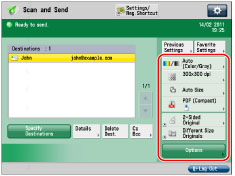
You can press [Options] to select useful scanning modes. You can also use modes in combination.
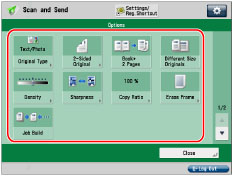
Press  or
or  to display the desired mode.
or to display the desired mode.For more information on setting each mode, see the corresponding section.
5.
Press  .
.
.If the original is placed on the platen glass, follow the instructions that appear on the touch panel display → press .
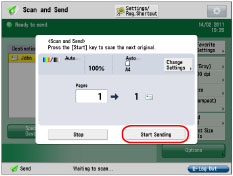
. When scanning is complete, press [Start Sending].
If a message appears indicating that scanning was canceled because the data size for the scanned original exceeds the maximum data size, scan your original again.
You may be able to perform scanning by changing the following settings.
Set the data compression rate to [High Ratio]. (See "Data Compression Ratio.")
Lower the resolution (See "Setting the Resolution.")
Reduce the sharpness (See "Adjusting the Image Sharpness.")
NOTE |
The machine automatically detects the size of the original. A screen to enter the user name and password may appear when you try to send to an e-mail or I-fax address, depending on the e-mail/I-fax settings. If the screen appears, enter the user name and password registered in SMTP Authentication. (See "Common Communication Settings for E-Mail/I-Fax.") If you try to send to a file server in which [Confirm Before Sending] is set to 'On', a screen appears prompting you to enter a user name and password. In this case, enter the file server password. If you want to register a file server in a group address, set [Confirm Before Sending] to 'Off'. You cannot send to a group address including a file server in which the Enter Password Each Time setting is set to 'On'. (See "Registering a File Server Address.") If you set the Preview mode to 'On', you can verify the images from the Preview screen before sending your document. (See "Preview.") |
6.
When scanning is complete, remove your originals.
IMPORTANT |
If you are using Microsoft Exchange Server 2003 or 2007, a sending error may occur when you send an e-mail message in the cases below. In this case, you should add the user logged in to the machine using the SSO-H to [Send On Behalf] in [Delivery Options] in [Exchange General]. For more information, contact the administrator. When a user is logged in to the machine using SSO-H When <SMTP Authentication (SMTP AUTH)> is set to 'On' in [Communication Settings] After a job is sent, the send settings may be retained except the specified destinations. To cancel the settings, press .To send other jobs with the same settings, specify destinations for the jobs as the destination specified for the previous job is not retained. |
NOTE |
We recommend you to read the following topics before using the Send function: Main Power and Energy Saver key (See "Main Power and Energy Saver Key.") Entering Characters from the Touch Panel Display (See "Entering Characters from the Touch Panel Display.") Routine Maintenance (See "Routine Cleaning.") You can print a report that contains the results of all send jobs. (See "Send TX Report" and "Communication Management Report.") If you are using a login service, it is necessary to log in to the machine with the appropriate procedure for the login service. If you are using Department ID Management with the Copy Card Reader-F, see "Copy Card Reader-F." If you are using Department ID Management, see "Entering the Department ID and PIN." For instructions on setting the SSO-H login service, see "Login Service." The maximum number of send jobs that the machine can handle is 120 (If there are fax jobs with error codes, the maximum number of fax jobs that can be handled is 64). However, the actual number of send jobs that the machine can handle may be less than 120, depending on the following conditions: When multiple documents are being sent at the same time When large documents are being sent When a large amount of memory is being used for the Mail Box and Fax/I-Fax Inbox For instructions on canceling a send job, see "Canceling a Job." You can also cancel a send job from the Status Monitor/Cancel screen. (See "Canceling a Job Being Sent or Waiting to Be Sent.") When multiple sheets are fedScanning is stopped and the message is displayed on the screen. Follow the instructions to clear the jam. When you have cleared the jam, the resume job screen is displayed. If the machine mistakenly detects multiple sheet feeding, press [Do Not Detect Multi. Sheet Feed] to resume scanning. To set the machine in advance to not notify you of multiple sheet feeding, perform one of the following operations. Each time you send a document, press [Options] on the Scan Basic Features screen → select [Dtct. Feeder Mlti Sheet Fd] to disable the setting. Set [Set Detect. of Feeder Multi. Sheet Fd as Def.] to [Off] (See "Changing the Default Setting of the Multiple Sheet Feed Detection.") |