Skipping Blank Pages When Scanning
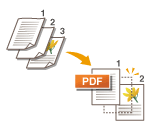
 | The machine can detect blank pages when scanning, and send/store all the pages except blank pages. |
1
Place the original. Placing Originals
2
Press <Scan and Send>. <Home> Screen
3
Specify the destination on the Scan Basic Features screen. Scan Basic Features Screen
4
Specify the scan settings as necessary. Basic Operations for Scanning Originals
5
Press <Options>  <Skip Blank Originals>.
 <Skip Blank Originals>.
6
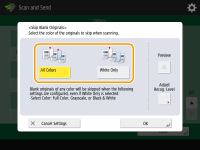
Select the color of the originals to skip.

To skip blank originals regardless of their color, select <All Colors>. To skip blank originals only in white, select <White Only>.
When something other than <Auto (Color/B&W)> or <Auto (Color/Gray)> is selected in <Select Color>, the same operation as <All Colors> is performed, even if <White Only> is set.

Pressing <Preview> to select the button enables you to check the contents of the scanned originals on the preview screen. <Preview> is not displayed when <Mail Box> is selected in <Scan and Store>. Checking Scanned Originals Before Sending/Saving (Preview)
7
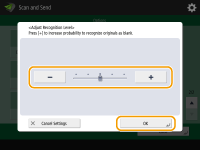
Press <Adjust Recog. Level>, set the accuracy to detect blank paper, and then press <OK>.

Pressing <+> makes the detection accuracy higher.
8
Press <OK>  <Close>.
 <Close>.
9
Press  (Start).
 (Start).
Originals are scanned and sending/saving starts.
 |
Only <E-Mail> or <File> type destinations can be specified when <Skip Blank Originals> is set. Sending cannot be performed if a destination with a type other than <E-Mail> or <File> is set. If the size of the original is smaller than the scan size setting, it may not be skipped correctly. |
 |
To check the number of pages that have been sent/saved, follow the procedures below:  (Status Monitor) (Status Monitor)  <Send> <Send>  <Job Log> <Job Log>  select a document select a document  <Details> <Details>  check the number displayed for <Send Pages> check the number displayed for <Send Pages>The status screen and Communication Management Report display the number including blank paper. Checking Status and Log for Scanned Documents |