Checking Status and Log for Scanned Documents
You can check the statuses and communication logs for sent and saved documents.
 |
When personal authentication management is used, you can restrict users from performing operations on the jobs of other users on the <Status Monitor> screen. <Restrict Access to Other User Jobs> |
Checking the Statuses for Sent/Saved Documents
1
Press  (Status Monitor).
 (Status Monitor).
2
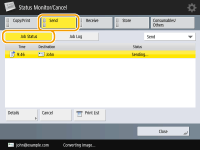
Press <Send>  <Job Status>.
 <Job Status>.
3
Check the statuses.
Selecting a document and pressing <Details> enables you to check detailed information such as destinations and the number of pages.
Selecting a document and pressing <Cancel> enables you to cancel sending/saving.
Pressing <Print List> prints a status list of sent/saved documents displayed on the screen.
 |
Pressing <Details>  <Resend> enables you to resend/resave the documents that failed to send/save. To specify another destination, press <Change Destination>. For documents with multiple destinations specified using the same sending/saving method, press <Broadcast List>, select a destination, and then press <Resend> or <Change Destination>. <Resend> enables you to resend/resave the documents that failed to send/save. To specify another destination, press <Change Destination>. For documents with multiple destinations specified using the same sending/saving method, press <Broadcast List>, select a destination, and then press <Resend> or <Change Destination>.You can resend/resave documents when <Delete Failed TX Jobs> is set to <Off>. <Delete Failed TX Jobs> You can change the destinations of documents that are set to be sent/saved at a specified time as well as documents that failed to send/save. Note that you cannot change the destinations for documents with multiple destinations specified that are being sent/saved, or when entering a new destination is restricted (Restricting New Destinations). |
Checking If Documents Are Sent or Saved Successfully
1
Press  (Status Monitor).
 (Status Monitor).
2
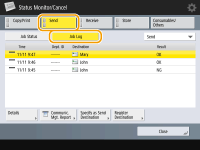
Press <Send>  <Job Log>.
 <Job Log>.
3
Check if documents are sent or saved successfully.
<OK> is displayed in the <Result> column when a document was sent or saved successfully. If <NG> is displayed, this shows that a document failed to be sent or saved because it was canceled or there was some error.
Selecting a job and pressing <Details> enables you to check detailed information about the job. A three-digit number in the <Error Code> column on the information represents an error code. You can check the causes and solutions for errors based on error codes. Countermeasures for Each Error Code
By pressing <Communic. Mgt. Report>, the displayed send/save log can be printed as a list.
TIPS |
Specifying/registering destinations from the send historyYou can specify destinations and register destinations to the address book from the send history on the <Status Monitor> screen. This saves you the effort of directly entering the address, and also helps avoid sending to an incorrect destination due to entering the wrong address. When specifying a destination: <Status Monitor>  <Send> <Send>  <Job Log> <Job Log>  select the destination to send to select the destination to send to  <Specify as Send Destination> <Specify as Send Destination>  <OK> <OK> When registering a destination: <Status Monitor>  <Send> <Send>  <Job Log> <Job Log>  register the destination from the registration screen for each destination type register the destination from the registration screen for each destination type |