Overlapping Forms
The function for printing data overlapping a fixed form stored in the device is known as overlay printing.
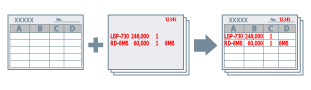
Fixed form information saved to the device in advance can be recalled in the operating system and printed in combination with overlapping print data.
Perform overlay printing in the following order.
To Save a Fixed Form in the Device
After creating a fixed form beforehand, carry out the following procedure. At the end, you can save the fixed form in the device by clicking [Print] in the [Print] dialog.
1.
In the [Print] dialog, click [Printer Options] → click [Special Features].
2.
Click [Page Options].
3.
In the displayed dialog, select [Create Form File] from the [Processing Method] pop-up menu.
4.
Enter the name of the form in [File Name] → click [OK].
5.
Click [OK].
6.
Click [Print].
To Retrieve the Saved Form File Information
To perform overlay printing, it is necessary to import the form information stored in the device using Office Printer Utility or CUPS PS Printer Utility.
1.
Open [System Settings] in macOS → click [Printers & Scanners] in the sidebar.
2.
Select the device to use.
3.
In the displayed dialog, click [Options & Supplies].
4.
In the displayed dialog, click the [Utility] tab → click [Open Printer Utility].
Office Printer Utility or CUPS PS Printer Utility starts.
5.
In Office Printer Utility or CUPS PS Printer Utility, click [Printer Information].
6.
Click [OK].
To Perform Overlay Printing
After importing the form information, you can combine it with the print data to be overlaid, and print.
1.
In the [Print] dialog, click [Printer Options] → click [Special Features].
2.
Click [Page Options].
3.
In the displayed dialog, select [Overlay Printing] from the [Processing Method] pop-up menu.
4.
Select the form to use from [File List] → click [OK].
When performing two-sided printing, select the page (front or back) on which the form is to be overlaid from the [Application] pop-up menu.
5.
Click [OK].
6.
Click [Print].