Generating Key Pairs
A key pair can be generated with the machine when it is required for encrypted communication via Transport Layer Security (TLS). You can use TLS when accessing the machine via the Remote UI or performing IPP Print. Up to eight key pairs, including the preinstalled pairs, can be registered. Self-signed certificates are used with key pairs generated in "Network Communication". With a "Key and Certificate Signing Request (CSR)", you can apply for a CA-issued digital certificate for the key pair generated by the machine.
Generate Network Communication Key
1
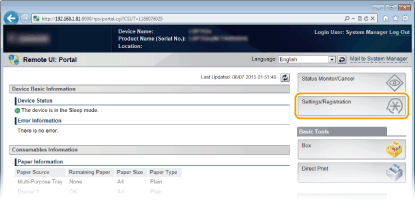
Start the Remote UI and log on in Management Mode. Starting Remote UI
2
Click [Settings/Registration].
3
Click [Security]  [Key and Certificate Settings].

4
Click [Generate Key].
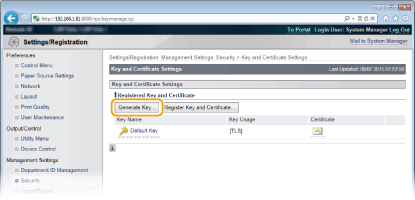

Deleting a registered key pair
Click [Delete] on the right of the key pair you want to delete click [OK].
A key pair cannot be deleted if it is currently used for some purpose, such as when "TLS" or "IEEE 802.1X", is displayed under [Key Usage]. In this case, disable the function or replace the key pair before deleting it.
5
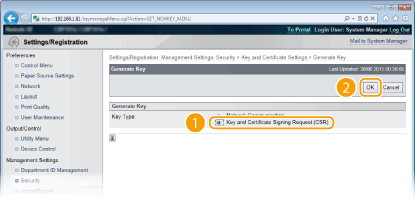
Select [Network Communication] and click [OK].

6
Specify settings for the key and certificate.
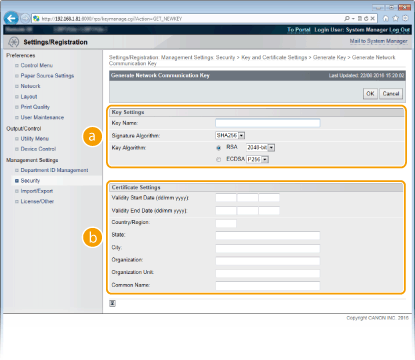
 [Key Settings]
[Key Name]
Enter alphanumeric characters for naming the key pair. Set a name that will be easy for you to find later in a list.
Enter alphanumeric characters for naming the key pair. Set a name that will be easy for you to find later in a list.
[Signature Algorithm]
Select the signature algorithm from the drop-down list.
Select the signature algorithm from the drop-down list.
[Key Algorithm]
RSA or ECDSA is used for generating a key pair. Select the key length from the drop-down list. The larger the number for the key length, the slower the communication. However, the security is tighter.
RSA or ECDSA is used for generating a key pair. Select the key length from the drop-down list. The larger the number for the key length, the slower the communication. However, the security is tighter.
[512-bit] cannot be selected for the key length of RSA, if [SHA384] or [SHA512] is selected for [Signature Algorithm]. |
 [Certificate Settings]
[Validity Start Date (mm/dd/yyyy)]
Enter the validity start date of the certificate.
Enter the validity start date of the certificate.
[Validity End Date (mm/dd/yyyy)]
Enter the validity end date of the certificate. A date earlier than [Validity Start Date (mm/dd/yyyy)] cannot be set.
Enter the validity end date of the certificate. A date earlier than [Validity Start Date (mm/dd/yyyy)] cannot be set.
[Country/Region]
Enter characters for the Internet country code.
Enter characters for the Internet country code.
[State]/[City]
Enter alphanumeric characters for the location as necessary.
Enter alphanumeric characters for the location as necessary.
[Organization]/[Organization Unit]
Enter alphanumeric characters for the organization name as necessary.
Enter alphanumeric characters for the organization name as necessary.
[Common Name]
Enter alphanumeric characters for the common name of the certificate as necessary. "Common Name" is often abbreviated as "CN."
Enter alphanumeric characters for the common name of the certificate as necessary. "Common Name" is often abbreviated as "CN."
 To perform IPPS Print, the "IP address" or "<host name>.<domain name>" that is used for connection via IPPS must be entered in [Common Name]. Enter the "IP address" when it is fixed. Enter "<host name>.<domain name>" when the DNS server is used. Enabling IPP/IPPS |
7
Click [OK].
Keys for network communication may take approximately 10 to 15 minutes to generate.
After a key pair is generated, it is automatically registered to the machine.
Generate Key and Certificate Signing Request (CSR)
1
Start the Remote UI and log on in Management Mode.
Starting Remote UI
Starting Remote UI
2
Click [Settings/Registration].
3
Click [Security] [Key and Certificate Settings].
4
Click [Generate Key].
Deleting a registered key pair
Click [Delete] on the right of the key pair you want to delete click [OK].
A key pair cannot be deleted if it is currently used for some purpose, such as when "TLS" or "IEEE 802.1X", is displayed under [Key Usage]. In this case, disable the function or replace the key pair before deleting it.
5
Select [Key and Certificate Signing Request (CSR)] and click [OK].
6
Specify settings for the key and certificate.
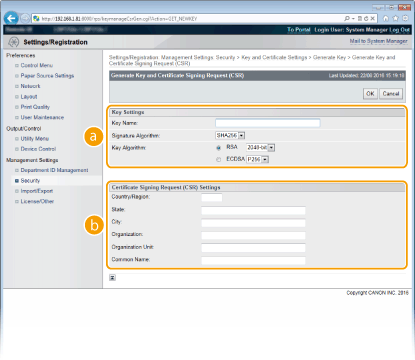 [Key Settings]
[Key Name]
Enter alphanumeric characters for naming the key pair. Set a name that will be easy for you to find later in a list.
Enter alphanumeric characters for naming the key pair. Set a name that will be easy for you to find later in a list.
[Signature Algorithm]
Select the signature algorithm from the drop-down list.
Select the signature algorithm from the drop-down list.
[Key Algorithm]
RSA or ECDSA is used for generating a key pair. Select the key length from the drop-down list. The larger the number for the key length, the slower the communication. However, the security is tighter.
RSA or ECDSA is used for generating a key pair. Select the key length from the drop-down list. The larger the number for the key length, the slower the communication. However, the security is tighter.
[512-bit] cannot be selected for the key length of RSA, if [SHA384] or [SHA512] is selected for [Signature Algorithm]. |
[Certificate Signing Request (CSR) Settings][Country/Region]
Enter characters for the Internet country code.
Enter characters for the Internet country code.
[State]/[City]
Enter alphanumeric characters for the location as necessary.
Enter alphanumeric characters for the location as necessary.
[Organization]/[Organization Unit]
Enter alphanumeric characters for the organization name as necessary.
Enter alphanumeric characters for the organization name as necessary.
[Common Name]
Enter alphanumeric characters for the common name of the certificate as necessary. "Common Name" is often abbreviated as "CN."
Enter alphanumeric characters for the common name of the certificate as necessary. "Common Name" is often abbreviated as "CN."
To perform IPPS Print, the "IP address" or "<host name>.<domain name>" that is used for connection via IPPS must be entered in [Common Name]. Enter the "IP address" when it is fixed. Enter "<host name>.<domain name>" when the DNS server is used. Enabling IPP/IPPS |
7
Click [OK].
Key and Certificate Signing Request (CSR) may take approximately 10 to 15 minutes to generate.
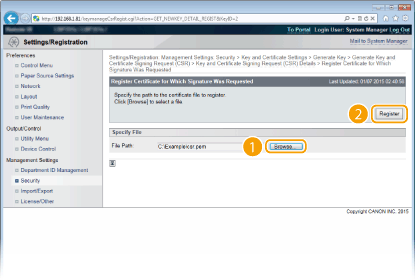
8
Click [Store in File].
A dialog box for storing the file appears. Choose where to store the file and click [Save].
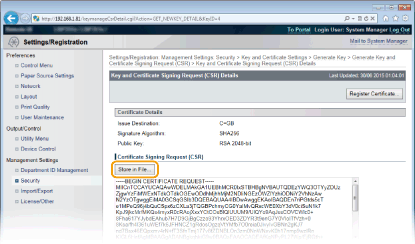
The Key and Certificate Signing Request (CSR) file is stored on the computer.
9
Attach the stored file and submit the application to the certification authority.
Register the digital certificate issued by the certification authority.
You cannot use the key pair generated by the Certificate Signing Request (CSR) until the certificate is registered. Once the certification authority has issued the digital certificate, register it using the procedure below.
1
Start the Remote UI and log on in Management Mode. Starting Remote UI
2
Click [Settings/Registration].
3
Click [Security] [Key and Certificate Settings].
4
Click [Key Name] or [Certificate] for the certificate to be registered.
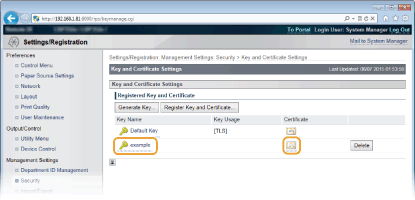
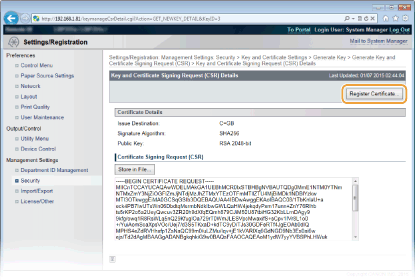
5
Click [Register Certificate].
6
Click [Browse] in [File Path], specify the file for the certificate signing request, and click [Register].