Setting Advanced Box to Public
Open the storage space (Advanced Box) on the network to share files. Specify information such as file types to be saved. You can create an exclusive space for personal use in the Advanced Box. To make the Advanced Box available on a network, you need to set the machine to be used as the SMB server or WebDAV server (Making SMB Settings or Making WebDAV Settings).
Advanced Box Batch Settings
1
Press  (Settings/Registration).
(Settings/Registration).2
Press <Function Settings>  <Store/Access Files> <Advanced Box Settings> <Unified Advanced Box Settings> <Next>.
3
Set the method to make the Advanced Box available to the network and press <Next>.
If you want to make the Advanced Box available to the outside as a WebDAV server, press <By WebDAV>.
If you want to make the Advanced Box available to the outside as an SMB server, press <By SMB>.

If you set to <WebDAV>, the <Use WebDAV Server> is set to <On>. If you set to <By SMB>, the <Use WebDAV Server> setting in <SMB Server Settings> is set to <On>.
Making WebDAV Settings
Making SMB Settings
Making WebDAV Settings
Making SMB Settings
4
Set the Advanced Box.
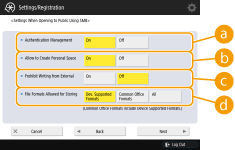
 <Authentication Management>
To manage authentication, press <On>.
 <Allow to Create Personal Space>
To create an exclusive folder for personal use in the Advanced Box, press <On>. If <Authentication Management> is not set to <On>, setting is not possible.
 <Prohibit Writing from External>
To create an exclusive folder for personal use in the Advanced Box, press <On>.
 <File Formats Allowed for Storing>
Select one of the file formats to be saved in the Advanced Box.
<Dev. Supported Formats> | pdf, jpg, jpe, jpeg, tif, tiff, xps, pptx, oxps format files |
<Common Office Formats> | In addition to the files in <Dev. Supported Formats>, doc, xls, csv, ppt, txt format and general-purpose files. |
<All> | All file formats. |
5
Press <Next> and carry out the necessary settings.
 If you set to <By WebDAV>
Set whether to use TLS and press <Next>.
If you use TLS, press <On>. Configure the setting of the keys and certificates. Configuring the Key and Certificate for TLS
If you set the <Authentication Management> and TLS setting to <On>, the setting of <Authentication Type> in <WebDAV Server Settings> is set to <Basic>. <Advanced Box Settings> <WebDAV Server Settings>
If you set to <By SMB> and set the <Authentication Management> setting to <On>
1 | Select the authentication type. 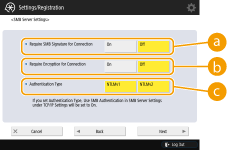 <Require SMB Signature for Connection> <Require SMB Signature for Connection>To request an SMB packet signature when connecting to an SMB server, press <On>. <Require Encryption for Connection>To request a connection with SMB v3.0 encrypted communication when connecting to an SMB server, press <On>. <Authentication Type>If you set the authentication type, <Use SMB Authentication> in <SMB Server Settings> is set to <On>. <TCP/IP Settings> |
2 | Press <Next>. |
If you set to <By SMB> and set the <Authentication Management> setting to <Off>
You don't need to configure the setting. Proceed to Step 6.
6
Press <OK>.
7
Press (Settings/Registration) <Yes>.
(Settings/Registration)  |
Even if <Prohibit Writing from External> is set to <On>, users with the Administrator privileges can perform the following operations. Operate folders/edit files by directly connecting to the Advanced Box from Windows Explorer on a computer. Operate folders/edit files from <Network> in <Scan and Store> or <Access Stored Files> on the touch panel display. |
Sending E-Mail Notification When Saving Is Complete
You can notify a user via e-mail that a file has been saved in the Advanced Box of the machine. The notification e-mail contains the path (URI: Uniform Resource Identifier) to the folder that includes the file.
|
A maximum of 16 URI TX Settings can be registered. |
1
Start the Remote UI. Starting the Remote UI
2
Click [Settings/Registration] on the portal page. Remote UI Screen
3
Click [Store/Access Files] [Advanced Box Settings].
4
Click [URI TX Settings].
5
Click [Enable].
The notification status changes to <Enabled>, and all the registered URI TX Settings are enabled.
6
Click [Register New...].
7
Carry out the necessary settings.
 [Path to Folder]
Enter the path of the folder to notify.
When the Advanced Box Is Opened as an SMB Server
Enter the IP address or host name of the machine plus "\share" or "\users", followed by "\folder_name".
Input example (to specify the "documents" folder in the Shared Space)
\\192.168.1.21\share\documents
Input example (to specify the "suzuki" folder in the Personal Space)
\\192.168.1.21\users\suzuki
When the Advanced Box Is Opened to Public as a WebDAV Server
Enter the URL in the format "http(s)://<IP address or host name of the machine>/<share or users>/<folder name>".
Input example (to specify the "documents" folder in the Shared Space when SSL is disabled)
http://192.168.1.21/share/documents
Input example (to specify the "suzuki" folder in the Personal Space when SSL is enabled)
https://192.168.1.21/users/suzuki
[Notice Timing]Select the timing for sending the URI TX.
[When specified as a store location in Scan and Store] | Notification is sent each time a file is saved in the specified folder inside the Advanced Box from <Scan and Store> on the touch panel display. However, notification is not sent when a file is saved in or a folder is added to a subfolder. |
[When a loopback address has been specified to send or forward] | Notification is sent each time a file is saved in the specified folder inside the Advanced Box from a loopback address (an address that indicates this machine on a network) using the Sending or Forwarding function. However, notification is not sent when a file is saved in or a folder is added to a subfolder. Specify a loopback address when using the Advanced Box of the machine as the destination for <Scan and Send> or <Forwarding Settings>. Registering Destinations in the Address Book |
[When the total of documents and sub-folders in the folder reaches 700] | Notification is sent when the total number of files and subfolders in the folder specified for notification in reaches 700. Files and folders inside subfolders are not counted. |
[When the total of documents and sub-folders in the folder reaches 900] | Notification is sent when the total number of files and subfolders in the folder specified for notification in reaches 900. Files and folders inside subfolders are not counted. |
You can save a maximum of 1,000 files or sub-folders inside the specified folder.
[Notice Destination]Specify the destination e-mail address in [Select Destination].
You can set a single e-mail address registered in the address book or a single e-mail address group as the destination to notify.
[Subject]Enter the subject for the e-mail (up to 40 characters).
 [Message]
Enter the message for the e-mail (up to 140 characters).
In addition to the text entered here, the path to the folder specified in and the file name are also added to the e-mail message.
and the file name are also added to the e-mail message.8
Click [OK].