WebDAV Server Settings
The WebDAV sending function is a function for sending scanned image files or image files sent from the mail boxes or Memory RX Inbox of the machine, to a WebDAV server directory on the Internet or your intranet, using the WebDAV protocol.
This section describes the procedure for setting up a WebDAV publishing directory.
Setting up a publishing directory enables users who have the necessary access privileges to manage files in the directory.
It is recommended that you consult the administrator for the network you are using when configuring the
WebDAV server.
WebDAV server.
IMPORTANT |
Server authentication is required for sending to a WebDAV server. Enable authentication before using a WebDAV server. IIS for Windows Server 2008/7/Server 2008 R2/8.1/Server 2012/10: The authentication methods available for the server are Anonymous, Basic, or Digest authentication, and authentication errors will occur if you try to use another authentication method. If the Anonymous authentication method is enabled, access rights are assigned to all users, and IIS always performs anonymous authentication, even if either of the other two authentication methods are enabled. (The priority level is Anonymous authentication > Digest authentication > Basic authentication.) If a high level of security is required, disable anonymous authentication. Use the user names and passwords registered in the address book of the WebDAV server for the Basic and Digest authentication methods. For instructions on how to set the authentication method for IIS, see the IIS documentation. Apache: The authentication methods available for the server are the Basic and Digest authentication methods, and authentication errors will occur if you try to use another authentication method. If you set both the Basic and Digest authentication methods, the authentication method you set last will be enabled. Use the user names and passwords registered in the address book of the WebDAV server for authentication. For instructions on setting authentication methods, see the Apache Software Foundation Web site at http://www.apache.org/. |
IIS for Windows Server 2008/7/Server 2008 R2/8.1/Server 2012/10
The procedure below uses items of Windows 8.1 as an example. Depending on your environment, the items you see on the screen may differ.
1.
In the [C:/Inetpub] folder of the computer you are using, create a physical directory to use as the sending destination.
IMPORTANT |
The physical directory cannot be created in the [C:/Inetpub/wwwroot] folder, because the default DACL of wwwroot differs from that of other directories. |
2.
Start IIS → create a virtual directory.
If you are using IIS 5.1/6.0:
Start IIS Manager.
From IIS snap-in, select the Web site to which to add a directory.
From the [Action] menu, select [New] → [Virtual Directory].
Follow the instructions on the Virtual Directory Creation Wizard to complete the creation of the directory.
If you are using IIS 7.0/IIS 7.5/IIS 8.0/IIS 8.5:
Start IIS Manager.
Right-click [Default Web Site] in the Connections pane on the left side of the IIS Manager → select [Add Virtual Directory].
Enter an alias and physical path → click [OK].
3.
Specify the directory path created in step 1 as a physical path to the virtual directory.
4.
Set access permissions in the properties for the virtual directory.
If you are using IIS 5.1:
Right-click the virtual directory → click [Properties].
Select [Write] → click [OK].
If you are using IIS 6.0:
Click [Allow] for [WebDAV] in [Web Service Extensions] of the IIS Manager.
If you are using IIS 7.0/IIS 7.5/IIS 8.0/IIS 8.5:
Select the virtual directory you have created from the Connections pane on the left side of the IIS Manager.
Double-click [WebDAV Authoring Rules] in [Home].
Click [Add Authoring Rule] in [Actions].
In the [Add Authoring Rule] dialog box, enter the appropriate access settings → click [OK].
Select the virtual directory again from the Connections pane on the left side of the IIS Manager.
Click [Edit Permissions] in [Actions].
Set the access permissions for the physical directory in the [Security] tab of the properties dialog box → click [OK].
5.
Specify the settings for TLS encrypted communication.
See the IIS documentation to specify the settings for TLS encrypted communication.
6.
Set a recipient address using the control panel.
Sample recipient settings:
Server side settings:
Create a physical directory named "C:/Inetpub/export/share/home/users/", and then create a virtual directory that links to the physical directory as the folder to which files are sent.
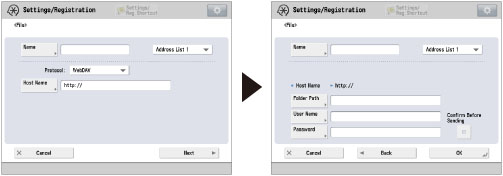
The machine's address settings:
<Protocol:>: | WebDAV |
[Host Name]: | https://example.cse.canon.co.jp/ |
[Folder Path]: | /export/share/home/users/ |
[User Name]: | User name for the Basic and Digest authentication methods of the WebDAV server |
[Password]: | Password for the Basic and Digest authentication methods of the WebDAV server |
IMPORTANT |
Up to 128 alphanumeric characters can be entered for [Host Name] on the control panel. Also, up to 255 alphanumeric characters can be entered for [Folder Path]. Specify the server settings within the character limits. If you change the language of the touch panel display, [Host Name] and [Folder Path] may not appear correctly. If the language of the touch panel display differs from the computer used as a master browser, [Host Name] and [Folder Path] may not appear correctly, or you may not be able to browse the directories. To send to an IPv6 host, set [Host Name] using the following format: <IPv6 address>:<Port number> Example: [5aed:90a0:bc05:01d2:568a:2fc0:0001:12ee]:21000 |
Apache
The following procedures describe how to create the "users/user_name/WebDAV" directory using the procedure for creating the directory under "C:/Program Files/Apache Group/Apache2" in the Windows file system as an example.
1.
Edit httpd.conf.
Erase # on the left of the line to enable the WebDAV modules.
Directive to be changed:
Before change
#LoadModule dav_module modules/mod_dav.so
#LoadModule dav_fs_module modules/mod_dav_fs.so
After change
LoadModule dav_module modules/mod_dav.so
LoadModule dav_fs_module modules/mod_dav_fs.so
Specify the server name.
Directive to be changed:
Before change
#ServerName localhost:80
After change
#ServerName localhost:80
ServerName Apache-Server.ccm.canon.co.jp:80
Change the user directory.
Directive to be changed:
Before change
UserDir "My Documents/My Website"
After change
# UserDir "My Documents/My Website"
UserDir "C:/Program Files/Apache Group/Apache2/users""
To enable the DAV function, add the following directive:
<Location /~user_name/WebDAV>
DAV On
</Location>
2.
After specifying the settings for TLS encrypted communication, configure httpd.conf so that the Apache service starts with TLS support.
For more information, see the Apache Software Foundation Web site at http://www.apache.org/.
3.
Restart Apache.
4.
Set a recipient address using the control panel.
Sample recipient settings:
Server side settings:
Create the "users/user_name/WebDAV" directory under "C:/Program Files/Apache Group/ Apache2" as the folder to send files to.
The machine's address settings:
<Protocol:>: | WebDAV |
[Host Name]: | https://Apache-Server.ccm.canon.co.jp/ |
[Folder Path]: | /~user_name/WebDAV/ |
[User Name]: | User name for the Basic and Digest authentication methods of the WebDAV server |
[Password]: | Password for the Basic and Digest authentication methods of the WebDAV server |
IMPORTANT |
Up to 128 alphanumeric characters can be entered for [Host Name] on the control panel. Also, up to 255 alphanumeric characters can be entered for [Folder Path]. Specify the server settings within the character limits. If you change the language of the touch panel display, [Host Name] and [Folder Path] may not appear correctly. If the language of the touch panel display differs from the computer used as a master browser, [Host Name] and [Folder Path] may not appear correctly, or you may not be able to browse the directories. To send to an IPv6 host, set [Host Name] using the following format: <IPv6 address>:<Port number> Example: [5aed:90a0:bc05:01d2:568a:2fc0:0001:12ee]:21000 |
IMPORTANT |
If IIS is not installed in the computer you are using, you will need to install the version of IIS for the operating system you are using before entering these settings. (See "Sending Data.") For installation procedures, see the manuals provided with your operating system. If you use WebDAV transmission with IIS 7.0/IIS 7.5/IIS 8.0/IIS 8.5, use either Basic authentication or Digest authentication. When connecting to a WebDAV server via a proxy with Digest authentication set using IIS 6.0, it is necessary to set <Use Divided Chunk Send for WebDAV TX> to 'On' from the control panel of the machine. (See "Gegevens in fragmenten verdelen bij verzending met WebDAV.") If you use WebDAV with IIS 7.0, you must download the Microsoft WebDAV Extension from the IIS web site and install it separately. For details, refer to the IIS documentation. Apache 1.3 is provided with macOS. If Apache is not installed in the computer you are using, refer to "Sending Data" and install the version for the operating system you are using (downloadable from the Apache Software Foundation Web site at http://www.apache.org/) before entering these settings. If you want to use TLS, install a version of Apache that supports TLS (downloadable from the Apache-SSL official Web site at http://www.apache-ssl.org/). After installing Apache, start it and confirm that the Apache service is working properly. If you are using macOS, root has ownership of the Apache setting file (/etc/httpd/httpd.conf). In this case, perform one of the following procedures before specifying the WebDAV settings. For more information, see the documentation provided with your macOS or the Apache Software Foundation Web site at http://www.apache.org/. Obtain root access from the Terminal, using the sudo or su command In the Finder, temporarily change the permissions for the Apache setting file to give permission to the user who will set the WebDAV server (return the permissions for the Apache setting file to their original values after setting the WebDAV server.) |