Forwarding Settings
The Remote UI enables you to specify the forwarding conditions for forwarding received documents.
NOTE |
To specify forwarding settings, it is necessary to log in as an administrator. |
1.
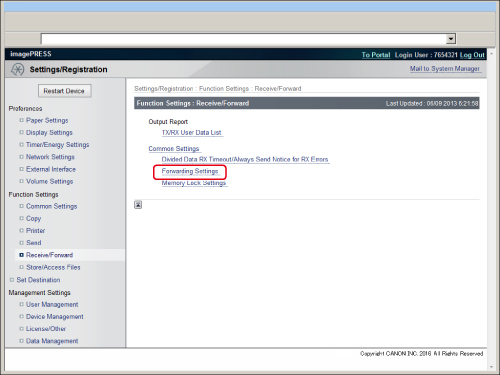
Click [Settings/Registration] → select [Receive/Forward] for <Function Settings> → click [Forwarding Settings].
2.
Add/edit/delete a forwarding setting.
You can restrict the type of receiving modes by selecting from the drop-down list. If you select [All], all the forwarding settings stored in the machine are displayed.
NOTE |
The types of receiving modes that can be selected vary depending on the optional equipment attached to the machine. |
To add a new forwarding condition:
Click [Add New Conditions...] → specify the desired settings → click [OK].
Details of each item are shown below.
Receive Method: | Select the receiving mode. |
Forwarding Condition Name: | Enter a name for the forwarding condition. If you select [Enable This Forwarding Condition], this forwarding condition will be enabled. |
Forwarding Conditions: | The settings here enable you to specify the forwarding conditions that the received documents must meet in order to be forwarded. |
Forwarding Destination: | To specify an address from the Address Book, select [Select Destination from Address List] → click [Select Destination] → select the desired address from the displayed list. If you want to forward documents to a Confidential Fax Inbox, select [Select from Confidential Fax Inbox] → click the drop-down list → select the desired Confidential Fax Inbox to forward documents to. If you want to send a link via e-mail to the Confidential Fax Inbox that the documents are stored, select [Enable URL Send]. |
Forwarding Settings: | Specify the necessary settings for forwarding documents, such as the document name and file format. Select the file format of the forwarded document from the list. If you want to divide the document into separate pages before forwarding it, select [Divide into Pages]. If you want to specify the time when forwarding is enabled, select [Specify Forwarding Time]. If you want to enable forwarding every day, select [Everyday] → set the start and end times. If you want to enable forwarding on certain days only, select [Specify Period] → specify the day, start time, and end time to enable forwarding. If you want a confirmation notice to be sent whenever forwarding completes successfully, select [Forwarding Done Notice] → click [Select Destination] → select the destination for the confirmation notice. If you want a notice to be sent only when there has been an error, select [Notice Only for Errors]. If you want to print the documents to be forwarded or store them in memory, select [Store/Print Received File]. |
NOTE |
For more information on forwarding conditions, see "Skanuj i wyślij" and "Wysyłanie faksu." |
To forward all received documents without specific conditions:
Click [Forwarding without Conditions] → specify the desired settings → click [OK].
Details of each item are shown below.
Receive Method: | Select the receiving mode. |
Enable This Forwarding Condition: | Enables the forwarding condition registered here. |
Forwarding Destination: | To specify an address from an address list, select [Select Destination from Address List] → click [Select Destination] → select the desired address from the displayed list. If you want to forward documents to a Confidential Fax Inbox, select [Select from Confidential Fax Inbox] → click the drop-down list → select the desired Confidential Fax Inbox to forward documents to. If you want to send a link via e-mail to the Confidential Fax Inbox that the documents are stored, select [Enable URL Send]. |
Forwarding Settings: | Select the file format of the forwarded document from the list. If you want to divide the document into separate pages before forwarding it, select [Divide into Pages]. If you want a confirmation notice to be sent whenever forwarding completes successfully, select [Forwarding Done Notice] → click [Select Destination] → select the destination for the confirmation notice. If you want a notice to be sent only when there has been an error, select [Notice Only for Errors]. If you want to print the documents to be forwarded or store them in memory, select [Store/Print Received File]. |
To edit a forwarding condition:
Click the forwarding condition name → edit the desired settings → click [OK].
To set the e-mail priority:
Click [E-Mail Priority Settings...] → select the desired priority → click [OK].
E-mail Priority:
High: Use this priority setting for important e-mails.
Normal: Use this priority setting for ordinary e-mails.
Low: Use this priority setting for e-mails with a low priority.
To delete forwarding settings:
Select the forwarding condition you want to delete → click [Delete Forwarding Settings].
Click [OK] when the confirmation dialog box appears.
IMPORTANT |
Once a forwarding setting is deleted, it cannot be retrieved. |
NOTE |
You can also specify forwarding settings from the control panel of the machine by pressing [Function Settings] (Settings/Registration) → [Receive/Forward] → [Common Settings] → [Forwarding Settings]. For instructions on using the control panel to specify forwarding settings and more information on forwarding settings, see "Odbiór/Przekazanie." |