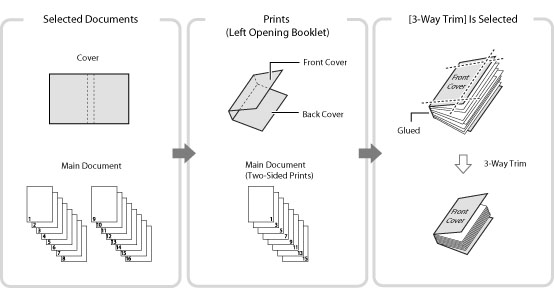
Perfect Binding
This mode enables you to print one-sided or two-sided originals in such a way that the prints are glued together to make a booklet.
For information on the optional products required to use this function, see "Produtos opcionais necessários para cada função."
IMPORTANT |
This mode cannot be used with jobs without a job ticket. This mode is available for the job with a job ticket which the perfect binding mode is already set. The Perfect Binding mode can be set only if the Perfect Binder-E is attached. Be sure to correctly set the paper type. If the type of paper is not set correctly, especially when you use special types of paper, such as heavy paper, it could adversely affect the quality of the image. Moreover, the fixing unit may become dirty, or the paper could jam, and a service repair may be needed. Before performing perfect binding, we recommend you to check the curl state of a using paper type. You need to print out the main document and a cover to the finisher or stacker, and check that curl is within the following specified value. 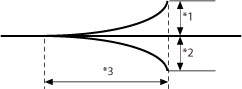 *1 Height of Curl: Less than +3 mm *2 Height of Curl: Less than -3 mm *3 Length of Curl: More than 15 mm If you use the paper type that curls easily exceeding the specified value for perfect binding, the following problems may occur: The finishing size of output is different from the specified one. Paper jam occurs. Error occurs. |
NOTE | ||||
On the Job Hold screen, you can only confirm and adjust such the settings as shown in the table below. To change overall settings, store the file to a Mail Box and specify settings again.
|
1.
Press  → [Hold].
→ [Hold].
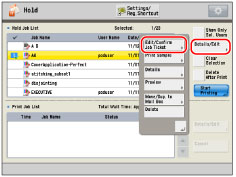
2.
Select the desired job → press [Details/Edit] → [Edit/Confirm Job Ticket].
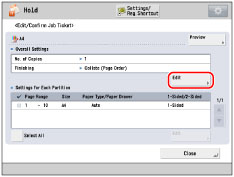
3.
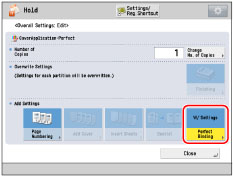
Press [Edit] under <Overall Settings>.
4.
Press [Perfect Binding].
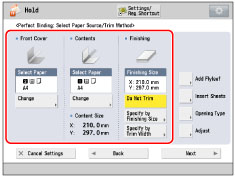
5.
Confirm the selected paper size and finishing size for the cover page and the main document.
IMPORTANT |
If you press [Cancel Settings], settings which are already specified for the job are canceled, and you cannot change the settings in the Job Hold screen. |
6.
Confirm the perfect binding print settings.
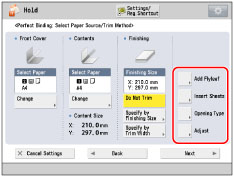
Adding Flyleaves:
Press [Add Flyleaf].
Confirm the print settings in [Front Cover] and [Back Cover] → press [OK].
Inserting Sheets:
Press [Insert Sheets].
Confirm the type of sheet insertions.
Press [OK].
Confirming the Finishing Format:
Press [Opening Type] → confirm the finishing format → press [OK].
[Left Opening]: | A booklet that opens to the left is created. |
[Right Opening]: | A booklet that opens to the right is created. |
7.
Press [Adjust] → select the item to adjust.
If you do not want to specify the detailed settings, proceed to step 8.
Adjusting the Image Location of the Main Document:
Press [Content Img Position].
Press [-] or [+] to shift the image for the main document vertically → [OK ].
NOTE | ||||
If you enter a value other than 0, you can switch between the positive and negative adjustment amount by pressing [±].
|
Press [Close].
Adjusting the Trim Angle:
Press [Trim Angle].
Press [-] or [+] to adjust the trim angle → [OK].
NOTE | ||||
If you enter a value other than 0, you can switch between the positive and negative adjustment amount by pressing [±].
|
Press [Close].
Adjusting the Image Location of the Cover Page:
Press [Cover Image Position].
Press [-] or [+] to shift the image on the cover page → [OK].
NOTE | ||||
If you enter a value other than 0, you can switch between the positive and negative adjustment amount by pressing [±].
|
Press [Close].
Adjusting the Trim Location:
Press [Trim Position].
Press [-] or [+] to shift the trim location → [OK].
NOTE | ||||
If you enter a value other than 0, you can switch between the positive and negative adjustment amount by pressing [±].
If the amount of the trimming is between 6.0 mm to 50.0 mm, each setting can be applied. |
Press [Close].
Adjusting slightly the Finishing Size:
Press [Fine Adjust Finishing Size].
Press [-] or [+] to reduce a difference between the finishing size and the trim location that the machine performs → [OK].
NOTE | ||||
If you enter a value other than 0, you can switch between the positive and negative adjustment amount by pressing [±].
|
Press [Close].
8.
Press [Next].
9.
Confirm the settings of the sides of the document to print on → press [Next].
If you do not want to print on the front and back covers, press [OK] → proceed to step 11.
10.
Press [-] or [+] to adjust the spine width → [OK].
11.
Press [Close].