Collating Prints
You can select Finishing modes to collate print output in various ways, by pages or print sets.
For information on the optional products required to use this function, see "Produtos opcionais necessários para cada função."
IMPORTANT |
The Finishing modes cannot be used with jobs without a job ticket. Be sure to correctly set the paper type. If the type of paper is not set correctly, especially when you use special types of paper, such as heavy paper, it could adversely affect the quality of the image. Moreover, the fixing unit may become dirty, or the paper could jam, and a service repair may be needed. If you set the Staple, Hole Punch, or Z-Fold mode, the side of the paper which is printed on will always be output face down. |
Specifying the Finishing Mode
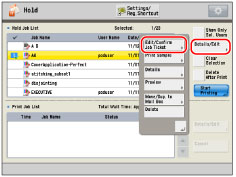
1.
Press  → [Hold].
→ [Hold].
2.
Select the desired job → press [Details/Edit] → [Edit/Confirm Job Ticket].
3.
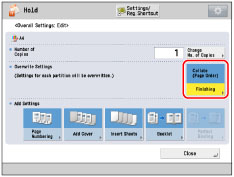
Press [Edit] under <Overall Settings>.
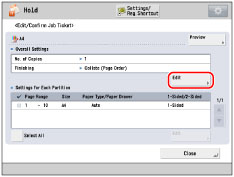
4.
Press [Finishing].
5.
Select the output destination → press [Next].
This screen is only displayed when both the finisher and the High Capacity Stacker-H are attached.
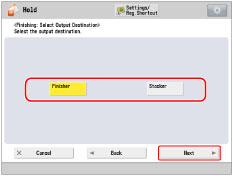
If this screen is not displayed, proceed to step 6.
If you select [Finisher], proceed to step 6.
If you select [Stacker], select the output destination from the drop-down list.
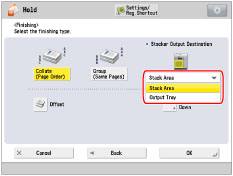
NOTE |
If you select [Stacker], you can change the output destination for each job to either [Stack Area] or [Output Tray]. |
6.
Set the desired finishing mode.
 |  |
When the Output Destination Is Set to the Finisher | When the Output Destination is set to the Stack Area of the Stacker |
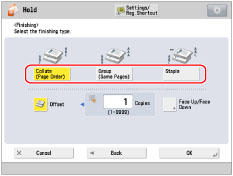
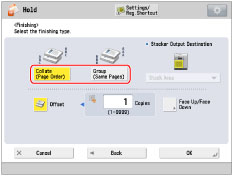
Select [Collate (Page Order)], [Group (Same Pages)], or [Staple].
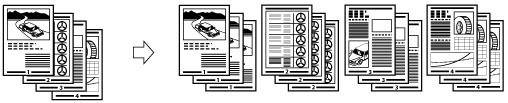
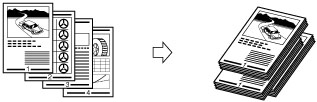
Page Order (Collate):
When printing multiple copies of a file, you can collate the output into separate prints.
Example: Three prints of each page collated in page order

Press [Collate (Page Order)] → [OK].
Same Page (Group):
When printing multiple copies of a file, you can group each page together.
Example: Three prints of each page grouped by page
Press [Group (Same Pages)] → [OK].
Page Order (Staple):
When printing multiple copies of a file, you can staple the output for separate prints.
If you select [Corner]:
Staples the output in one location.
If you select [Double]:
Staples the output in two locations, on the left or right side.
If you select [Saddle Stitch]:
Staples the output in two locations along the saddle stitch position.
If you select [Staple-Free (Max 5 pg.)]:
You can bind the paper by crimping without using staples. This is convenient for when you want to save staples or temporarily bind the paper, as you can easily tear off the paper by rubbing the crimped part.
Press [Staple] → [Next].
Select the stapling type and position → press [OK].
If you select [Saddle Stitch], you can specify the following settings:
Selecting the paper
Press [Change] for <Select Paper> → select the paper source → press [OK].
Trimming the edges of the booklet
When both the Booklet Trimmer-F and Two-Knife Booklet Trimmer-A are attached to the Booklet Finisher-W PRO:
Press [Trim] → select [Specify by Finishing Size] or [Specify by Trim Width] → select [Vertical Trim] or [3-Way Trim] → specify the desired finishing size or trim width → press [OK] → [OK].
When only the Booklet Trimmer-F is attached to the Booklet Finisher-W PRO:
Press [Trim].
Adjusting the trim position
When both the Booklet Trimmer-F and Two-Knife Booklet Trimmer-A are attached to the Booklet Finisher-W PRO:
Press [Trim] → [Adjust Trim Position] → adjust the trim position using [-] or [+] → press [OK] → [OK].
When only the Booklet Trimmer-F is attached to the Booklet Finisher-W PRO:
Press [Adjust] → [Adjust Trim Width] → specify the trim width →press [OK] → [Close].
Adjusting the strength of the saddle press
Press [Saddle Press] → adjust the strength of the saddle press → press [OK].
Adding a cover
Press [Add Cover] → select whether to print on the cover → press [OK].
If you feed cover paper from the Document Insertion Unit-N, select [Leave Blank].
Changing the saddle stitch position
When both the Booklet Trimmer-F and Two-Knife Booklet Trimmer-A are attached to the Booklet Finisher-W PRO:
Press [Change Fold/Stitch Pos.] → select the paper size → adjust the saddle stitch position using [-] or [+] → press [OK] → [Close].
When only the Booklet Trimmer-F is attached to the Booklet Finisher-W PRO:
Press [Adjust] → [Change Fold/Stitch Pos.] → select the paper size → adjust the saddle stitch position using [-] or [+] → press [OK] → [Close].
When the Booklet Finisher-AC is attached:
Press [Change Fold/Stitch Pos.] → select the paper size → adjust the saddle stitch position using [-] or [+] → press [OK] → [Close].
IMPORTANT |
The paper used for the cover page must be the same size as that which is used for the main document. If you load preprinted paper to use as the cover page into the document insertion unit, you must load the paper face up. The following shows the paper weight that you can use when the Booklet Finisher-W PRO is attached. For the cover page and main document: 52 g/m2 to 300 g/m2 (14 lb bond to 110 lb cover) The following shows the paper weight that you can use when the Booklet Finisher-AC is attached. For the main document: 52 g/m2 to 220 g/m2 (14 lb bond to 80 lb cover) For the cover page: 52 g/m2 to 256 g/m2 (14 lb bond to 140 lb index) The [Saddle Stitch] mode can be set only if 2-Sided Printing is set. The accuracy of folds created in the Saddle Stitch mode may vary, depending on the paper type and the number of sheets. The Trim mode can be set if the Booklet Trimmer-F or the Two-Knife Booklet Trimmer-A is attached to the Booklet Finisher-W PRO. |
Other Modes Compatible with Finishing
Offset
If you set [Offset], you can specify the number of print sets to offset. The prints are slightly offset vertically in the output tray as shown below.
Face Up/Face Down
You can specify whether the printed sheets are face up or face down, press [Face Up/Face Down] and select from the following:
[Auto]: | If you are printing a single page original, the printed sheets are output face up. Otherwise, the printed sheets are output face down. |
[Face Down (Normal Order)]: | Printed sheets are always output face down. |
[Face Up (Reverse Order)]: | Printed sheets are always output face up. |
Trim
When both the Booklet Trimmer-F and Two-Knife Booklet Trimmer-A are attached:
The machine trims the fore edges and top/bottom of prints in the Saddle Stitch mode.
When only the Booklet Trimmer-F is attached:
The machine trims the fore edges of prints in the Saddle Stitch mode.

IMPORTANT |
You can set [Trim] only if you select [Saddle Stitch]. |
NOTE |
If both the Booklet Trimmer-F and Two-Knife Booklet Trimmer-A are attached, you can select the fore-edge trimming individually. |
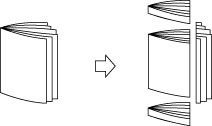
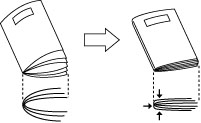
Saddle Press
This mode enables you to compress a saddle stitched booklet spine.
IMPORTANT |
The Saddle Press mode is set automatically when you select [Saddle Stitch]. |
NOTE |
To make sure that the [Saddle Press] setting is effective, you must saddle stitch more than nine sheets of paper (including one cover sheet). |
Finishing features available with each optional unit
 : Available
-: Unavailable
Optional Unit | Collate (Page Order) | Group (Same Pages) | Offset | Staple | Hole Punch*2 | Multiple Hole Punch*2 | |||
Corner | Double | Saddle Stitch | Staple-Free (Max 5 pg.) | ||||||
None | | | - | - | - | - | - | - | - |
Copy Tray-R | | | - | - | - | - | - | - | - |
Staple Finisher-W PRO | | | | | | - | - | - | - |
Staple Finisher-W PRO and Puncher Unit | | | *1 | | | - | - | *1 | - |
Staple Finisher-W PRO and Multi Function Professional Puncher-B | | | *1 | | | - | - | *1 | *1 |
Staple Finisher-W PRO and Paper Folding Unit-J | | | | | | - | - | - | - |
Booklet Finisher-W PRO | | | | | | | - | - | - |
Booklet Finisher-W PRO and Puncher Unit | | | *1 | | | | - | *1 | - |
Booklet Finisher-W PRO and Multi Function Professional Puncher-B | | | *1 | | | | - | *1 | *1 |
Booklet Finisher-W PRO and Paper Folding Unit-J | | | | | | | - | - | - |
Booklet Finisher-W PRO and Booklet Trimmer-F | | | | | | | - | - | - |
Booklet Finisher-W PRO, Booklet Trimmer-F, and Two-Knife Booklet Trimmer-A | | | | | | | - | - | - |
High Capacity Stacker-H | | | *3 | - | - | - | - | - | - |
Staple Finisher-AC | | | | | | - | - | - | - |
Staple Finisher-AC and Hole Puncher | | | | | | - | - | | - |
Booklet Finisher-AC | | | | | | | - | - | - |
Booklet Finisher-AC and Hole Puncher | | | | | | | - | | - |
Optional Unit | Fold*2 | Trim | Face Up/Face Down | Saddle Press | ||
Saddle Fold | Z-Fold, C-Fold, Half Fold, Accordion Z-Fold, Double Parallel Fold | Fore Edges of Booklet | Top/Bottom of Booklet | |||
None | - | - | - | - | | - |
Copy Tray-R | - | - | - | - | | - |
Staple Finisher-W PRO | - | - | - | - | | - |
Staple Finisher-W PRO and Puncher Unit | - | - | - | - | | - |
Staple Finisher-W PRO and Multi Function Professional Puncher-B | - | - | - | - | | - |
Staple Finisher-W PRO and Paper Folding Unit-J | - | | - | - | | - |
Booklet Finisher-W PRO | | - | - | - | | |
Booklet Finisher-W PRO and Puncher Unit | | - | - | - | | |
Booklet Finisher-W PRO and Multi Function Professional Puncher-B | | - | - | - | | |
Booklet Finisher-W PRO and Paper Folding Unit-J | | | - | - | | |
Booklet Finisher-W PRO and Booklet Trimmer-F | | - | | - | | |
Booklet Finisher-W PRO, Booklet Trimmer-F, and Two-Knife Booklet Trimmer-A | | | | | | |
High Capacity Stacker-H | - | - | - | - | | - |
Staple Finisher-AC | - | - | - | - | | - |
Staple Finisher-AC and Hole Puncher | - | - | - | - | | - |
Booklet Finisher-AC | | - | - | - | | - |
Booklet Finisher-AC and Hole Puncher | | - | - | - | | - |
*1 When using custom paper sizes, and both the Hole Punch mode and the Offset mode are set, the edge of paper may become curled or creased. In this case, set the Offset mode to 'Off'.
*2 These modes are available for the job ticket that only applies to certain pages of a job (partition). For more information, see "Editing the Settings of Each Partition."
*3 This mode is available only if you set the output destination to [Stack Area] of the stacker.
Maximum number of sheets you can staple
The maximum number of sheets that can be stapled differs, depending on the paper size.
When the Staple Finisher-W PRO or Booklet Finisher-W PRO is attached
Paper Size | Corner | Double | Saddle Stitch* |
330 x 483 mm | - | - | 25 sheets |
305 x 457 mm | - | - | 25 sheets |
SRA3 | - | - | 25 sheets |
A3 | 50 sheets | 50 sheets | 25 sheets |
A4R | 50 sheets | 50 sheets | 25 sheets |
A4 | 100 sheets | 100 sheets | - |
A5R | - | - | - |
A5 | - | - | - |
* You can set Saddle Stitch only if the Booklet Finisher-W PRO is attached.
When the Staple Finisher-AC or Booklet Finisher-AC is attached
Paper Size | Corner | Double | Saddle Stitch*1 |
305 x 457 mm (12" x 18") | - | - | 16 sheets |
SRA3 (12 5/8" x 17 11/16") | - | - | - |
A3 | 30 sheets | 30 sheets | 20 sheets |
B4 | 30 sheets | 30 sheets | 20 sheets |
A4R | 30 sheets | 30 sheets | 20 sheets |
A4 | 65 sheets | 65 sheets | - |
B5R | - | - | - |
B5 | 65 sheets | 65 sheets | - |
A5R | - | - | - |
A5 | - | - | - |
11" x 17" | 30 sheets | 30 sheets | 16 sheets |
LGL | 30 sheets | 30 sheets | 16 sheets |
LTRR | 30 sheets | 30 sheets | 16 sheets |
LTR | 65 sheets | 65 sheets | - |
EXEC | 65 sheets | 65 sheets | - |
STMTR | - | - | - |
STMT | - | - | - |
*1 You can set Saddle Stitch only if the Booklet Finisher-AC is attached.
NOTE |
For information on the original orientation and paper orientation when performing stapling, see "Relação entre a orientação do original e a orientação do papel." |
NOTE |
For information on optional products that can be used with this machine, see the following: You can display the detailed information of the selected paper by pressing [Details]. |