Protocol Settings
This section describes how to specify the protocol settings for the machine using the control panel. If you are configuring the settings for the first time, use the control panel of the machine.
After configuring the settings, you can change them using software other than the control panel of the machine. For more information, see "Таблица Параметры/Регистрация."
1.
Press  .
.
.2.
Press [Preferences] → [Network] → [NetWare Settings].
NOTE |
If [NetWare Settings] is not displayed, consult your local authorized Canon dealer. |
3.
Press [On] for <Use NetWare> → specify the following items → press [Set].
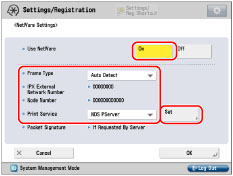
Press [Off] for <Use NetWare> if you do not want to use NetWare.
Press the <Frame Type> drop-down list → select the frame type for your environment. If you select [Auto Detect], the frame type is automatically determined.
Press the <Print Service> drop-down list → select the print service specified in "NetWare Print Service Settings." The following print services are available:
Bindery PServer: Used in the queue server mode (Bindery mode print service).
RPrinter: Used in the remote printer mode (Bindery mode print service).
NDS PServer: Used in the queue server mode (NDS print service).
NPrinter: Used in the remote printer mode (NDS print service).
IMPORTANT |
If you set <Use NetWare> to 'On', the machine will not completely enter the Sleep mode. |
4.
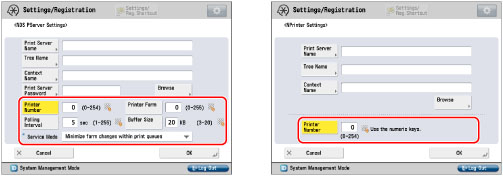
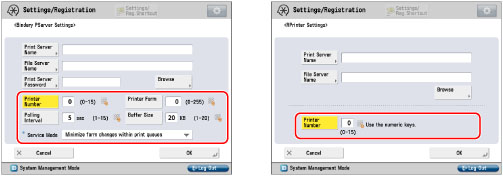
Specify the detailed print service settings → press [OK].
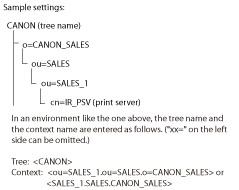
Specify the same tree, context, file server, and print server names that you specified in "NetWare Print Service Settings." (Settings differ depending on the print service. For print service settings, see <Print Service> in "Таблица Параметры/Регистрация.")
You can specify the print service settings either by selecting the desired options from the list on the screen that appears when you press [Browse], or by entering the desired character string for each item.
IMPORTANT |
If you want to specify each item from the list on the Browse screen, make sure you press [Browse] after the expiration of the time specified in "Setting the Waiting Time for Connection at Startup." |
Setting NDS PServer or NPrinter in the Browse screen (If browse rights are not limited to specific users):
Press [Browse] → [Skip Log In].
If browse rights are not limited to specific users, you can specify the print service without having to log in to NetWare.
Select the tree to which the desired print server belongs → select the context to which the desired print server belongs → select the desired print server.
Press [OK].
Specify the settings for the other items as necessary.
Setting NDS PServer or NPrinter in the Browse screen (If browse rights are limited to specific users):
Press [Browse] → press the <Tree> to which you want to log in → select the <Context> to which you want to log in → press [Log In].
In the Enter Network Password screen, enter the name in [User Name] and the password in [Password] of a user to whom browse rights are granted → press [OK].
If browse rights are limited to specific users, it is necessary to log in to NetWare as a user to whom browse rights are granted.
Enter a user name prefixed with 'CN='. If the password is not specified, leave [Password] blank.
Select the tree to which the desired print server belongs → select the context to which the desired print server belongs → select the desired print server.
Press [OK].
Specify the settings for the other items as necessary.
Setting Bindery PServer or RPrinter in the Browse screen:
Press [Browse] → select the <File Server> to which the desired print server belongs.
In the Enter Network Password screen, enter the name in [User Name] and password in [Password] of a user on the file server → press [OK].
If the password is not specified, leave [Password] blank.
Select <Print Server>.
Press [OK].
Specify the settings for the other items as necessary.
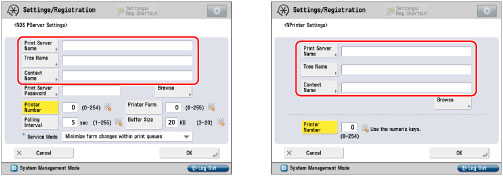
Setting NDS PServer or NPrinter using the keyboard on the touch panel display:
In [Tree Name], enter the name of the tree to which the desired print server belongs → in [Context Name], enter the name of the context to which the desired print server belongs → in [Print Server Name], enter the name of the desired print server.
If you set a print server password when using NDS PServer, press [Print Server Password] → enter the password → press [OK].
When the Confirm screen appears, enter the same password to confirm the password → press [OK].
Specify the settings for each of the other items as necessary.
Setting Bindery PServer or RPrinter using the keyboard on the touch panel display:
In [File Server Name], enter the name of the file server to which the desired print server belongs → in [Print Server Name], enter the name of the desired print server.
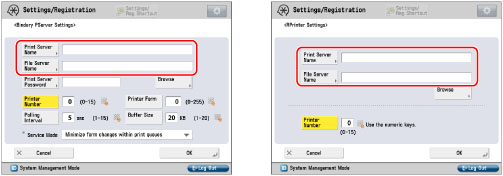
If you set a print server password when using Bindery PServer, press [Print Server Password] → enter the password → press [OK].
When the Confirm screen appears, enter the same password to confirm the password → press [OK].
Specify the settings for each of the other items as necessary.
5.
Press [OK] → [OK].