Communication Environment Setup
This section describes how to set up the environment for communication between the machine and computers on your network. If you are configuring the settings for the first time, use the control panel of the machine.
After configuring the settings, you can change them using software other than the control panel of the machine. For more information, see "Таблица Параметры/Регистрация."
IMPORTANT |
[SNMP Settings] does not support AppleTalk networks. |
1.
Press  .
.
.2.
Press [Preferences] → [Network].
3.
Press [SNMP Settings] for [Network] → specify the SNMP v. 1 settings → press [OK].
If you want to use SNMP v. 1, press [On] for <Use SNMPv1> → set the MIB access permissions and community names.
IMPORTANT | ||||||||||||||||||||||||||||
The machine supports the SNMP v. 1 and SNMP v. 3 management functions. You can use them simultaneously. The [Read Only]/[Read/Write] functions of SNMP v. 1 and the security functions of SNMP v. 3, such as an encrypted communication path, enable you to manage devices more securely. The combinations of SNMP v. 1 and SNMP v. 3 functions you can use are shown below:
If you want to use a Canon utility, the following settings are required in some cases: Press [On] for <Use SNMPv1> → [Dedicated Comm. Settings]. Press [On] for <Dedicated Community> → [Read/Write] for <MIB Access Permission>. Press [On] for [Dedicated Port Settings]. You can restrict the IP addresses of computers on which items can be set or browsed. If you restrict IP addresses, it is not possible to set or browse detailed information concerning the machine on computers other than those whose IP addresses are allowed to send or receive data, even if <Use SNMPv1>, <Use SNMPv3>, and [Dedicated Port Settings] are set to 'On'. For more information, see "TCP/IPv4 Settings" and "TCP/IPv6 Settings." | ||||||||||||||||||||||||||||
If you want to set a Dedicated Community:
Press [On] for <Use SNMPv1> → [Dedicated Comm. Settings].
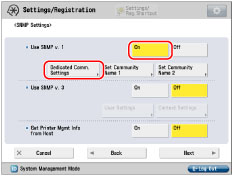
Press [On] for <Dedicated Community> → select <MIB Access Permission>.
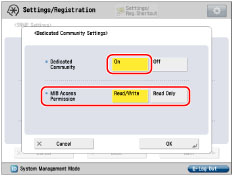
Press [OK].
If you want to set Community Name 1:
Press [On] for <Use SNMPv1> → [Set Community Name 1].
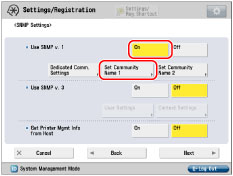
Press [On] for <Community Name 1> → select <MIB Access Permission> → press [Community Name].
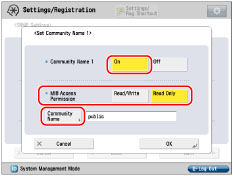
Enter the community name → press [OK].
You can change the community name in [Community Name] to a name other than 'public'.
Press [OK].
If you want to set Community Name 2:
Press [On] for <Use SNMPv1> → [Set Community Name 2].
Press [On] for <Community Name 2> → select <MIB Access Permission> → press [Community Name].
Enter the community name → press [OK].
You can change the community name in [Community Name] to a name other than 'public2'.
Press [OK].
4.
Specify the settings for SNMP v. 3 → press [OK].
If you want to use SNMP v. 3, press [On] for <Use SNMPv3> → set the user and context.
If you do not want to use SNMP v. 3, proceed to step 5.
NOTE |
An SNMP v. 3 user with the following settings is registered by default. Delete or change these settings as necessary. [User Name]: initial <MIB Access Permission>: [Read/Write] <Security Settings>: [Auth. Yes/Encry. Yes] <Authent. Algorithm>: [MD5] [Authent. Password]: initial <Encryption Algorithm>: [DES] [Encryption Password]: initial |
If you want to add an SNMP v. 3 user:
Press [On] for <Use SNMPv3> → [User Settings] → [Register].
Press [User Name].
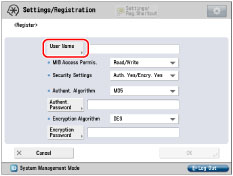
Enter the user name → press [OK].
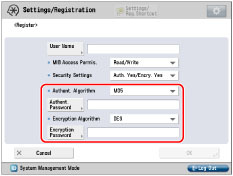
Press the <MIB Access Permis.> drop-down list → select the type of MIB access permission.
Press the <Security Settings> drop-down list → select the type of security.
[Auth. Yes/Encry. Yes]: | Applies authentication and encryption. |
[Auth. Yes/Encry. No]: | Applies only authentication. |
[Auth. No/Encrypt. No]: | Does not apply authentication or encryption. |
Specify the settings according to the type of security.
<Security Settings> | Required Settings |
[Auth. Yes/Encry. Yes]: | Select [MD5] or [SHA1] from the <Authent. Algorithm> drop-down list → set [Authent. Password]. Select [DES] or [AES] from the <Encryption Algorithm> drop-down list → set [Encryption Password]. |
[Auth. Yes/Encry. No]: | Select [MD5] or [SHA1] from the <Authent. Algorithm> drop-down list → set [Authent. Password]. |
[Auth. No/Encrypt. No]: | No settings are required. |
Press [OK].
If you want to confirm or change the SNMP v. 3 user settings:
Press [On] for <Use SNMPv3> → [User Settings] → select the user to confirm/change the settings for.
Press [Details/Edit] → confirm/change the settings → press [OK].
If you want to delete an SNMP v. 3 user:
Press [User Settings] → select the user whose settings you want to delete → press [Delete].
Press [OK].
If you want to enable/disable SNMP v. 3 for a registered SNMP v. 3 user:
Press [User Settings] → select the user you want to enable/disable SNMP v. 3 for → press [User On/Off].
Press [OK].
If you want to add a context:
Press [Context Settings] → [Register].
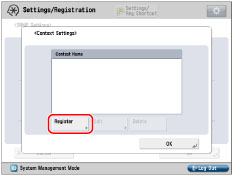
Enter the name of the context to add → press [OK].
Press [OK].
If you want to change a context name:
Press [Context Settings] → select the context whose name you want to change → press [Edit].
Enter the context name → press [OK].
Press [OK].
If you want to delete a context:
Press [Context Settings] → select the context you want to delete → press [Delete].
Press [OK].
NOTE |
A context named 'NULL' is registered by default. The 'NULL' context cannot be deleted, and is not displayed on the Context Settings screen. |
5.
Set the SNMP port monitoring function → press [Next].
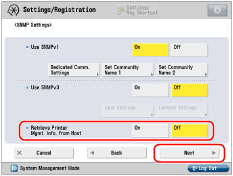
To use the SNMP port monitoring function with Windows Server 2008/7/Server 2008 R2/8.1/Server 2012/10, set <Retrieve Printer Mgmt. Info. from Host> to 'On'. If you set [Standard TCP/IP Port] for the printer driver port in the printer properties, the SNMP port monitoring function will be enabled automatically to obtain printer management information such as information on print applications and printer ports.
6.
Set [Reject SNMP Packets While in Sleep Mode] → press [OK].
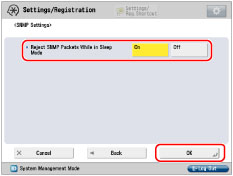
Select [On] to discard the SNMP packets that are received when the machine is in the Sleep mode.
IMPORTANT |
By setting <Reject SNMP Packets While in Sleep Mode> to 'On', you may be unable to access the machine from Canon software (iW Series) or applications using the SNMP protocol. |
7.
Press [Dedicated Port Settings] for [Network] → specify the required settings → press [OK].
Press [On] to set or browse detailed information on the machine with a Canon printer driver or utility.
IMPORTANT |
If you want to use a Canon utility, the following settings are required in some cases: Press [On] for <Use SNMPv1> → [Dedicated Comm. Settings]. Press [On] for <Dedicated Community> → [Read/Write] for <MIB Access Permission>. Press [On] for [Dedicated Port Settings]. You can restrict the IP addresses of computers on which items can be set or browsed. If you restrict IP addresses, it is not possible to set or browse detailed information concerning the machine on computers other than those whose IP addresses are allowed to send or receive data, even if <Use SNMPv1>, <Use SNMPv3>, and [Dedicated Port Settings] are set to 'On'. For more information, see "TCP/IPv4 Settings" and "TCP/IPv6 Settings." |
8.
Press [Use Spool Function] for [Network] → specify the required settings → press [OK].
Press [On] to spool print jobs transmitted to this machine on the machine's hard disk.
IMPORTANT |
If the imagePRESS Printer Kit is activated, take note of the following: If you print a file in PDF or PS format by specifying its URL on the Remote UI, the print job will always be spooled, regardless of the settings made under this option. |
NOTE |
When you spool a print job on the machine's hard disk, the time required to release a computer outputting a print job is shortened. |