Windows Server 2008/7/Server 2008 R2/8.1/Server 2012/10
In the following procedures, items displayed on the screens for Windows 8.1 are used. Depending on your environment, the items you see on the screen may differ.
Installing a New Driver
1.
The procedure for checking whether the IP address of the computer to install the driver in is allowed in the [Firewall Settings] of the machine is described in steps 13 to 14 of "TCP/IPv4 Settings," and steps 9 to 10 of "TCP/IPv6 Settings."
IMPORTANT |
If communication via the relevant IP address is not permitted in [Firewall Settings], you cannot install the driver. After you have installed the driver, if communication via the IP address of the computer you have installed it on is not permitted in [Firewall Settings], you cannot print from that computer. |
2.
Install the driver.
Install the driver according to the following procedures indicated in the manual for the driver:
If you want to use the UFR II/PCL/PS printer driver
See the procedure for dynamic installation in the Printer Driver Installation Guide.
See the procedure for dynamic installation in the Printer Driver Installation Guide.
NOTE |
The print application will be LPD and the print queue will be set to <LP> if the driver has been installed according to the above procedures. This machine enables you to specify print queues other than <LP>. You can also use Raw as the print application. For instructions on how to change the settings, see "Changing the Port After Installing the Driver." |
Changing the Port After Installing the Driver
1.
Display the icon of the printer you installed.
Windows Server 2008: From the [Start] menu, select [Control Panel] → double-click [Printer].
Windows 7/Server 2008 R2/8.1: From the [Start] menu, select [Control Panel] → [Hardware and Sound] → [Devices and Printers].
Windows Server 2012: Place the cursor on the top right (bottom right) of the desktop → select [Settings] → [Control Panel] → [Hardware and Sound]/[Hardware] → [Devices and Printers].
Windows 10: Place the cursor on the bottom left of the desktop and right-click, [Windows System] → [Control Panel] → [Hardware and Sound] → [Devices and printers].
NOTE |
Depending on the computer that you use, the operation may differ. |
2.
Right-click the icon of the printer you installed → select [Properties].
If you are using Windows Server 2008/Server 2008 R2, select [Printer properties].
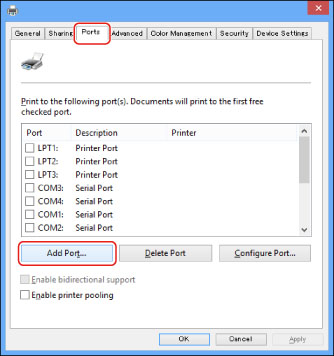
3.
Click [Ports] → [Add Port].
4.
In the [Printer Ports] dialog box, select [Standard TCP/IP Port] from [Available ports types]/[Available port types] → click [New Port].
5.
Click [Next] for Add Standard TCP/IP Printer Port Wizard.
6.
In [Printer Name or IP Address], enter the IP address or name for the printer → click [Next].
If a printer with the IP address you entered is confirmed to exist, the [Completing the Add Standard TCP/IP Printer Port Wizard] window is displayed.
If the dialog box displays <Additional Port Information Required>, follow the instructions on the screen to search again, or click [Standard] → click [Canon Network Printing Device with P9100] under [Device type] → click [Next].
7.
Click [Finish].
8.
Click [OK]/[Close].
9.
Set the port.
Setting the Port Using LPD:
In the printer properties dialog box, click [Configure Port].
Select [LPR] in [Protocol] → enter the print queue name in [Queue Name] in [LPR Settings] → click [OK].

You can specify one of the following print queues in [Queue Name].
LP
The machine prints according to its spool settings. Normally, <LP> is entered as a print queue.
The machine prints according to its spool settings. Normally, <LP> is entered as a print queue.
SPOOL
The machine prints only after spooling a print job on the machine's hard disk, regardless of its spool settings.
The machine prints only after spooling a print job on the machine's hard disk, regardless of its spool settings.
DIRECT
The machine prints without spooling a print job on the machine's hard disk, regardless of its spool settings.
The machine prints without spooling a print job on the machine's hard disk, regardless of its spool settings.
Setting the Port Using Raw:
In the printer properties dialog box, click [Configure Port] → select [Raw] in [Protocol] → click [OK].
10.
Click [OK].