
Correcting Uneven Density
If the density is uneven when printing, perform <Correct Shading>. There are various methods for correcting the density: Correction with a Densitometer using a commercial measuring instrument, Visual Correction, and Scanner Correction.

|
Adjustments may not be performed effectively if there is not sufficient toner. |
Correction with a Densitometer
Measure a test page you have output with a commercial densitometer and enter the measured density values to correct the density of halftone areas.
1
Press  (Settings/Registration)
  <Adjustment/Maintenance> <Adjust Image Quality> <Correct Shading> <Densitometer Correction>.
(Settings/Registration) 2
Press <Start Printing>.
A test page is printed.
3
Measure the test page with a densitometer.
Measure marks 1 to 7 printed on the test page, and make a note of the density values that are detected.
4
Press <Fine Adjust> for each color.
5
Enter the density values.
Enter the density values you measured and made a note of in step 3 in 1 to 7 for each color.
6
Press <OK>.
7
Press <Output Test Page> <Start Printing>.
A test page after correction is output.
8
If there is no problem with the test page, press <Store and Finish>.
If the density of the test page after correction is uneven, perform the procedure indicated in Visual Correction.
Visual Correction
Visually measure a test page you have output to perform correction using the density adjustment values you determine. Use this procedure when you do not have a densitometer or when correction is not effective.
1
Press (Settings/Registration) <Adjustment/Maintenance> <Adjust Image Quality> <Correct Shading> <Visual Correction>.
(Settings/Registration) 2
Press <Output Test Page> <Start Printing>.
A test page is printed.
3
Visually check the test page to determine the density adjustment values.

The range of marks printed for each color may be -6 to +6 or -5 to +5, depending on the paper size used for the test page.
4
Press <Fine Adjust> for each color.
5
Enter the density values.
Enter the density values according to the results that you visually checked in step 3 from -6 to +6 (or -5 to +5) for each color.
Enter a plus value to increase the density, or a minus value to decrease the density.
6
Press <OK>.
7
Press <Output Test Page> <Start Printing>.
A test page after correction is output.
8
If there is no problem with the test page, press <Store and Finish>.
Scanner Correction
You can perform density correction by scanning a test page that you have output. The machine automatically determines density correction values and corrects irregularities.
1
Press (Settings/Registration) <Adjustment/Maintenance> <Adjust Image Quality> <Correct Shading> <Scanner Correction>.
(Settings/Registration) 2
Select the paper to use and press <OK>.
3
Press <Start Printing>.
A test page is printed.
4
Place the test page on the platen glass.
|
Place the test page face down on the platen glass. Make sure the cyan bar is at the top edge of the glass. 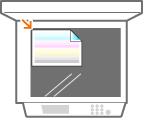 |
5
Close the feeder and press <Start Scanning>.
The test page is scanned.
6
Open the feeder and remove the test page.