
Replacing the Stamp Cartridge
0UUY-0HA 0UW1-0HA 0YRY-0H6 0X7F-0KA 0X7H-0KA 1100-0H9 0X6E-0KA 0X6W-0KA 10XJ-0H9 0X7C-0KA 0X7A-0KA 1106-0H9 0WXY-0KC 0X7E-0KA 10YY-0H9 10H3-0H7 0WR6-0KJ 0WR7-0KJ 108A-0H8 1116-0H8 10H4-0H7 0WR5-0KJ 0WR8-0KJ 0YWJ-0J4 0YWH-0KA 0YWR-0HY 0YWK-0KA 0YWE-0KA 0YWF-0KA
The machine has a function for stamping originals scanned with the feeder to indicate that they have already been scanned. This stamp is a consumable. When the stamp starts becoming faint, replace the stamp cartridge attached to the feeder.
|
For information on the product number for the stamp cartridge, see Replacement Parts. |
When the Single Pass DADF-B is attached
1
Turn the power OFF, and remove the power plug from the power outlet.

Check the operation status of the machine before turning the power OFF. You can turn the power OFF even if the machine is executing an operation, but this may cause the operation to be interrupted or data to become damaged.
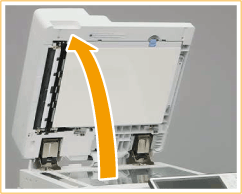
2
Open the feeder.
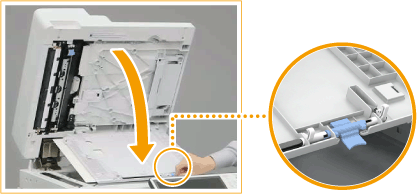
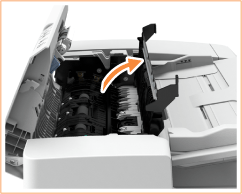
3
Open the document feed scanning area cover.
Pull the lever on top of the feeder to open the document feed scanning area cover.
Gently open the cover so that you do not damage the platen glass.
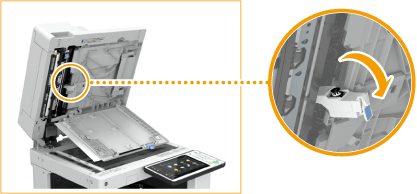
4
Open the stamp cover.
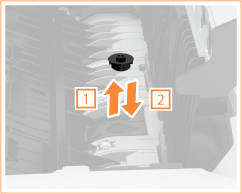
5
Replace the stamp cartridge using the included tweezers.
Remove the stamp cartridge, and place the new stamp cartridge by inserting it until a click is heard.
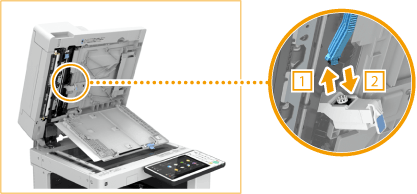
Set the stamp cartridge in proper position. If it is set inclined, paper jams may occur.
6
Close the stamp cover.
7
Close the document feed scanning area cover until it clicks into place.
8
Gently close the feeder.
9
Insert the power plug into the power outlet, and turn the power ON.
When the DADF-AV is attached
1
Turn the power OFF, and remove the power plug from the power outlet.
Check the operation status of the machine before turning the power OFF. You can turn the power OFF even if the machine is executing an operation, but this may cause the operation to be interrupted or data to become damaged.
2
Pull the lever, and open the feeder cover.

3
Open the inner cover of the feeder.
4
Replace the stamp cartridge using the included tweezers.
Remove the stamp cartridge, and place the new stamp cartridge by inserting it until a click is heard.
Make sure that the stamp cartridge is not protruding from the surface.
Set the stamp cartridge in proper position. If it is set inclined, paper jams may occur.
5
Close the inner cover of the feeder.
6
Close the feeder cover.
7
Insert the power plug into the power outlet, and turn the power ON.