Front Side


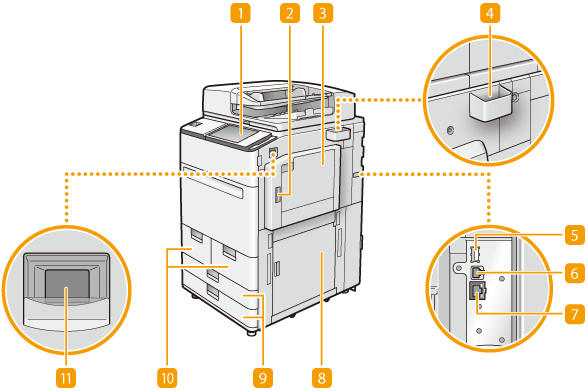
 Control panel
The control panel consists of the numeric keys,  , indicators, touch panel display, etc. You can perform all the operations and specify settings from the control panel. Control Panel
 , indicators, touch panel display, etc. You can perform all the operations and specify settings from the control panel. Control Panel
 Upper-right cover of the main unit
Open this cover when clearing a paper jam inside the machine. Paper Jams in a Paper Source
 Multi-purpose tray
Load paper into the multi-purpose tray when you want to use a type of paper different from that which is loaded in the paper deck/drawer.
 Glass cleaning cloth storage box
Use this box to store the cloth for cleaning the platen glass.
 USB port (Rear-right side of the machine)
You can connect devices such as an external hard disk to the machine. Backing Up/Restoring Data

The USB port (rear-right side of the machine) supports USB 3.0.
 USB connector
Connect a USB cable when connecting the machine and a computer.

The USB connector supports USB 2.0.
 LAN port
Connect a LAN cable when connecting the machine to a wired LAN router, etc. Setting up the Network Environment
 Lower-right cover of the main unit
Open this cover when clearing a paper jam inside the machine. Paper Jams in the Right Side of the Main Unit
 Paper drawer 1/paper drawer 2
Load the type of paper that you frequently use. You can load paper that cannot be loaded in the paper decks. Paper Deck/Drawer
 Paper deck 1/paper deck 2
Load the type of paper that you frequently use. Paper Deck/Drawer
 Power switch
Press the power switch when turning ON or OFF the machine.
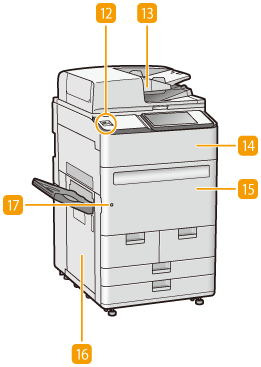
 USB port (Front side of the machine)
You can connect devices such as a USB memory device to the machine. Connecting a USB Memory Device

Some types of memory media may not be able to save data correctly.
The USB port (front side of the machine) supports USB 2.0.
 Feeder
Automatically feeds originals into the machine for scanning. When two or more sheets are loaded in the feeder, originals can be scanned continuously. Feeder
 Toner replacement cover
Open this cover when replacing the toner cartridge. Replacing the Toner Cartridge
 Front cover of the main unit
Open this cover when clearing a paper jam. Paper Jams Inside the Main Unit
 Left cover of the main unit
Open this cover when clearing a paper jam. Paper Jams in the Left Side of the Main Unit
 Main unit front cover lock indicator
Lights when the front cover of the main unit locks. Clearing Paper Jams
 |
For more information about the configuration of optional equipment installed on the machine, see Options. |
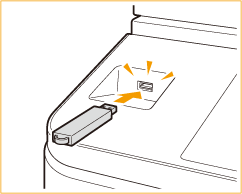
Connecting a USB Memory Device
You can connect a USB memory device to the USB port located on the left side of the control panerl, and directly print data from the USB memory device. Originals scanned using the machine can also be saved directly to the USB memory device.

 |
Make sure that the USB memory device is oriented properly when connecting it to the machine. If it is not connected properly, it may cause the USB memory device or machine to malfunction. Make sure to follow the proper procedure when removing the USB memory device. Removing the memory media Failure to do so may cause the USB memory device or machine to malfunction. The machine only supports FAT32/exFAT format USB memory device. |
 |
Unsupported devices and usagesMemory media with security functions Memory media that does not meet the USB specification Memory card readers connected via USB Connecting memory media via an extension cable Connecting memory media via a USB hub |