Customizing the Home Screen
You can add/delete shortcut buttons displayed in the Home screen according to your application or a preferred arrangement. You can also change the order that they are displayed in.
Adding Buttons to the Home Screen
You can add shortcut buttons to the Home screen for frequently used functions such as <Copy>, <Fax>, and <Scan>. For example, you can carry out tasks more quickly and efficiently by assigning a sequence of settings (e.g. "Scan both sides of an original, save it as a highly compressed PDF file and send it via e-mail") to a single button.
 |
The settings to be added as a shortcut button must be registered beforehand as Favorite Settings. Registering Frequently Used Settings |
1
Select <Home Screen Settings> in the Home screen. Home Screen
If the login screen appears, enter the correct ID and PIN. Logging in to the Machine
2
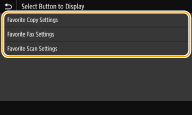
Select <Select Button to Display>.
3
Select the function with the Favorite Settings you want to add as a button.

4
Select the check box for all settings to be displayed in the Home screen and select <Apply>.


Removing registered buttons
Clear the check box for the name of the button you want to remove and then select <Apply>. Once you remove a registered button, a space appears where the button was displayed in the Home screen. If necessary, delete the space.
5
Read the message that is displayed, and select <OK>.
A button for the newly selected settings is added to the Home screen.

If the Home screen is full and no more settings can be registered, delete registered buttons and spaces in <Home Screen Settings>.
Changing the Arrangement of Buttons
To make the buttons easier to use, you can rearrange the buttons however you like. For instance, you can put the most frequently used functions first, or arrange the function buttons together with shortcut buttons for Favorite Settings. You can also insert a blank (space) instead of a button to make it easier to view the Home screen.
1
Select <Home Screen Settings> in the Home screen. Home Screen
If the login screen appears, enter the correct ID and PIN. Logging in to the Machine
2
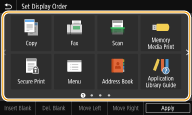
Select <Set Display Order>.
3
Select the button to move.
The selected button is highlighted. Tap the selected button again to deselect it.

4
Select <Move Left> or <Move Right>.
The button moves as many times as you tapped.
A long touch on <Move Left> or <Move Right> moves the selected button continuously.
 Inserting a blank
When <Insert Blank> is selected, a blank is inserted on the left side of the selected button.
If the button at the end is selected, a blank is inserted even if <Move Right> is selected.

Deleting a blank
Select the blank to be deleted, and select <Del. Blank>.
5
Select <Apply>.