Basic Copy Operations
This section describes the basic operation procedure used to copy an original.
1
Place the original(s). Placing Originals
2
Select <Copy> in the Home screen. Home Screen
3
Select <Number of Copies> in the Copy Basic Features screen. Copy Basic Features Screen
4
Enter the number of copies, and select <Close>.
Tap  to cancel the entered quantity.
 to cancel the entered quantity.
5
Specify the copy settings as necessary.
Selecting Color Copying or Black and White Copying
Adjusting Density
2-Sided Copying
Enlarging or Reducing
Selecting Copy Paper
Selecting Color Copying or Black and White Copying
 | Normally, the machine automatically detects whether the original is color or black and white for copying, but you can also specify it. For example, this enables you to save toner by copying color originals in black and white, or copying tickets with a single color such as red or blue to indicate the date they are distributed. |
<Select Color>  color to copy with <Auto (Color/B&W)>, <Full Color> and <Black & White>
  <Close>
 color to copy with <Auto (Color/B&W)>, <Full Color> and <Black & White>
  <Close>
<Auto (Color/B&W)>
Automatically detects the color of the original. Color pages are copied in four colors (CMYK), and black and white pages are copied in black (K) only.
<Full Color>
Copies in four colors (CMYK), regardless of the color of the original.
<Black & White>
Copies in black (K) only, regardless of the color of the original.
 |
Originals with colors close to black, originals with light colors, or originals with small color areas may be detected as black and white originals, even if you set <Auto (Color/B&W)>. |
Back to Top
Adjusting Density
 | Adjust the density of the scan if the text or images in an original are excessively light or dark. For example, you can sharpen text and lines written using a pencil. Adjusting Entire Density | |
 | Adjust the background density. You can make a clear copy of originals with colored backgrounds, or originals such as a newspaper that is printed on thin paper on which text or images on the other side are visible through the paper. Adjusting the Background Density |
<Other Settings>  <Density>
  Adjust the density
  <Apply>
 <Density>
  Adjust the density
  <Apply>
<Other Settings>  <Density>
  <Adjust Background Density>
  <Adjust (Manual)>
  Adjust the background density
  <Apply>
 <Density>
  <Adjust Background Density>
  <Adjust (Manual)>
  Adjust the background density
  <Apply>
  |
Depending on the original color, portions other than the background may be affected. If you select <Density by Color>, you can adjust the background density for each color. |
Back to Top
2-Sided Copying
 | You can copy two pages of an original on both sides of the paper. You can also copy a 2-sided original on both sides of the paper, or on two separate pages. |
 |
<2-Sided> may not be available with some sizes and types of paper. Available Paper |
<Other Settings>  <2-Sided Printing>
  Select the type of 2-sided copying
  <Apply>
 <2-Sided Printing>
  Select the type of 2-sided copying
  <Apply>
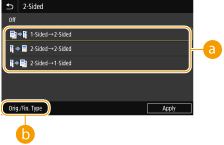
 Types of 2-sided copying
The illustration below shows the types of 2-sided copying.
<1-Sided->2-Sided> | <2-Sided->2-Sided> | <2-Sided->1-Sided> | |||
 |  |  |
 <Orig./Fin. Type>
Specify the original orientation, opening type, and finishing type.
Back to Top
Enlarging or Reducing
 | You can enlarge or reduce copies by using a preset copy ratio such as <STMT->LTR>, or by setting a custom copy ratio in increments of 1 %. |
 |
If you make a setting for <N on 1> after setting the copy ratio, the setting of reduction ratio in <N on 1> takes priority. |
<Copy Ratio>  Select the copy ratio
 Select the copy ratio
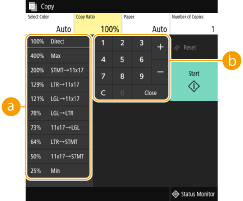
 Preset copy ratio
Select a copy ratio.
 Numeric keys
You can set any copy ratio from 25 % to 400 % in 1 % increments.
Back to Top
Selecting Copy Paper
Specify the paper source that contains the paper to use for printing out copies.
 |
You must first specify the size and type of paper that is loaded in the paper source. Specifying Paper Size and Type Loading Paper |
<Paper>  Select the paper source
  <Close>
 Select the paper source
  <Close>
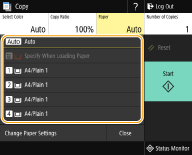
 | Automatically selects the paper depending on the original size loaded. |
 | Uses the paper that is loaded in the multi-purpose tray to make copies. |
 | Uses the paper that is loaded in the paper drawer (Drawer 1) of the machine to make copies. |
 | Uses the paper that is loaded in the paper drawer (Drawer 2) of the machine to make copies. |
 , ,  | Uses the paper that is loaded in the optional cassette feeding unit (Drawer 3, 4) to make copies. |
Back to Top

For information about other copy settings, see Enhancing and Adjusting Copy Quality or Useful Copy Functions.
6
Select <Start>.
Copying starts.
If you want to cancel, select <Cancel>  <Yes>. Canceling Copies
 <Yes>. Canceling Copies
 When placing originals in the feeder in step 1
The original is automatically scanned.
 When placing originals on the platen glass in step 1
For 2-sided copying or N on 1 copying, the screen prompting you to load the next original is displayed.
1 | Place the next original on the platen glass, and select <Scan Next Original>. You can also specify <Select Color>, <Original Type>, <Density> and <Color Balance> separately for each original. 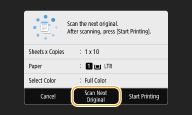 Repeat this step until you finish scanning the entire original. |
2 | Select <Start Printing>. |

When the <Paper Settings and Loaded Size Mismatch> or <The memory is full. Scanning will be canceled. Do you want to print?> message is shown in the display. Countermeasures for Each Message
 |
When copying originals with text or images that extend to the edges of the pageThe edges of the original might not be copied. For more information about the scan margins, see Main Unit. |
 |
If you always want to make copies with the same settings: Changing the Default Settings for Functions If you want to register a combination of settings to use when needed: Registering Frequently Used Settings |