[Advanced Settings] Sheet
You can configure more detailed settings than the [Basic Settings] sheet, such as the original orientation and density adjustment.
Input Settings
[Scanning Method]
Select the method for placing the originals and the surface to scan.
[Original Size]
Select the original size.
[Free Size]
Enables you to scan non-standard size originals.
When scanning different width originals with [Free Size] specified, they may be scanned with blank areas or with the image cut off, depending on the feeder.
[Specify Area to Scan]
Specify the range to scan when scanning from the feeder.
[Different Size (Letter/Legal)]
Enables you to scan Letter size and Legal size originals together in the feeder.
Enables you to scan different size originals together in the feeder.
The combination of original sizes that can be placed differs according to the scannable range of the device.
Size Combinations | [Same Width] | [Different Width] | |
Maximum Scannable Range of Device | A3/11x17 | A4/Letter | A3/11x17 |
Combination of Original Sizes | A4/A3 B4/B5 A4R/A5 8K/16K Letter/11x17 LetterR/Legal/Statement | A4/A5 Letter/Legal/Statement | A3/B4 A4/B5 B4/A4R B5/A5 A3/8K A4/16K 8K/A4R 16K/A5 Letter/LetterR/11x17 Legal/Statement |
[Original Thickness]
Select the thickness of the original placed in the feeder.
[Orig. Orientation]
Select the method for setting the orientation of the original placed in the feeder.
[Manual]
Manually sets the direction for feeding the originals placed in the feeder and the direction for opening two-sided originals.
[2-Sided Original Opening Type] can be used when [Feeder (2-sided)] is selected in [Scanning Method].
[Pages to Scan]
Specify the pages to scan of the originals placed in the feeder.
When [Specify] is selected, you can enter the original page count in [Pages].
For example, enter "60" in [Pages] to scan a two-sided original with 30 pages.
[Original Type]
Select the mode suitable for the original type.
[Area to Scan]
Specify the range to scan with numeric values. The unit for specifying the values can be changed in [File] > [Unit].
When scanning with the feeder, selecting [Specify Area to Scan] in [Original Size] enables you to specify the range to scan with numeric values. Note that the origin point of the specified range is the center of the feeder.
The origin point of the feeder is indicated below.
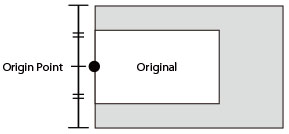
Image Quality Settings
[Resolution]
Sets the resolution. You can also manually enter a numeric value in increments of one dpi.
The resolutions that can be set differ according to the connected device.
[Color Mode]
Select the color mode of the original.
[Black and White]
Suitable for scanning originals with a large amount of text and lines and a small amount of color and gray. Results in the smallest data size for the scanned image.
[Grayscale]
Suitable for scanning photos, etc. realistically. Scans the original as 256 shades of density from white to black.
[Color]
Scans the original as a full color image. The file size of scanned images is largest with this setting.
[Auto (Color/B&W)]
Automatically detects the state of the original to determine the color mode.
[Density Adj.]
Adjusts the density of the image.
When [Auto] is enabled, the automatic density adjustment function on the device side is used. When this device function is used, [Background Adj.] > [Remove Background] or [Prevent Bleed-thru] is also automatically adjusted.
[Background Adj.]
Adjusts the image quality of the original background when [Auto] is not selected in [Density Adj.].
You can perform adjustment so that the reverse side of the original does not bleed through or the background color is not scanned. You can also adjust the background density.
The items that can be adjusted differ according to the connected device.
[Remove Background]
Performs adjustment so that the background color is not scanned.
This is useful when scanning originals with a background color like a catalog or when scanning yellowed originals.
Performs fine adjustment of the density for each background color.
[Prevent Bleed-thru]
Performs adjustment so that the reverse side of the original does not bleed through.
This is useful when scanning originals printed on both sides of thin paper.
Performs fine adjustment of the level for preventing bleed through.
Dragging the slider to the left prevents dense bleed through but may also prevent light areas on the original from being scanned.
Dragging the slider to the right ensures that light areas of the original are scanned but may also prevent bleed through from being reduced entirely.
[Background Density]
Adjusts the density of the background color. Making the background density lighter has the same effect as [Remove Background] and [Prevent Bleed-thru].
You can also adjust the background density to intentionally keep traces of corrections made with correction fluid, etc.
Performs fine adjustment of the density for each background color.
Enabling [Auto Adjust] automatically adjusts the density of each color.
If you adjust [All Colors], all colors are set to the same value as [All Colors].
If you perform fine adjustment of either [Red], [Green], or [Blue], the adjustment value of [All Colors] returns to the default value.
If you enable [Auto (Keeping Traces of Corr.)], the background density is adjusted to keep traces of corrections. If [Black and White] is selected for [Color Mode], it is changed to [Grayscale]. If [Auto (Color/B&W)] is selected, it is changed to [Color]. You will also become unable to adjust the background density and the settings for adjusting the background density will be grayed out.
[Color Settings]  [Color Settings] Dialog Box
Enables you to set the image brightness, contrast, and gamma value.
This setting can be used when [Color Mode] is set to [Color] or [Grayscale] or when scanning a color original with [Color Mode] > [Auto (Color/B&W)].
With [Monitor Gamma], you can adjust the overall brightness by correcting the halftones of the blackest and whitest parts of the original (gamma adjustment). This is useful when scanning photographs etc. that are underexposed or overexposed.
[Processing Options] [Processing Options] Dialog Box
Enables you to set the options for image processing, such as how to process frame lines and the compression ratio.
[Erase Original Frame]
Erases the shadows around the original and the frame lines.
Scanning using this function creates a white margin with a width of approximately 2.5 mm (0.1 inches) around the original.
This function cannot be used in either of the following cases.
When either [Auto], [Different Size Originals], [Different Size (Letter/Legal)], or [Free Size] is selected in [Original Size]
When the range to scan is specified
[Compression Ratio]
Select the compression ratio when compressing an image scanned in color or grayscale in the JPEG format on the device side. The size of scanned image data cannot be increased or decreased with the compression ratio settings.
Normally select [Normal].
A higher compression ratio means less memory of the device is used but lower image quality.
If a message indicating that the size of the image data is too large is displayed, select [High].
[Preview]
When an original is placed on the platen glass, previews the original with the current settings.
You can also specify the range to scan in the preview area. The range to scan is displayed with dotted lines.
This function can be used when [Platen Glass] is selected in [Scanning Method] and something other than [Auto] is selected in [Original Size].
[Scan]
Scans the original with the current settings.