Scanning with Customized Settings
This explains the procedure for scanning with detailed settings customized, such as the original orientation and color adjustment.
 NOTE
NOTEWhen using this driver with the WIA-TWAIN compatibility mode of the operating system, etc., a UI dependent on the operating system is displayed and the procedure differs from that described here.
Prerequisites
Selecting the scanner in the Color Network ScanGear 2 Tool
Confirming that the scanner is online
Procedures
1.
Place the originals in the device.
The orientation of the originals differs according to where the originals are placed.
Feeder: Place the originals with the side to scan face up.
Platen glass: Place the originals with the side to scan face down.
2.
Select the scan function from the application menu → select [Color Network ScanGear 2].
The scan settings screen of Color Network ScanGear 2 is displayed.
The procedure for displaying the scan settings screen may vary according to the application.
NOTEDepending on the TWAIN supported application, both a TWAIN compatible driver and WIA compatible driver via the WIA-TWAIN compatibility mode may be displayed with the same name when selecting the driver.
Information for the selected scanner can be checked in [File] > [Scanner Information] on the scan settings screen.
3.
Display the [Advanced Settings] sheet.
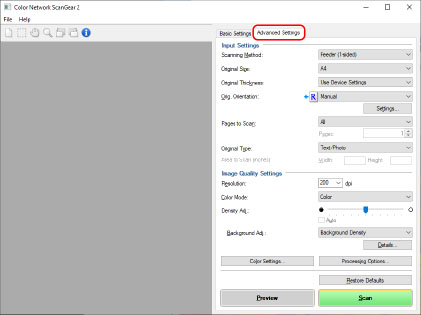
4.
Select the location where the originals are placed in [Scanning Method].
5.
Select the original size for scanning in [Original Size] → specify the range to scan as required.
The range to scan can be specified in [Preview] or with numeric values.
To specify the range to scan in the preview area
You can use this method when scanning from the platen glass with something other than [Auto] selected in [Original Size].
(1) Click [Preview].
(2) Specify the range to scan by dragging the mouse in the preview area.
The range enclosed with dotted lines is scanned. You can perform the following operations on the specified range.
Move: Drag the dotted line frame.
Resize: Drag the handle (black square) above the frame lines.
Cancel scan range: Click outside the specified range.
To specify the range to scan with numeric values
(1) When scanning from the feeder, select [Specify Area to Scan] in [Original Size].
[Area to Scan] may not be enabled, depending on the feeder.
(2) In [Area to Scan], enter the width and height of the range to scan in [Width] and [Height].
6.
If necessary, configure other scan settings.
7.
Click [Scan].
The scanned image is displayed in the application.
If the Color Network ScanGear 2 screen does not automatically close after scanning, click the close button on the top of the screen.
 IMPORTANT
Do not operate the Color Network ScanGear 2 screen until the scanning dialog box is displayed after clicking [Scan].