
Loading Envelopes
Load envelopes in the paper drawer or multi-purpose tray. When printing on envelopes, to prevent paper jams and wrinkles, make sure to flatten any curls on envelopes before loading them. Also pay attention to the orientation of envelopes and which side is face up.
 |
This section describes how to load envelopes with the proper orientation, as well as procedures that you need to complete before loading envelopes. For a description of the general procedure for loading envelopes in the multi-purpose tray, see Basic Paper Loading Method. |
Before Loading Envelopes
Follow the procedure below to prepare the envelopes before loading.
 |
Do not use envelopes that have glue attached to their flaps, as the glue may melt due to the heat and pressure of the fixing unit. Envelopes may become creased, depending on the type of envelopes or the conditions in which they are stored. Streaks may appear where envelopes overlap. |
1
Flatten any curls.
Pick up about five envelopes. Flatten any curls, and loosen the stiff areas in the four corners.
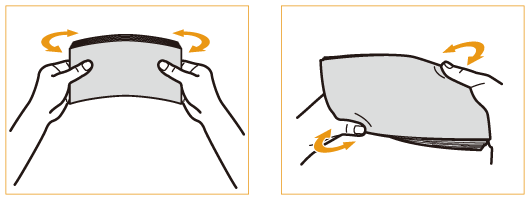
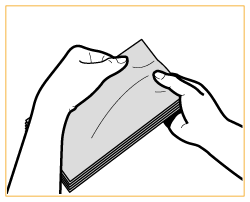
Repeat this step five times for each set of five envelopes.
2
Smooth the envelopes out, and remove any air inside them.
Place the envelopes on a flat surface, and move your hands in the direction of the arrows to remove the air inside the envelopes.
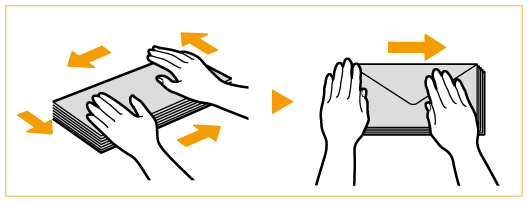
Repeat this step five times for each set of five envelopes.
3
Press down on the four sides.
Press down firmly on all four sides. In particular, carefully press down on the side facing the direction in which the envelopes will be fed. Press down firmly so that the flap stays flat.
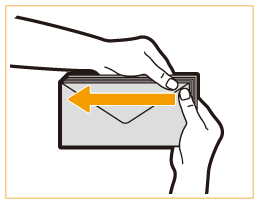

Failure to firmly press down on the flap may result in a paper jam. If this happens, press down firmly on all four sides of each individual envelope.
4
Align the envelopes on a flat surface.
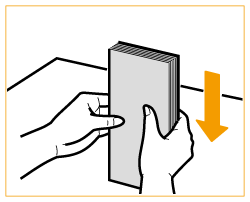

Check that no envelopes are tucked underneath the flap of the envelope above or below them.
Loading Envelopes in the Paper Drawer
This section describes how to load envelopes into the paper drawer 2.

Make sure that you change the envelope settings from the Settings/Registration screen before carrying out the following procedure. <Register Envelope Drawer> (4700 Series Only) Otherwise, the machine may not recognize the changes you have made.

Only COM 10 No. 10, Monarch, DL, and ISO-C5 envelopes can be loaded into the paper drawer 2.
In order to load envelopes in a paper drawer, it is necessary to attach the optional Envelope Feeder Attachment-D to the paper drawer 2 (it cannot be attached to the other paper drawers). To attach the Envelope Feeder Attachment-D to the paper drawer 2, contact your authorized Canon dealer.
If you want to adjust the width guides to load ISO-C5 envelopes, contact your local authorized Canon dealer.
1
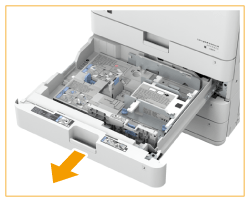
Hold the handle of the paper drawer 2 and pull it out until it stops.
2
Adjust the positions of the guides as necessary.
If you do not want to change the positions of the guides, proceed to step 3.
1 | Remove the paper drawer 2 from the machine. Pull and lift the paper drawer out of the machine by holding its left and right sides with both hands. 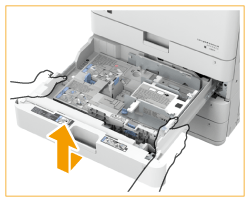  Remove any envelopes loaded in the paper drawer. |
2 | While pressing the top part of the left guide, slide the left guide to align it with the mark for the desired envelope size. 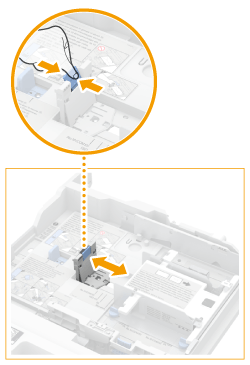 |
3 | Remove the two screws fixing the front guide of the envelope feeder attachment. 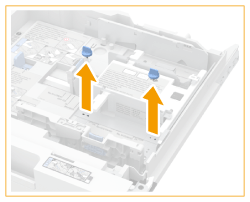 |
4 | While pressing down the envelope receptacle, slide the front guide to align it with the mark for the desired envelope size. 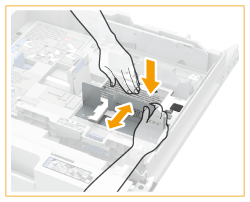 |
5 | Fix the front width guide in place with the screws. 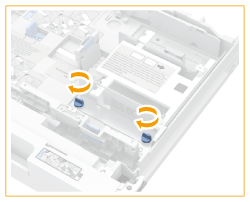 |
6 | Adjust the rear guide in the same way as in steps 3 to 5. 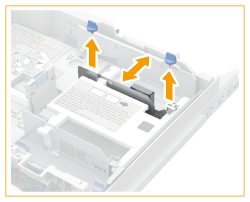 |
7 | Gently insert the paper drawer into the machine. |
3
Load the envelopes.
Load the envelopes as indicated below, with the front side of the envelopes (the side without the glued areas) face up. Load 50 envelopes at a time.
1 | While loading the envelopes, press down on the left side of the receptacle to lock them into place. 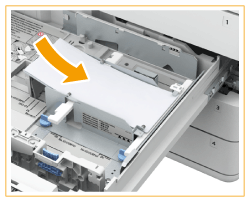 |
2 | Align the leading edges of the envelopes, and make sure that they are held in place under the claws. 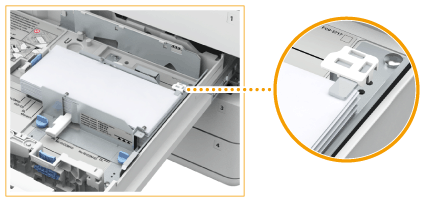 Close the flaps, and load the envelopes so that their flaps are on the far side. 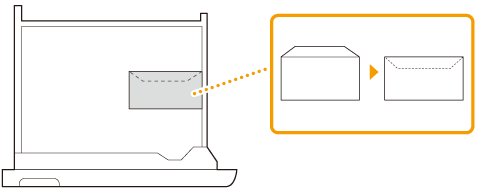 |
IMPORTANT |
Envelopes may not be able to be fed properly if they are loaded at an angle. |
4
If you changed the size of envelopes in step 2, set the size switch to either "1" or "2".
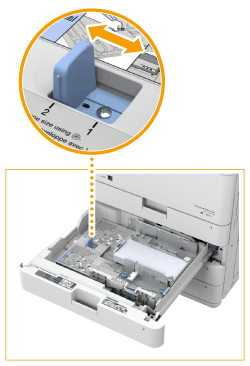
When using the envelopes set for <ENV.1>, set the size switch to "1".
When using the envelopes set for <ENV.2>, set the size switch to "2".
Correctly match the paper guides, size switch, and the <Register Envelope Drawer> settings with the size of the envelopes being loaded. Failure to do so may cause paper jams, dirty prints, or make the inside of the machine dirty. <Register Envelope Drawer> (4700 Series Only)
5
Change the paper size label of the paper drawer as necessary.
Loading Envelopes in the Multi-Purpose Tray
Load the envelopes as indicated below, with the front side of the envelopes (the side without the glued areas) face down (recommended).
Yougatanaga 3, ISO-C5, Monarch, DL, COM10 No.10
Close the flaps, and load the envelopes so that their flaps are on the far side.
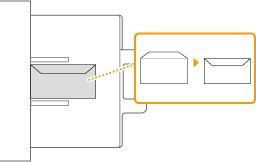
Nagagata 3, Nagagata 4, Nagagata 40, Kakugata 2
Close the flaps, and load the envelopes so that their flaps are on the left side.
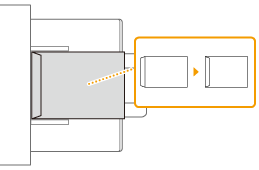
 |
Make sure that the paper stack does not exceed the load limit line (  ). If the envelopes are not fed properly even if they have been prepared according to the procedures, load the envelopes individually in the multi-purpose tray instead of loading several envelopes together. ). If the envelopes are not fed properly even if they have been prepared according to the procedures, load the envelopes individually in the multi-purpose tray instead of loading several envelopes together.Do not print on the reverse side of the envelopes (the side with the glued areas). |
 |
When you print on envelopes, remove them from the output tray 10 at a time. Load envelopes with the flaps closed. |