Printing at a Specified Time (Scheduled Printing)
 | You can set a time to start printing, which is useful when printing large amounts of documents at night, etc. |
 |
To use the scheduled print function, it is necessary to set <Forced Hold> to <Off> in advance. To use the scheduled print function, it is necessary to set <Use ACCESS MANAGEMENT SYSTEM> to <Off> in advance. The scheduled print jobs are deleted when <Use ACCESS MANAGEMENT SYSTEM> is set to <On>. |
Sending Scheduled Print Documents from a Computer (Windows)
1
Open the document and display the print screen.
For information on displaying the print screen, see the help for the application.
2
Select the machine, and click [Details] or [Properties].
3
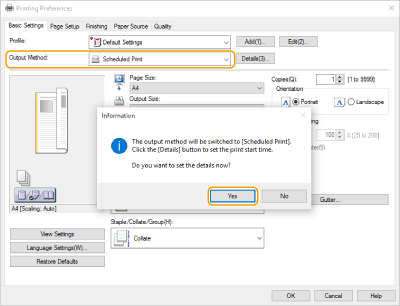
Select [Scheduled Print] from [Output Method] and click [Yes].

4
Specify [Print Start Time] and click [OK].
5
Configure the print settings as necessary, and click [OK].
6
Click [Print] or [OK].
The document is sent to the machine.
 |
The scheduled print jobs are executed according to the time set in the machine. Confirm that the time set in the machine matches that of your computer in advance. If a print job is scheduled at a time longer than 24 hours in advance, the job is canceled. A print start time between 0:00 and 23:59 is specified on the printer driver screen, but the time is processed in the format year, month, day, hour, minute, and second (with the second fixed to 0). |
Checking the Scheduled Print Jobs
1
Press <Print>. <Home> Screen
2
Press <Scheduled Print>, and check the print jobs waiting to be output.
The scheduled print date and time can be checked in <Scheduled>.
To delete a print job, select the document, and press <Delete Job>.
Scheduled print jobs are deleted after they are executed. They are also not displayed in <Jobs Printed>.