
Basic Operations for Scanning Originals
This section describes the basic operations for scanning originals.
1
Place the original. Placing Originals

When the screen for selecting the original thickness appears, select the thickness of the original being used. (Appears if <Original Thickness Defaults for Scan from Feeder> is set to <Always Specify>. <Original Thickness Defaults for Scan from Feeder>)
2
Press <Scan and Send>. <Home> Screen
3
Specify the destination on the Scan Basic Features screen. Scan Basic Features Screen
Specifying Destinations from the Address Book
Specifying Destinations from One-Touch Buttons
Entering Destinations Manually
Specifying Destinations in the LDAP Server
Specifying Your Own E-Mail Address
Specifying Personal Folder
Specifying Destinations from the Address Book of a Mobile Device
Specifying Addresses in Cc/Bcc

To specify multiple destinations, press <Specify Destinations> and specify an additional destination.
To delete a destination, select the destination you want to delete, and press <Delete Dest.>.
You can select a destination and press <Details> to confirm the detailed information for the destination.
You can only change destinations from <Details> specified using the New Destination and destinations obtained via an LDAP server.
If the server machine is performing the System Manager information settings, authentication between the server machine and the client machine is performed while the client machine is obtaining the Remote Address Book/one-touch buttons. Authentication is performed by matching the System Manager ID and System Manager PIN set by the server machine and client machine. Changing the System Manager ID and PIN
The availability of the Remote Address Book/one-touch buttons depends on the status of the System Manager information settings for the server machine and client machine, as shown below.
The availability of the Remote Address Book/one-touch buttons depends on the status of the System Manager information settings for the server machine and client machine, as shown below.
When the server machine is performing the System Manager information settings | When the client machine is performing the System Manager information settings | The System Manager ID and System PIN for the server machine and client machine match | Can use the Remote Address Book/One-Touch Button |
Performing | Performing | Matches | Yes |
Does Not Match | No | ||
Not Performing | - | No | |
Not Performing | Performing | - | Yes |
Not Performing | - | Yes |
Specifying Destinations from the Address Book
1
Press <Address Book>.
2
Select the destination and press <OK>.
If an access number is set when the destination is registered, press <Access No.> and enter the access number using the numeric keys. The corresponding destination is displayed in the Address Book.
To use the Remote Address Book, press <To Remote Address Book>. When <Change Address Book> is displayed, press <Change Address Book>  <Remote>.
 <Remote>.
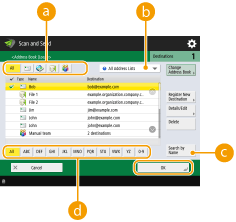
 Destination type buttons
Pressing  ,
,  , and
, and  displays e-mail, file server, and group destinations, respectively.
 ,
,  , and
, and  displays e-mail, file server, and group destinations, respectively.
 Drop-down list for selection of Address Book types
When you are logged in to the machine with personal authentication management, selecting <Personal Address List> displays your personal Address Book. You can also display dedicated user group address lists (User Group Address Lists) in which you are included.
 <Search by Name>
Enables you to search the destination by the name you are entering.
 Search buttons by first letter
Enables you to narrow down a search by the first letter of the destination name.
 |
<Register New Destination>, <Details/Edit>, and <Delete> on the <Address Book (Local)> screen can be used to register new destinations, check details, and edit/delete destinations. Registering Destinations To use the Remote Address Book, it is necessary to configure the server machine settings. Set to open the Remote Address Book externally on the server machine. |
Back to Top
Specifying Destinations from One-Touch Buttons
1
Press <One-Touch>.
2
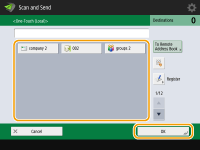
Select the desired one-touch button and press <OK>.
To specify the destination using a one-touch button number (one-touch number), press  and enter the number for the desired one-touch button.
 and enter the number for the desired one-touch button.
To use the Remote Address Book, press <To Remote Address Book>.
 |
To select a destination from the <One-Touch> screen after scanning, set <One-Touch> for <Default Screen>. The work required for sending scanned documents to the same destination can be reduced. <Default Screen> The destinations registered in the one-touch buttons of the server machine are updated in the following times: When a fax job has been sent on the client machine When you press  (Reset) on the client machine (Reset) on the client machineWhen Auto Reset is activated on the client machine |
Back to Top
Entering Destinations Manually
You can specify destinations manually that are not registered in the Address Book or one-touch buttons.
1
Press <New Destination> and select the destination type (<E-Mail> or <File>).

Selecting <I-Fax> enables you to send scanned documents as a fax via the Internet.
If <Store in Mail Box> appears as the destination type
Selecting <Store in Mail Box> enables you to save scanned documents in the Mail Box of the machine.
When <Store in Mail Box> is selected, you can send "Mail Box Incoming Notice" to the address specified in <Set/Register Mail Boxes> by selecting <URL Send>.
You can only select one mail box in <Store in Mail Box>.
If the URL Send mode is set, you cannot send to a group address that includes a mail box as a destination.
2
Specify the destination and press <OK>.

You can press <Register to Address Book> to register the entered destination. Set the required conditions, and specify <Name> and <Address List>. For information on the settings, see Registering Destinations in the Address Book.
If you select <File> in step 1, specify the settings such as the IP address of a file server and the path of the save location folder. For details about the setting items, consult your network administrator.
Back to Top
Specifying Destinations in the LDAP Server
You can search and specify destinations registered in the LDAP server.
1
Press <Address Book>.
2
Press <To LDAP Server>.
When <Change Address Book> is displayed, press <Change Address Book>  <LDAP Server>.
 <LDAP Server>.
If the network password input screen is displayed, enter the user name and password and press <OK>.
3
When searching destinations in the LDAP server, press either <Search by Conditions> or <Search by Name>.
To display all the destinations in the LDAP server, proceed to step 4.

A maximum of 2,000 destinations can be displayed in the search results.
 When searching by conditions
Press <Search by Conditions>, specify the search conditions on the screen, and press <Start Searching>.
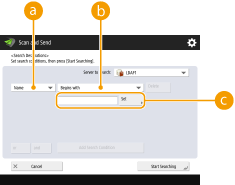
 Search categories
Select a criterion to search for destinations from name, e-mail address, organization name, and organization unit (department name, etc).
 Search conditions
Select a search condition such as a destination name that contains "John" and a department name that begins with "Development."
 Search characters
Press <Set> and enter search characters for the search condition.

To search with multiple conditions
You can search destinations with multiple conditions. Specify the first search condition, press <Add Search Condition>, and then select <or> or <and> for the next condition.
To change conditions and search again
Press <Delete> to delete the specified contents, and specify the conditions again.
 When searching by name
Press <Search by Name>  enter the text to search
  press <OK>.
 enter the text to search
  press <OK>.
You can specify attributes used when performing "Search by Name" for a destination from the LDAP server. <Settings for Search by Name When Using LDAP Server>
4
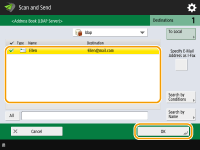
Select the destination and press <OK>.
Back to Top
Specifying Your Own E-Mail Address
You can specify the e-mail address of the user who is logged in to the machine with personal authentication management.
1
Press <Send to Myself>.
The e-mail address of the user who is logged in to the machine is specified as the destination.
Back to Top
Specifying Personal Folder
You can specify the personal folder of the user who is logged in to the machine with personal authentication management.
1
Specify <Personal Folder>.
The personal folder of the user who is logged in to the machine is specified as destination.
Back to Top
Specifying Destinations from the Address Book of a Mobile Device
You can specify a destination from the address book of a mobile device.
 |
Only e-mail destinations can be specified from the address book of a mobile device. To use this function, you must install the "Canon PRINT Business" application to your mobile device. Utilizing the Machine through Applications |
1
Connect to the mobile device. Connecting with Mobile Devices
2
Send the address from the mobile device to the machine.
For detailed information on operations using the mobile device, see the Help of the application.

You can send information including the subject, message body, and file name from the mobile device to the machine. Specifying E-Mail Settings
Back to Top
Specifying Addresses in Cc/Bcc
E-mail addresses can be specified in Cc (Carbon copy) and Bcc (Blind carbon copy).
1
Press <Cc Bcc>.
2
Press <Cc> or <Bcc>  <Specify Destinations>.
 <Specify Destinations>.
To move a destination from Cc or Bcc, press <To/Bcc|Cc> or <To/Cc|Bcc> and specify the destination to move to To, Cc, or Bcc.
3
Specify the destination  press <OK>.
 press <OK>.
For information on specifying the destination, see the method for specifying each type of destination.

A destination other than an e-mail destination can be specified with <Specify Destinations>, but cannot be specified in Cc or Bcc or moved to Cc or Bcc.
Back to Top
4
Specify the scan settings as necessary.
Selecting a File Format
Selecting Resolution
Specifying the Scanning Size of Originals
Selecting Color Scan/Black & White Scan
Scanning Both Sides of Originals
Enlarging or Reducing
Selecting a File Format
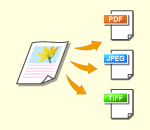 | Scanned originals are converted into electronic files such as PDF. Select the file format according to your purposes and environment of use. |
1
Press the setting button for file format.
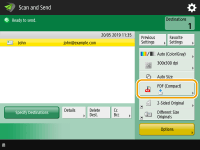
2
Select the file format.
<JPEG> | This file format is suitable for photographic originals. Multiple-page originals will be divided into one file per page. |
<TIFF> | This file format is suitable for graphical originals. Originals are scanned in black and white. |
<PDF> | This file format is suitable for text documents. Documents can be displayed in the same way on any computer, regardless of the operating system used. |
<XPS> | This is a file format taken from Windows Vista. Documents can be displayed in the same way on any Windows computer, regardless of the operating system used. |
<OOXML> | This file format can be edited in Microsoft Office Word or PowerPoint. |
 If you selected <PDF>, <XPS>, or <OOXML>
You can set various additional functions.
For details of the additional functions, see the help screen displayed when you press  at the top right of the screen.
 at the top right of the screen.
 If you selected <JPEG> or <TIFF>
This completes the procedure. Press <OK>.
 |
<PDF (Trace & Smooth)> is only valid with the following settings: Select Color: Color mode other than the Black-and-White mode Resolution: 300 dpi x 300 dpi Copy Ratio: 100% or Auto <PDF (Compact)> or <XPS (Compact)> is only valid with the following settings: Select Color: Color mode other than the Black-and-White mode Resolution: 300 dpi x 300 dpi Copy Ratio: 100% or Auto <Word> documents to which <OOXML> is set can only be sent with the following settings. Select Color: Color mode other than the Black & White mode Resolution: 300 dpi x 300 dpi Copy Ratio: 100% or Auto <PowerPoint> documents to which <OOXML> is set can only be sent with the following settings. Select Color: Color mode other than the Black & White mode Resolution: 300 dpi x 300 dpi or 600 dpi x 600 dpi Copy Ratio: 100% or Auto You cannot set <Trace & Smooth> for the file format and <Long Original> for the scan size at the same time. If you select <PDF (Trace & Smooth)>, the machine may be unable to recognize which parts of the scanned document are text and line drawings, depending on the scanned document. The text and background of PDF files containing outline data may become misaligned, and text and line drawings may not be displayed, depending on the version of Adobe Illustrator used to open the PDF. When creating files by pagesTo scan a multiple-page original and save each page as a separate file instead of saving all pages as a single file, press <Divide into Pages>. To specify the number of pages to include in each file, after pressing <Divide into Pages>, specify the desired number of pages. To save each page as a separate file, specify <1> for the number of pages. If you select <TIFF/JPEG>, each page will automatically be created as a separate file according to the Select Color mode. When Black & White is set for the Select Color mode: TIFF When a setting other than Black & White is set for the Select Color mode: JPEG You cannot specify the number of pages to include in one file if you are currently using the <Scan and Store> function. |
TIPS |
Installing an option can expand functions for scanning to create files. For information on the required optional products and on the file formats, see System Options. |
Back to Top
Selecting Resolution
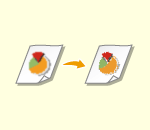 | To scan an original clearly, increase the resolution. To reduce the file size, decrease the resolution. |
1
Press the setting button for resolution.
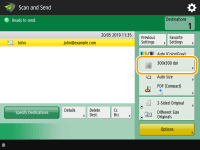
2
Select the resolution and press <OK>.
Depending on the file format you are selecting, the resolution that you can select is limited.
Back to Top
Specifying the Scanning Size of Originals
 | If you are scanning free size/highly transparent originals, or the edge of image is missing when scanning, you need to manually specify the scanning size. |
1
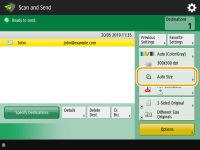
Press the setting button for scanning size.
2
Select the scanning size and press <OK>.
To set the machine to detect the size of the original, select <Auto>.

If <11x17+>/<A3+> appears in the scanning size
If you want to scan an 11" x 17"/A3 original with an image that extends all the way to the edges without the periphery of the original being cut off, place the original on the platen glass and press <11x17+>/<A3+>.
 When scanning a special size document, such as OFICIO (for the 230 V machine only)
Press <Other Size>, and select the paper size.
 When scanning a free size original
Place the original in the feeder and select <Free Size>. You can only set a zoom ratio of 100%.
 When specifying the values of scanning size
Place the original on the platen glass/in the feeder, select <Custom>, and enter the height and width of the original. Sent images are not rotated.

When a scanning size smaller than the minimum size that can be scanned with the feeder is set, scanning cannot be performed with the feeder. For information on the document sizes that can be scanned with the feeder, see Hardware Specifications.
 When scanning a long original
Place the original in the feeder and select <Long Original>. You can only set a zoom ratio of 100%.
 |
To register the scanning sizeIf you frequently specify the scanning size with the same values, register the size in <Custom>  <Register Size> to quickly recall the setting for convenience. <Register Size> to quickly recall the setting for convenience.If the scanning size is specifiedDocuments that are scanned using a specified scan size (<Custom>, <Long Original>, or <Free Size>), cannot be stored in a mail box. If you are currently using the <Scan and Store> function, you cannot select <Long Original>. |
Back to Top
Selecting Color Scan/Black & White Scan
 | You can specify color when scanning original. |
1
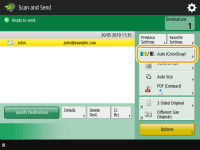
Press the setting button for color.
2
Select the color and press <OK>.
Depending on the file format you are selecting, the setting item that you can select is limited.
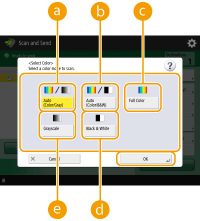
 <Auto (Color/Gray)>
Determines automatically what color is used for scanning according to the color of an original. For example, color pages are scanned in color, and monochrome pages are scanned in grayscale (monochrome gradation).
 <Auto (Color/B&W)>
Determines automatically what color is used for scanning according to the color of an original. For example, colored pages are scanned in color, and monochrome pages are scanned in black and white. Select this mode when text is faint with <Auto (Color/Gray)>, or when the original mainly consists of text.
 <Full Color>
Scans in color regardless of a document's color. Depending on the state of the color original, it may be detected as black and white when scanned, even if you set <Auto (Color/B&W)>. To avoid this, set the color mode to <Full Color>.
 <Black & White>
Scans in black and white regardless of an original's color. This mode is automatically set for the TIFF file format.
 <Grayscale>
Scans in grayscale regardless of an original's color. This mode uses different shades of color, such as black, dark gray, gray, light gray, and white, making color look more natural and beautiful compared with <Black & White>.

If a black-and-white original is scanned in the Full Color mode, it is counted as a color scan.
If you select <JPEG> as the file format, <Black & White> is changed to <Grayscale>.
If you select <TIFF> as the file format, <Black & White> is set.
If <OOXML> is selected as the file format, you can only send in <Auto (Color/Gray)>, <Full Color>, or <Grayscale>.
Back to Top
Scanning Both Sides of Originals
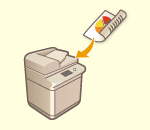 | The machine can automatically scan both the front and back sides of an original. |
 |
Place the original in the feeder. For landscape-oriented originals, place them horizontally. If you want to scan each side of the 2-sided originals placed on the platen glass, specify the <Job Build> settings. Sending/Saving Separately Scanned Documents Together (Job Build) |
1
Press <2-Sided Original>.
2
Select <Book Type> or <Calendar Type> and press <OK>.
Select <Book Type> for originals whose images on the front and back sides face the same direction, or <Calendar Type> for originals whose images on the front and back sides face in opposite directions.
Back to Top
Enlarging or Reducing
 | You can enlarge or reduce standard size original to other standard sizes when scanning. Enlarging or Reducing in Standard Paper Sizes | |
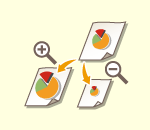 | You can enlarge or reduce by specifying magnification (%). Enlarging or Reducing by Specifying Magnification | |
 | You can enlarge or reduce to automatically fit the paper size selected. Enlarging and Reducing to Fit the Finished Paper Size |
Enlarging or Reducing in Standard Paper Sizes
1
Press <Options>  <Copy Ratio>.
 <Copy Ratio>.
2
To reduce, select magnification from  , to enlarge, select magnification from
  and press <OK>.
 , to enlarge, select magnification from
  and press <OK>.
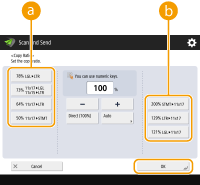
3
Press <Close>.
Back to Top
Enlarging or Reducing by Specifying Magnification
1
Press <Options>  <Copy Ratio>.
 <Copy Ratio>.
2
Specify magnification and press <OK>.
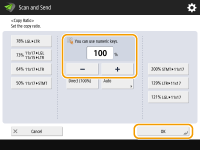
3
Press <Close>.
Back to Top
Enlarging and Reducing to Fit the Finished Paper Size
1
Press <Options>  <Copy Ratio>.
 <Copy Ratio>.
2
Press <Auto>, specify the finished size, and then press <OK>.
Depending on the resolution you are selecting, you cannot specify the finished size.
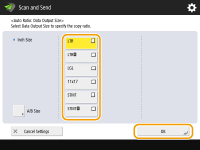
3
Press <Close>.

If you want to send with <Auto>, set the resolution to 300 dpi x 300 dpi or 600 dpi x 600 dpi.
If you select <Long Original> as the scan size, you can only send documents at a zoom ratio of 100%.
Back to Top
5
Press  (Start).
 (Start).
Originals are scanned and sending/saving starts.
To cancel scanning, press <Cancel> or  (Stop)
  <Yes>.
 (Stop)
  <Yes>.
 When <Press the [Start] key to scan the next original.> is displayed
Place the next original to scan and press  (Start). When scanning all of the originals is complete, press <Start Sending> to send/save the file.
 (Start). When scanning all of the originals is complete, press <Start Sending> to send/save the file.
Depending on the communication settings, you may be prompted to enter the user name and password. Setting E-mail/I-Fax Communication
 |
To check the total number of specified destinationsThe total number of specified destinations is displayed on the top right of the screen. This enables you to confirm that the number of destinations is correct before sending. 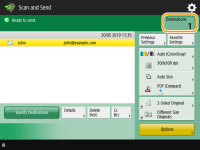 To immediately cancel a job that is being sentIf you press  (Stop) on the control panel while a job is being sent, the message <Is it OK to cancel the following Send job?> appears. Press <Yes> to cancel sending. (Stop) on the control panel while a job is being sent, the message <Is it OK to cancel the following Send job?> appears. Press <Yes> to cancel sending.You can select <Latest Received Job> or <Job Being Sent> to choose the job to cancel. <Job to Cancel When Stop is Pressed> Press  (Stop) when there are multiple send jobs to display the screen for selecting the send job to cancel. If the send job you want to cancel is not displayed, press <Check Other Jobs> to display <Send Jobs>. Select the job that you want to cancel, and press <Cancel>. (Stop) when there are multiple send jobs to display the screen for selecting the send job to cancel. If the send job you want to cancel is not displayed, press <Check Other Jobs> to display <Send Jobs>. Select the job that you want to cancel, and press <Cancel>.To check the statuses for sent/saved documentsOn the <Status Monitor> screen, you can check the statuses for sent/saved documents. This screen enables you to send/save documents again or cancel sending/saving after checking the statuses. Checking Status and Log for Scanned Documents When <Display Notification When Job Is Accepted> is set to <On>, the <Status Monitor> screen can be displayed from the following screen that is shown after a send job is received. <Display Notification When Job Is Accepted> 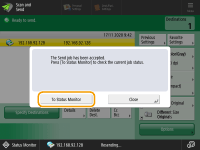 To print the report for the results of sending/savingOn the Scan Basic Features screen, pressing <Options>  <TX Report> enables you to set to automatically print the report listing the results of sending/saving. <TX Report> enables you to set to automatically print the report listing the results of sending/saving.To set this for each job from <Options>, it is necessary to select <For Error Only> or <Off> in <TX Report>, and then set <Allow Printing from Options> to <On>. File nameWhen a file is sent/saved, its file name is automatically set based on the following format. You can change the setting so that a different name can be assigned. Setting a File Name When sending by e-mail "Job numbers (four digits)_page numbers (three digits).file extension name" format, such as "1042_001.jpg" When saving in a file server "The year, month, day, hour, minute, and second the file is saved (14 digits).file extension name" format, such as "20151030133541.jpg" E-mail subjectThe subject entered in <Default Subject> is automatically set (<Default Subject>). If you specify a different subject, change the setting, or specify each time you send an e-mail (Specifying E-Mail Settings). When multiple sheets are fedScanning is stopped and the message is displayed on the screen. Follow the instructions to clear the jam. When you have cleared the jam, the resume job screen is displayed. If the machine mistakenly detects multiple sheet feeding, press <Do Not Detect Multi. Sheet Feed> to resume scanning. To set the machine in advance to not notify you of multiple sheet feeding, perform one of the following operations. Each time you send/save a document, press <Options> on the Scan Basic Features screen  select <Detect Feeder Multi Sheet Fd.> to disable the setting. select <Detect Feeder Multi Sheet Fd.> to disable the setting.Set <Set Detection of Feeder Multi. Sheet Feed as Default> to <Off>. <Set Detection of Feeder Multi. Sheet Feed as Default> |
TIPS |
Determining the top and bottom of the originalYou can set the orientation of the document before scanning so that its top and bottom are positioned correctly when the sent/saved file is displayed on a computer. When placing an original of the following paper size, press <Options> on the Scan Basic Features screen  <Orig. Content Orientation> <Orig. Content Orientation>  <Top at Far Edge> <Top at Far Edge>  <OK>. <OK>.208 V and 120 V machines: LTR 230 V machine: A4 When placing an original of the following paper size, press <Options> on the Scan Basic Features screen  <Orig. Content Orientation> <Orig. Content Orientation>  select <Top at Far Edge> or <Top at Side Edge> according to the orientation of the original select <Top at Far Edge> or <Top at Side Edge> according to the orientation of the original  press <OK>. press <OK>.208 V and 120 V machines: Large-size originals such as LGL size 230 V machine: Large-size originals such as A3 size Specifying multiple destinations including faxesSetting <Enable Fax in Scan and Send Function> to <On> enables you to specify fax destinations from the Scan Basic Features screen (<Display Fax Function>). This setting is useful for specifying multiple destinations including faxes, such as when saving a copy of a sent fax in a file server. Checking scanned images before sending/savingYou can check scanned images on the preview screen before sending/saving. Checking Scanned Originals Before Sending/Saving (Preview) Registering frequently used settingsYou can combine frequently used destinations and scan settings into a button of the machine for later use. By pressing the registered button when scanning originals, you can quickly complete your settings. Registering a Combination of Frequently Used Functions |