Depending on the image or paper type, the loaded paper may become curled and may not be neatly stacked.
Also, if you change the settings of this machine, or if the temperature and humidity of the environment where the finisher/stacker is installed change abruptly, the loaded paper may not be neatly stacked. In these cases, follow the procedure described below to perform curl correction. This section describes the curl correction procedures for using the finisher.
Correcting Paper Curl
Described below, so that the paper curl is reduced to between 1 to 3 mm.
* 1 to 3 mm
If the paper curls down, see "If the loaded paper curls downward."
If the paper curls up, see "If the loaded paper curls upward."
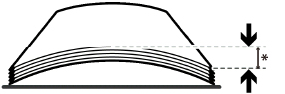
If the loaded paper curls downward
To correct the curl, perform the procedure described below.
1.
Press  .
.
.2.
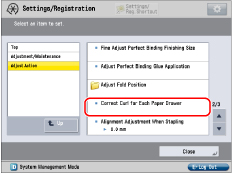
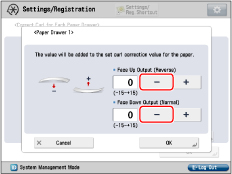
Press [Adjustment/Maintenance] → [Adjust Action] → [Correct Curl for Each Paper Drawer].
3.
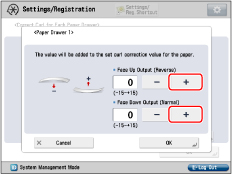
Select the paper source to change the curl correction level → press [Set].
4.
Press [+] under <Face Up Output (Reverse)> to correct the curl correction level when outputting the print face up. Press [+] under <Face Down Output (Normal)> to correct the curl correction level when outputting the print face down. Adjust the value of <Face Up Output (Reverse)> when outputting double sided.
If the curl (distance between the center and curled edges) amounts to 5 mm or less, increase the value three levels (+3). If the curl (distance between the center and curled edges) amounts to 5 mm or more, increase the value six levels (+6).
* 5 mm
5.
Press [OK].
6.
Remove the paper from the output tray and output about 100 sheets of paper to the output tray.
7.
Make sure that the paper curl is reduced to between 1 to 3 mm. If paper curl is not reduced, repeat step 1 to 5.
IMPORTANT |
Note that this mode may affect paper feeding. Since increasing the pressure to a great extent may cause paper jams, adjusting the values in small increments is recommended. If you change the print settings, perform curl correction again. |
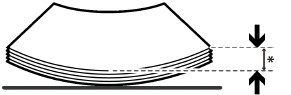
If the loaded paper curls upward
To correct the curl, perform the procedure described below.
1.
Press .
.2.
Press [Adjustment/Maintenance] → [Adjust Action] → [Correct Curl for Each Paper Drawer].
3.
Select the paper source to change the curl correction level → press [Set].
4.
Press [-] under <Face Up Output (Reverse)> to correct the curl correction level when outputting the print face up. Press [-] under <Face Down Output (Normal)> to correct the curl correction level when outputting the print face down. Adjust the value of <Face Up Output (Reverse)> when outputting double sided.
If the curl (distance between the center and curled edges) amounts to 3 mm or more, decrease the value three levels (-3).
* 3 mm or more
5.
Press [OK].
6.
Remove the paper from the output tray and output about 100 sheets of paper to the output tray.
7.
Make sure that the paper curl is reduced to between 1 to 3 mm. If paper curl is not reduced, repeat step 1 to 5.
IMPORTANT |
Note that this mode may affect paper feeding. Since increasing the pressure to a great extent may cause paper jams, adjusting the values in small increments is recommended. If you change the print settings, perform curl correction again. If you want to print using various paper types and print settings, refer to "Adjusting the Level of Curl Correction," to change the curl correction level at this machine. |