Control Panel
0UUY-01C 0X7F-01S 0X6E-01S 0X7C-01S 0WXY-01S 0WR6-01S 0WR7-01S 0WR8-01S 0YWH-01S 0YWF-01S
This section describes the names and usage of the keys on the control panel.
Flat Control Panel
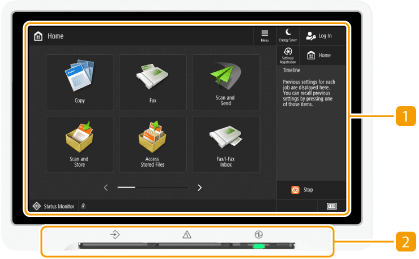
 Touch panel display
In addition to the settings screen for each function, the error status is also shown on this display. Using the Touch Panel Display
 Lamp displays
The display consists of the following three lamps, from left to right.
 : : | Processing/Data indicator Blinks while operations such as sending or printing are being performed. Lights up green when there are documents waiting to be processed. |
 : : | Error indicator Blinks or lights up when an error such as a paper jam occurs.  If the Error indicator blinks, follow the instructions that appear on the touch panel display. If the Error indicator maintains a steady red light, contact your dealer or service representative. |
 : : | Main Power indicator Lights up when the machine is turned ON. Turning ON the Machine |
Upright Control Panel
0UUY-01C 0X7F-01S 0X6E-01S 0X7C-01S 0WXY-01S 0WR6-01S 0WR7-01S 0WR8-01S 0YWH-01S 0YWF-01S
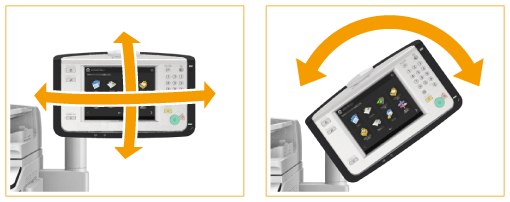
When the optional Upright Control Panel-J is installed, you can adjust the position and angle of the entire control panel so that the touch panel display can be seen clearly.
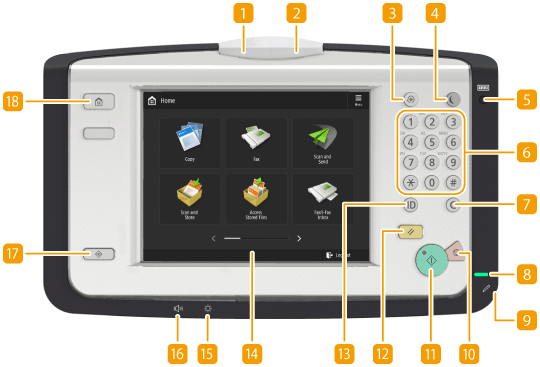
 Processing/Data indicator
Blinks while operations such as sending or printing are being performed. Lights up green when there are documents waiting to be processed.
 Error indicator
Blinks or lights up when an error such as a paper jam occurs.

If the Error indicator blinks, follow the instructions that appear on the touch panel display.
Clearing Paper Jams
Clearing Staple Jams
Clearing Paper Jams
Clearing Staple Jams
If the Error indicator maintains a steady red light, contact your dealer or service representative.
 [Settings/Registration] key
Press to start specifying many of the settings for the machine, such as <Preferences> or <Set Destination>. Settings/Registration
 [Energy Saver] key
Press to put the machine into sleep mode. The key lights up when the machine is in sleep mode. Entering Sleep Mode
 [Counter/Device Information] key
Press to display the total number of pages used for operations such as copying or printing on the touch panel display. You can also check the serial number and IP address of the machine, and the device information of optional products. Further, you can check the version information of the security chip related to HDD data encryption. Checking the Number of Pages for Copy/Print/Fax/Scan
 Numeric keys ([0] - [9])
Press to enter numerical values. Entering Characters
 [Clear] key
Press to clear entered values or characters.
 Main Power indicator
Lights up when the machine is turned ON. Turning ON the Machine
 Edit pen
Use the edit pen when operating the touch panel display, such as to enter characters. If you lose the edit pen, contact your dealer or service representative. Do not use an object with a sharp end on the control panel, such as a pencil or ballpoint pen, in place of the edit pen.
 [Stop] key
Stops a send job or a print job. Canceling Send/Print Jobs
 [Start] key
Press to start copying or scanning documents.
 [Reset] key
Press to cancel the settings and restore the previously specified settings.
 ID (Log In/Out) key
Press this key to log in when personal authentication is necessary. After you finish using the machine, press this key again to log out. Logging into the Machine
 Touch panel display
In addition to the settings screen for each function, the error status is also shown on this display. Using the Touch Panel Display
 Brightness Adjustment dial
Use to adjust the brightness of the touch panel display. Turn the dial clockwise to increase the brightness, and counter-clockwise to decrease.
 Volume Settings key
Press to display the screen when you want to adjust the sound volume for the fax communication or to set the alarm sound when an error occurs. Setting Sounds
 [Status Monitor] key
Press to check the status of printing or faxing, or to view the usage history. You can also check the status of the machine, such as the remaining amount of paper and toner, or whether any errors occurred. Using the Touch Panel Display
 [Home] key
Press to display the Home in which buttons for the basic functions are placed. Using the Touch Panel Display
Adjusting the Position and Angle of the Touch Panel Display 
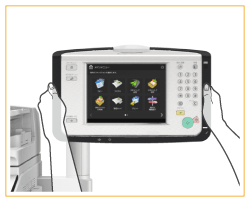
You can adjust the position and angle of the control panel if the touch panel display cannot be seen clearly. When adjusting the control panel, hold it with both hands, and slowly adjust the position and angle as shown in the illustration below.
You can adjust the angle of the arm, as indicated below. If you exceed the adjustment range in any direction, you could break the arm that supports the control panel.
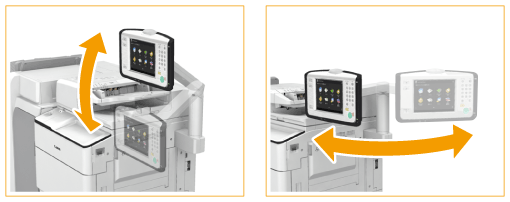
You can adjust the angle of the control panel, as indicated below. If you exceed the adjustment range in any direction, you could break the arm that supports the control panel.
