Other Network Settings
Set the following according to your network environment.
Setting the PASV Mode of FTP
PASV is an FTP communication mode that is used during file transfer. Press <On> for this setting to enable the machine to connect to an FTP server even if the machine is within a firewall. Confirm beforehand that the PASV mode is set on the FTP server side.

 <Preferences>
  <Network>
  <TCP/IP Settings>
  <Use FTP PASV Mode>
  <On>
<On>  <OK>
<OK>Making SNTP Settings
SNTP is a protocol to adjust time using a time server on the network. SNTP is used when time needs to be adjusted between the machine and the server in cases when security authentication is done at the time of accessing an LDAP server. Set the time difference (time zone) beforehand because actions are based on Coordinated Universal Time (UTC). Setting the Date/Time
1
Press  .
.
 .
.2
Press <Preferences>  <Network>
  <TCP/IP Settings>
  <SNTP Settings>.
 <Network>
  <TCP/IP Settings>
  <SNTP Settings>.
3
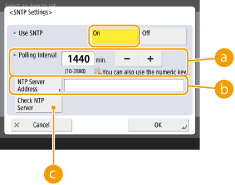
Press <On> in <Use SNTP> and carry out the necessary settings.

 <Polling Interval>
Specify the prescribed interval in minutes to adjust the time.
 <NTP Server Address>
Enter the IP address of the NTP server. When the DNS server is used, instead of an IP address, you can enter "host name.domain name" (FQDN) using alphanumeric characters. (Example: "ntp.example.com").
 <Check NTP Server>
You can check the communication status between a registered server and the SNTP. When a connection is made properly, "OK" is displayed. However, only the communication status is confirmed and time adjustment is not carried out.

To perform time synchronization via SNTP with the NTP server, setting the time zone where the machine is used is required in advance. Setting the Date/Time
4
Press <OK>.
5
Press 
 <Yes>.

 <Yes>.
Monitoring the Machine From Device Management Systems
When device management software such as iW Management Console is employed, you can collect/manage various information such as setting information, address information, and device failure information on the network through the server.
1
Press  .
.
 .
.2
Press <Preferences>  <Network>
  <TCP/IP Settings>
  <Multicast Discovery Settings>.
 <Network>
  <TCP/IP Settings>
  <Multicast Discovery Settings>.
3
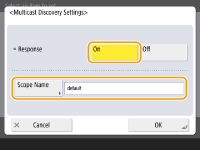
Set <Response> to <On>, press <Scope Name> and enter a scope name.

Enter a scope name specified using Multicast Discovery Settings in <Scope Name>.
4
Press <OK>.
5
Press 
 <Yes>.

 <Yes>.