Backing Up/Restoring Data
You can back up the data saved on the machine to an external storage device or SMB server. If you perform backup before updating the firmware or initializing the settings, you can restore the settings if a problem occurs. Administrator privileges are required in order to perform these operations.
 |
To restore backed up data, the storage device of the machine needs to have enough available space for the backed up data. Data cannot be backed up or restored if more than one external storage device is connected to the machine. Disconnect any unnecessary external storage devices so that only one is connected. It may take some time to back up or restore the saved data. Do not turn OFF the machine until the backup or restore process is complete. Doing so may cause the machine to malfunction. Data may be lost if a problem occurs with the storage device. Periodically back up/export sensitive data. Please note that Canon is not liable for any damages caused by loss of data. |
 |
Connecting an external storage deviceWhen using an external storage device to back up or restore data, it is recommended that you connect it to the USB port at the rear of right side of the main unit (the back of the main unit). Parts and Their Functions For more information on the external storage devices that can be used with the machine, see System Specifications. Display language during backup/restore processIf you change the display language and back up or restore data without restarting the machine first, the data may not be backed up or restored properly. |
Backing Up Data
 |
Do not change or delete the backed-up data. Doing so may prevent you from being able to restore the data properly. Do not perform backup while the machine is being operated via the control panel or the Remote UI. |
1
Start the Remote UI. Starting the Remote UI
2
Click [Settings/Registration] on the portal page. Remote UI Screen
3
Click [Data Management]  [Backup Location Settings].
 [Backup Location Settings].
Auto Backup
You can click [Auto Backup Settings] and configure the machine to automatically back up data on a specified day and time. Follow the on-screen instructions to configure the settings.
4
Configure the necessary settings.
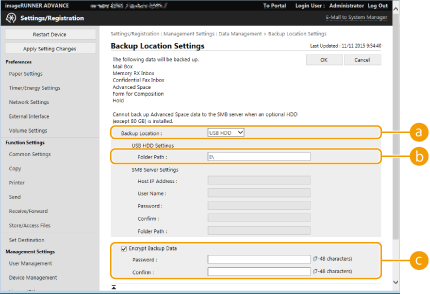
 When backing up to an external storage device

 [Backup Location]
Select [USB HDD].
 [Folder Path]
Enter the path to the folder on the external storage device in which to save the backed-up data.
 [Encrypt Backup Data]
If you select the check box and enter a password, you can encrypt the backed-up data. The password specified here will be required when restoring the encrypted backup data.
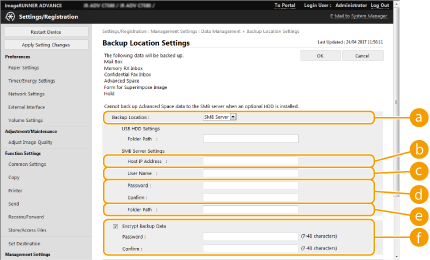
 When backing up to an SMB server

 [Backup Location]
Select [SMB Server].
 [Host IP Address]
Specify the location of the SMB server. Use the following format: \\Name of server\Name of shared folder
 [User Name]
Enter the user name for accessing the SMB server.
 [Password]/[Confirm]
Enter the password for accessing the SMB server. For confirmation, enter the same password again in [Confirm].
 [Folder Path]
If the backup folder is at a level below  , add the rest of the path that follows
  . Make sure that the user limit of the specified folder is set to allow two or more users. If the user limit is set to allow one user, you will not be able to restore the backed-up data properly.
 , add the rest of the path that follows
  . Make sure that the user limit of the specified folder is set to allow two or more users. If the user limit is set to allow one user, you will not be able to restore the backed-up data properly.
 [Encrypt Backup Data]
If you select the check box and enter a password, you can encrypt the backed-up data. The password specified here will be required when restoring the encrypted backup data.
5
Click [OK].
6
Click [Back Up].
7
Select the backup method, and click [Execute]  [OK].
[OK].
 [OK].
[OK].
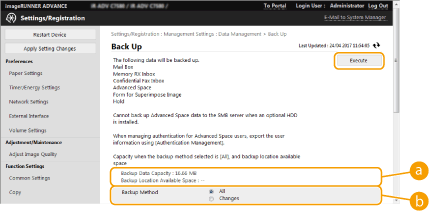
 [Backup Data Capacity]/[Backup Location Available Space]
If [Backup Location Available Space] is not enough for [Backup Data Capacity], set a different backup destination.
 [Backup Method]
Select [All] to perform standard backup. If you only want to back up the data that has been changed since the previous backup, select [Changes].

Backup can be performed a limited number of times in the same folder. If backup can no longer be performed, specify a different backup destination folder.
[Changes] for Advanced Space backs up only the data updated or added since all the stored data was backed up. [Changes] always backs up data based on differences from [All] as opposed to the last [Changes] backup.
 |
After performing backup, you can click [Back Up/Restore Log] on the screen displayed in step 7, and check the results of the backup in [Result]. If the [A server error has occurred.] message is displayed, the network settings may not be configured properly. Check the network settings. The backed-up data can be restored not only to the machine but also to upgrades of the same model. |
Restoring Backup Data
1
Start the Remote UI. Starting the Remote UI
2
Click [Settings/Registration] on the portal page. Remote UI Screen
3
Click [Data Management]  [Restore].
 [Restore].
4
Click [Display Backup Data].
5
Select the backup data to restore, and click [Execute]  [OK].
[OK].
 [OK].
[OK].Enter the password if one was set when backing up the data.
6
Click [Restart Main Unit].
After the machine restarts, the backup data is restored.
 |
The backup data may not be fully restored when certain machine settings are used. |
 |
Restoring saved dataRestoration is performed after all of the data stored in the machine, or documents that are being sent, received, or stored, are erased. If authentication management is performed for Advanced Space users (Setting Advanced Space to Public), you need to pay particular attention when restoring the backed up data to a different model. For more information, see. Manually Importing User Data After you restore backup data, the machine may print documents automatically. If you back up data from an optional storage device and restore it on the standard-equipped storage device, some of the data may not be restored. |