Configuring SQL Server
This section describes the settings required to use SQL Server as the database of this software.
Before installing this software, it is necessary to configure the following settings according to the operation environment.
NOTE |
This software operates even if the Manager and SQL Server are installed on separate computers. |
Creating the User Used by This Software
Create the user used by this software to connect to SQL Server, and assign the server role to the user. The setting method differs when using an existing instance of SQL Server or installing a new instance of SQL Server.
When SQL Server Has Been Installed
IMPORTANT |
When using SQL Server authentication, the following operation is not required if the "sa" system manager of SQL Server is used by this software. When installing this software, enter "sa" as the user name of the system manager and the password. |
NOTE |
When [Default instance] is selected while installing SQL Server, the description "\<SQL Server instance name>in the command executed in the following procedure can be skipped. |
1.
Log on to the computer as a user with administrator privileges for SQL Server.
2.
Start the command prompt.
3.
Create the user used by this software. Execute the following command.
When using Windows authentication
Create the "NT AUTHORITY\SYSTEM" system user.
sqlcmd -S localhost\<SQL Server instance name> -E -Q "CREATE LOGIN [NT AUTHORITY\SYSTEM] FROM WINDOWS"
When using SQL Server authentication
Set a user name and password of your choice.
sqlcmd -S localhost\<SQL Server instance name> -E -Q "CREATE LOGIN [<user name>] WITH PASSWORD = '<password>'"
NOTE |
When installing this software, enter the user name and password configured here. |
4.
Assign the "sysadmin" server role to the user used by this software. Execute the following command.
When using Windows authentication
sqlcmd -S localhost\<SQL Server instance name> -E -Q "ALTER SERVER ROLE sysadmin ADD MEMBER [NT AUTHORITY\SYSTEM]"
This software also operates when the "dbcreator" server role is assigned. Configure the settings according to your environment.
When using SQL Server authentication
sqlcmd -S localhost\<SQL Server instance name> -E -Q "ALTER SERVER ROLE sysadmin ADD MEMBER [<user name>]"
When Installing a New Instance of SQL Server
Install a version of SQL Server supported by this software. Set the instance name and authentication mode of SQL Server during installation. Configure the user used by this software after installation.
The procedure for SQL Server 2017 Express is described here.
NOTE |
For details on the versions of SQL Server supported by this software, see the following. |
1.
Log on to the computer as a user with Administrator privileges.
2.
Execute the installer for SQL Server Express.
3.
Select [Custom] from [Select an installation type].
4.
Specify the destination folder, and click [Install].
[SQL Server Installation Center] is displayed when the download of the installation package is complete.
5.
Click [New SQL Server stand-alone installation or add features to an existing installation].
6.
Follow the wizard to proceed with the installation.
A warning is displayed if Windows Firewall is enabled, but you can proceed with the installation.
7.
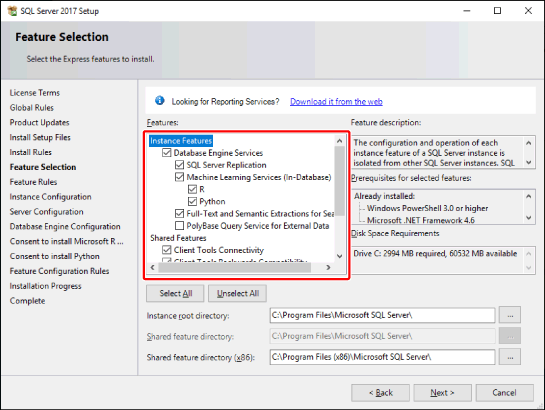
Select the functions to install on the [Feature Selection] screen.

Confirm that the following items are selected.
[Database Engine Services]
[SQL Server Replication]
[SQL Client Connectivity SDK]
[Machine Learning Services (In-Database)] and the functions below it are not required for this software to operate. Deselect them if you do not want to install them.
Other items do not need to be changed from their default values.
Click [Next].
8.
On the [Instance Configuration] screen, configure the instance and click [Next].

NOTE |
When installing this software, enter the instance name configured here. |
9.
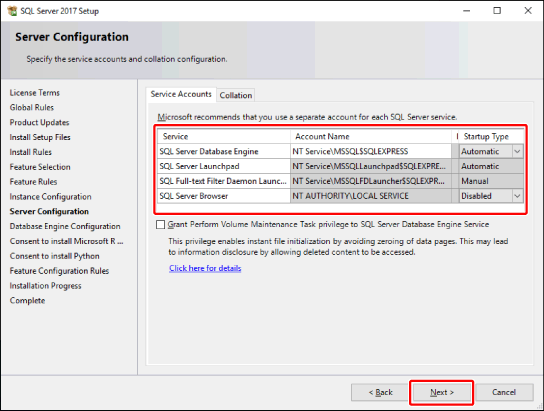
Confirm that the [Service Accounts] tab is displayed on the [Server Configuration] screen as indicated below, and click [Next].

10.
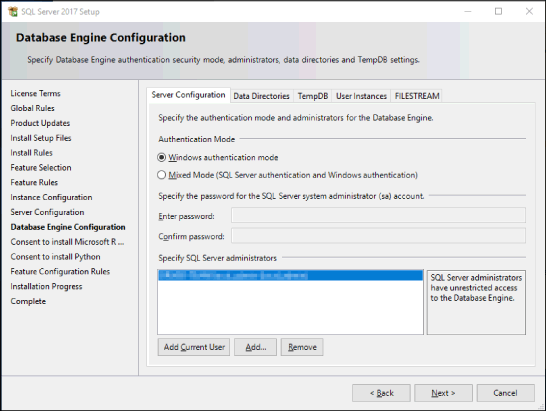
Configure the authentication mode and SQL Server administrator on the [Server Configuration] tab of the [Database Engine Configuration] screen.

When using Windows authentication
Select [Windows authentication mode] from [Authentication Mode].
Click [Add] in [Specify SQL Server administrators].
The [Select Users or Groups] dialog box is displayed.
Enter "SYSTEM" in [Enter the object names to select], and click [OK].
The [Database Engine Configuration] screen is displayed again.
Confirm that "NT AUTHORITY\SYSTEM(SYSTEM)" is displayed in [Specify SQL Server administrators].
Click [Next].
When using SQL Server authentication
Select [Mixed Mode (SQL Server authentication and Windows authentication)] from [Authentication Mode].
Enter a password of your choice for the "sa" system manager of SQL Server in [Enter password] and [Confirm password].
Click [Next].
11.
Continue to follow the wizard to proceed with the installation.
12.
When the [Complete] screen is displayed, click [Close].
13.
Restart the computer.
Continue to configure the user used by this software.
IMPORTANT |
When using SQL Server authentication, the following operation is not required if the "sa" system manager of SQL Server is used by this software. When installing this software, enter "sa" as the user name of the system manager and the password. |
14.
Log on to the computer as a user with administrator privileges for SQL Server.
15.
Start the command prompt.
16.
Configure the user used by this software.
NOTE |
When [Default instance] is selected while installing SQL Server, the description "\<SQL Server instance name>" in the command executed in the following procedure can be skipped. |
When using Windows authentication
Assign the "sysadmin" server role to the "NT AUTHORITY\SYSTEM" user used by this software. Execute the following command.
sqlcmd -S localhost\<SQL Server instance name> -E -Q "ALTER SERVER ROLE sysadmin ADD MEMBER [NT AUTHORITY\SYSTEM]"
This software also operates when the "dbcreator" server role is assigned. Configure the settings according to your environment.
When using SQL Server authentication
Create the user used by this software. Execute the following command.
Set a user name and password of your choice.
sqlcmd -S localhost\<SQL Server instance name> -E -Q "CREATE LOGIN [<user name>] WITH PASSWORD = '<password>'"
NOTE |
When installing this software, enter the user name and password configured here. |
Assign the "sysadmin" server role to the user used by this software. Execute the following command.
sqlcmd -S localhost\<SQL Server instance name> -E -Q "ALTER SERVER ROLE sysadmin ADD MEMBER [<user name>]"
Creating the Database in Advance
The installer of this software creates a database for this software and assigns the "db_owner" database role to the user used by this software. Therefore, it is normally not necessary to create the database in advance. Only perform the following operation when database operation rules are determined and it is necessary to create the database in advance.
IMPORTANT |
The name of the database used by this software is fixed to "ManagementConsole." Other names cannot be used. When the database has been created in advance, select [Use the current database] for [Database] when installing this software. |
NOTE |
When [Default instance] is selected while installing SQL Server, the description "\<SQL Server instance name>" in the command executed in the following procedure can be skipped. |
1.
Log on to the computer as a user with administrator privileges for SQL Server.
2.
Start the command prompt.
3.
Create the user used by this software. Execute the following command.
sqlcmd -S localhost\<SQL Server instance name> -E -Q "CREATE DATABASE [ManagementConsole]"
4.
Assign the "db_owner" database role for the database created in step 3 to the user used by this software. Execute the following command.
sqlcmd -S localhost\<SQL Server instance name> -E -Q "ALTER AUTHORIZATION ON DATABASE::[ManagementConsole] TO [<user name>]"
Confirming the Operating Environment of the Database Server
When installing this software to a separate computer from SQL Server, check the following on the computer where SQL Server is installed.
Network support function
Confirm that the network support function is enabled so that this software can connect to the database. For details, see the following.
Windows Firewall settings
If the firewall function is enabled, register the database instance used by this software as an application allowed to communicate via the firewall.
Sleep mode function
Confirm that the operating system is set to not enter the sleep mode.
Checking the Network Support Function of the Database
Check the network support function of the database instance used by the software, and enable it as necessary. The procedure for SQL Server 2017 Express is described here.
1.
Select [SQL Server Configuration Manager] from the Start menu.
[Sql Server Configuration Manager] is displayed.
2.
In the tree on the left, expand [SQL Server Network Configuration], and double-click [Protocols for <instance name>].
Double-click the instance name of the database used by this software.
3.
Check the state of the protocol in the window on the right.
Confirm that [Status] is set to [Enabled] for the following protocols.
Shared Memory
Named Pipes
TCP/IP
If [Status] is set to [Disabled] for a protocol, right-click and select [Enable].
4.
In the tree on the left, select [SQL Server Services].
5.
In the window on the right, right-click [SQL Server (<instance name>)] and select [Restart].
Double-click the instance name of the database used by this software.
The database is restarted.
6.
Check the state of [SQL Server Browser] in the window on the right.
When [Start Mode] is set to [Automatic] or [Manual]
Confirm that [State] is set to [Running].
If [State] is set to [Stopped], right-click and select [Start].
When [Start Mode] is set to [Other (Boots, System, Disabled or Unknown)]
Right-click and select [Properties].
The [SQL Server Browser Properties] dialog box is displayed.
Click [Service] tab.
Select [Automatic] or [Manual] for [Start Mode], and click [OK].
The display returns to [Sql Server Configuration Manager].
Confirm that [State] is set to [Start].
If [State] is set to [Stopped], right-click and select [Start].
NOTE |
When [Start Mode] is set to [Automatic], this service automatically starts when the computer starts. |
7.
Close [Sql Server Configuration Manager].