Importing/Exporting User Data
You can save user information stored in the machine to a computer (export), as well as load user information from other machines into the machine you are using (import). This is useful when you want to register multiple users at once.
 |
For information on editing a CSV file for importing, see Adding and Editing User Information in a CSV File. If duplicates of data exist in a CSV file for importing, the version of the data that was read first will be prioritized and registered. It is recommended that you export the registered/edited user data to make a backup copy. |
Exporting User Data
1
Start the Remote UI. Starting the Remote UI
2
Click [Settings/Registration] on the portal page. Remote UI Screen
3
Click [User Management]  [Authentication Management].
4
Click [Export].
5
Select the file format, and click [Start Export].
User information created in the file format that can be used with User Authentication is exported. The file extension is "csv."
6
Follow the instructions on the screen to specify the location to store the file.
The csv file is stored.
Automatically Importing User Data
You can automatically update user data by periodically importing import files stored in a specified location.
1
Start the Remote UI. Starting the Remote UI
2
Click [Settings/Registration] on the portal page. Remote UI Screen
3
Click [User Management] [Authentication Management].
4
Click [Import] [Auto Import Settings...].
5
Select the check box for [Use auto import] and specify the required settings.
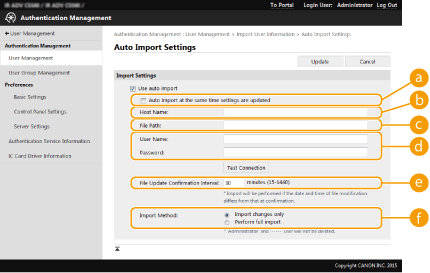
 [Auto import at the same time settings are updated]
Click the [Update] button to start importing.
 [Host Name:]
Enter the host name of the server to access, along with the path that require authentication.
Example:
\\Host Name
\\IP Address\Shared Folder Name
 [File Path:]
Enter the path of the file for importing.
 [User Name:]/[Password:]
Enter the user name and password required to log in to the computer in which the file for importing is stored.
 [File Update Confirmation Interval:]
You can specify the interval in minutes for checking for files to import.
If the operation cannot be performed at the specified time because the machine is turned OFF or is completely in the Sleep mode, the operation is performed and information is reflected when the machine recovers.
 [Import Method:]
Select whether to import only updated or added user data, or all user data.
If you select [Perform full import] and a user with the same user name is already registered, the user information is overwritten.
When importing information of a user who accesses the Advanced Space with SMB, specify the appropriate value in the "password" column. If you export the data from the machine and import it to the other machine without performing the above operation, authentication may fail. (The value is "********" when exported.)
When performing a complete import, any users not listed in the imported files are deleted from the machine. However, "-----" and "Administrator", which are registered by default, will remain even if they are not listed in the imported files.
"User Authentication Format" is the only file format that is supported. Also, the "uid" column is required.
Note that if you are using a server that does not support SMB v3.0 encrypted communication, user data travels unencrypted across communication paths while it is being obtained.
6
Click [Connection Test], confirm that you can connect, and then click [Update].
Manually Importing User Data
You can manually specify data for importing and update user information.
1
Start the Remote UI. Starting the Remote UI
2
Click [Settings/Registration] on the portal page. Remote UI Screen
3
Click [User Management] [Authentication Management].
4
Click [Import] [Manual Import Settings...]
5
Specify the required settings.
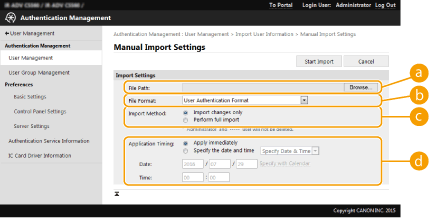 [File Path:]
Specify the path of the file for importing.
[File Format:]Select the file format for importing.
<Simple Device Login Format>:
Imports user information exported from a Canon machine using the Local Device Authentication of SSO-H. The file extension is "ldif."
<User Access Control for Advanced Space Format>:
Imports user information exported from a Canon machine with Advanced Space user access control. The file extension is "csv."
<User Authentication Format>:
Imports user information created in the file format that can be used with User Authentication. The file extension is "csv."
[Import Method:]Select whether to import only updated or added user data, or all user data.

If you select [Perform full import] and a user with the same user name is already registered, the user information is overwritten.
When importing information of a user who accesses the Advanced Space with SMB, specify the appropriate value in the "password" column. If you export the data from the machine and import it to the other machine without performing the above operation, authentication may fail. (The value is "********" when exported.)
When performing a complete import, any users not listed in the imported files are deleted from the machine. However, "-----" and "Administrator", which are registered by default, will remain even if they are not listed in the imported files.
[Application Timing:]Select [Apply immediately] or [Specify the date and time]. If you select [Specify the date and time], enter the desired date and time or the time only.
If the user information cannot be reflected at the specified time because the machine is turned OFF or is completely in the Sleep mode, the information is reflected when the machine recovers.
6
Click [Start Import]
If the Department ID (dept_id) and PIN (dept_pin) are written in the imported CSV file, [Check Unregistered Department ID] will be displayed after importing is complete. Perform Department ID registration.