Using AirPrint
This section describes the settings required to use AirPrint and the procedure for printing, scanning, and sending faxes from Apple devices.

AirPrint Settings |
Functions of the AirPrint |
Troubleshooting |
Configuring AirPrint Settings
You can register information, including the name of the machine and installation location, that is used for identifying the machine. The settings required for using AirPrint can be configured remotely using the Remote UI.
Configuring Settings Using the Remote UI
1
Start the Remote UI and log on in System Manager Mode. Starting the Remote UI
2
Click [Settings/Registration].
If you are using a mobile device, such as an iPad, iPhone, or iPod touch, read "click" as "tap" in this section.
3
Click [Network Settings]  [AirPrint Settings].
 [AirPrint Settings].
4
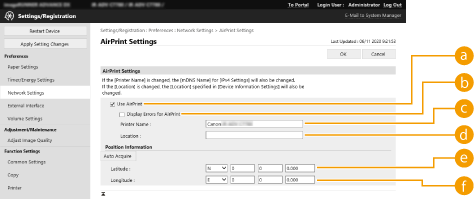
Specify the required settings, and click [OK].

 [Use AirPrint]
Select the check box to enable AirPrint. To disable AirPrint, clear the check box.
 [Display Errors for AirPrint]
If you are printing with AirPrint and there is an issue with the print file and the file does not print correctly, you can use this setting to choose whether error screens appear on the control panel.
 [Printer Name]
Enter the name of the machine. If an mDNS name has already been registered in [mDNS Settings] ([Network Settings] in [Preferences] (Settings/Registration)), the registered name is displayed.
 [Location]
Enter the location of the machine. If a location has already been registered in [Device Information Settings] ([Device Management] in [Management Settings] (Settings/Registration)), the registered name is displayed.
 [Latitude]
Enter the latitude of the location where the machine is installed.
 [Longitude]
Enter the longitude of the location where the machine is installed.
5
Restart the machine.
Turn OFF the machine, wait at least 10 seconds, and then turn it ON.
Configuring Settings from the Touch Panel Display
1
Press  (Settings/Registration).
 (Settings/Registration).
2
Press <Log In>.
Enter the System Manager ID and System PIN.
3
Press <Preferences>  <Network>
  <Use AirPrint>.
 <Network>
  <Use AirPrint>.
4
Press <On>  <OK>.
<OK>.
 <OK>.
<OK>. |
If you select [Use AirPrint], the following settings in <TCP/IP Settings> are set to <On>.Use HTTP IPP Print Settings Use IPv4 mDNS Use IPv6 mDNS Use Network Link Scan |
 |
If you change [Printer Name] that you have once specified, you may be unable to print any more from the Mac that has been able to be used for printing so far. This phenomenon occurs because <mDNS Name> (Making DNS Settings) of IPv4 is also changed automatically. In this case, add the machine to the Mac again. When AirPrint is in-use, <Use Same mDNS Name as IPv4> is fixed to <On> for the mDNS name of IPv6. Entering the printer name makes it easier to identify multiple printers that support AirPrint. |
Displaying the Screen for AirPrint
You can display the screen for AirPrint, on which you can not only access the AirPrint Settings but also view information about consumables, such as paper and toner cartridge. Further, you can configure security function settings.
Displaying from a Mac
1
Click [System Preferences] in the Dock on the desktop  [Printers & Scanners].
 [Printers & Scanners].
2
Select the machine, and click [Options & Supplies].
3
Click [Show Printer Webpage].
4
Logging in to the Remote UI
To change the AirPrint settings, it is necessary to log in as an administrator.
Configuring the Screen for AirPrint
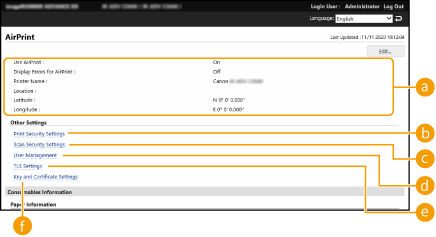
If you log in with administrator privileges, you can also change the AirPrint settings from the page for AirPrint.

 [AirPrint]
Enables you to check the values entered in the AirPrint settings, such as the name and location of the machine. You can click [Edit...] to change the settings.
 [Print Security Settings]
Specify the settings required to print using TLS and authentication.
If <IPP Print Settings> is already set, the existing settings are displayed. The values registered in [Print Security Settings] change according to the values in <IPP Print Settings>.
 [Scan Security Settings]
Specify the settings required to scan using TLS.
If <Use TLS> in <Use Network Link Scan> is already set, the existing settings are displayed. The values registered in [Scan Security Settings] change according to the value in <Use TLS> in <Use Network Link Scan>.
 [User Management]
You can add/edit users to authenticate. Managing Users
 [TLS Settings]
Enables you to change the key and certificate used for TLS. Configuring the Key and Certificate for TLS
 [Key and Certificate Settings]
Enables you to generate and install a key and certificate, or request a certificate to be issued. Configuring the Key and Certificate for TLS
Checking Consumables and the Device Version
You can check information regarding the paper sources of the machine, the remaining amount of toner, and the device version.
Trademarks
Apple, Bonjour, iPad, iPhone, iPod touch, Mac, OS X, and Safari are trademarks of Apple Inc. AirPrint and the AirPrint logo are trademarks of Apple Inc.
iOS is a trademark or registered trademark of Cisco in the U.S. and other countries and is used under license.