Paper Output
Finishing
[Off], [Collate], [Group]*, [Offset+Collate], [Offset+Group], [Staple+Collate], [Staple+Group]
Copies to Offset (Offset+Collate):
1 to 9999; 1*
Staple Position (Staple+Collate and Staple+Group):
Corner (Upper-L), Corner (Upper-R), Corner (Lower-R), and Corner (Lower-L)
The functions that can be set differ according to the model, as indicated below.
 : Available - : Unavailable
Models without a Finisher Attached | Models with a Finisher Attached | |
Collate | | |
Group | | |
Offset+Collate | - | |
Offset+Group | - | |
Staple+Collate | - | |
Staple+Group | - | |
[Off]
This setting prints all copies of the same page before printing the next page.
[Collate]
This setting prints all pages of each copy before printing the next copy.
[Group]
This setting prints all copies of the same page before printing the next page.
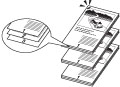
[Offset+Collate]
This setting prints all pages of each copy (collating). It offsets every other complete copy by the number specified with this setting to indicate where each copy starts.
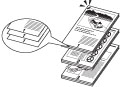
[Offset+Group]
This setting prints all copies of the same page before printing the next page. It offsets every other complete set of pages to indicate where each new set starts.
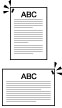
[Staple+Collate]
This setting prints all pages of each copy (collating), and prepares them for stapling according to the option selected for [Staple+Collate].
[Staple+Group]
This setting prints all copies of the same page before printing the next page, and prepares them for stapling according to the option selected for [Staple+Group].
Examples of each Finishing option when printing three copies of a three page document:
Off | Collate | Group |
 |  | |
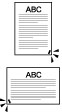
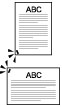
Offset+Collate | Offset+Group | |
 |  | |
Staple+Collate | Staple+Group | |
 |  |
IMPORTANT |
A large print job may be automatically canceled by the machine. |
When you select [Staple+Collate], or [Staple+Group], you can select the stapling position.
[Corner (Upper-L)] | [Corner (Upper-R)] |
 | 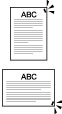 |
[Corner (Lower-R)] | [Corner (Lower-L)] |
 |  |
NOTE |
When you are stapling paper in landscape orientation, the image orientation and the staple position may not match. When setting the stapling location to one of the following, stapling is applied from the back sides of the printouts, and the claws of the staple appear on the front side (first page) of the printouts. In horizontal (landscape) orientation, staple in the upper left In horizontal (landscape) orientation, staple in the lower right In vertical (portrait) orientation, staple in the lower left In vertical (portrait) orientation, staple in the upper right |
Paper That Can Be Stapled and Staple Position
: Available -: UnavailableCorner (Upper-Left) | Corner (Upper-Right) | Corner (Lower-Left) | Corner (Lower-Right) | |
LGL (portrait) | | * | * | |
LGL (landscape) | * | | | * |
LTR (portrait) | | * | * | |
LTR (landscape) | * | | | * |
Statement (landscape) | - | - | - | - |
Statement (Portrait) | - | - | - | - |
Exec (portrait) | | * | | * |
Exec (landscape) | * | | * | |
A4 (portrait) | | * | * | |
A4 (landscape) | * | | | * |
B5 (portrait) | | * | * | |
B5 (landscape) | * | | | * |
A5 (portrait) | - | - | - | - |
A5 (landscape) | - | - | - | - |
*When setting the stapling location to one of the above starred (*) items, stapling is applied from the back sides of the printouts, and the claws of the staple appear on the front side (first page) of the printouts.
NOTE |
The maximum number of sheets of Plain 1 or Plain 2 type paper that can be stapled at one time is 30. |