Replacing the Toner Cartridge
A warning message appears in the display when the amount remaining in the toner cartridge is low or when printing is no longer possible because of toner depletion. Note that the print quality may suffer if you continue printing without resolving this issue. You can check the amount remaining in the toner cartridges on the display (Checking the Remaining Amount of Consumables).
When a Message Appear
The message that is displayed depends on the amount remaining in the toner cartridges. Depending on which message is displayed, you will need to make sure that you have a replacement toner cartridge ready or replace the toner cartridge.
Procedure for Replacing the Toner Cartridge
Replacement Parts
Procedure for Replacing the Toner Cartridge
Replacement Parts
<Prepare cartridge.> 
This message notifies you that a toner cartridge needs to be replaced soon. Make sure that you have a replacement toner cartridge ready. Replace the toner cartridge if you see this message before you start to print a large job.

 When a message is displayed When copying or printing, you can continue printing the original. If a message is displayed for the black toner cartridge when the machine is receiving a fax/I-Fax or automatic report output is set, received faxes/I-Faxes and reports will be stored in memory so that they do not appear faded after they are printed. To continue printing even if the amount remaining in toner cartridge is running low, set <Continue Print. When Cart. Low> to <On>. <Continue Print. When Cart. Low> Specify when a message is displayed You can set any value as the percentage of the amount remaining in the toner cartridge that triggers a message. <Display Timing for Cart. Prep.> |
<Low Cartridge Level>
This message notifies you that a toner cartridge needs to be replaced soon. Make sure that you have a replacement toner cartridge ready. Replace the toner cartridge if you see this message before you start to print a large job. This appears when <Action When Warning> is set to <Stop Printing> (<Action When Warning>).
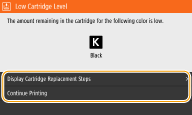
<Display Cartridge Replacement Steps>
Displays the procedure for replacing a toner cartridge. Follow the on-screen instructions to replace the toner cartridge.
Displays the procedure for replacing a toner cartridge. Follow the on-screen instructions to replace the toner cartridge.
<Continue Printing>
You can end a printing stoppage state and continue copying/printing.
You can end a printing stoppage state and continue copying/printing.
 If a message is displayed when the machine is receiving a fax/I-Fax or automatic report output is set, received faxes/I-Faxes and reports will be stored in memory so that they do not appear faded after they are printed. To continue printing even if the amount remaining in toner cartridge is running low, set <Continue Print. When Cart. Low> to <On>. <Continue Print. When Cart. Low> |
 |
Specify when a message is displayedYou can set any value as the percentage of the amount remaining in the toner cartridge that triggers a message. <Display Timing for Cart. Prep.> |
<End of Cartridge Lifetime> 
This message, which appears with the toner cartridge color(s), notifies you that a toner cartridge has reached the end of its lifetime, so printing cannot be performed.
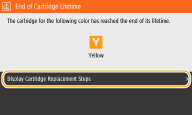
<Display Cartridge Replacement Steps>
Displays the procedure for replacing a toner cartridge. Follow the on-screen instructions to replace the toner cartridge.
Displays the procedure for replacing a toner cartridge. Follow the on-screen instructions to replace the toner cartridge.
When Printouts are Poor in Quality
If your printouts begin to show any of the following features, one of your toner cartridges is consumed. Replace the nearly empty toner cartridge even if no message is displayed. Procedure for Replacing the Toner Cartridge
Streaks Appear/Printing is Uneven | Partially faded | Uneven density | White Spots Appear | |||
 |  |  |  |
Toner smudges and splatters appear | Blank space of originals becomes grayish in printouts | |||
 |  |
Procedure for Replacing the Toner Cartridge
Read the precautions in "Getting Started" provided with this product before replacing the toner cartridges. Manuals and Their Contents
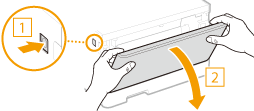
1
Open the front cover.
2
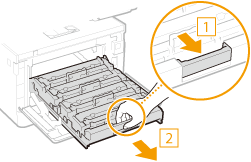
Pull out the cartridge tray.
3
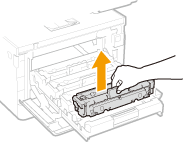
Pull the target toner cartridge straight up and out of the machine.
4
Remove the replacement toner cartridge from the packing material.
1 | Pull the tab of the packing material on a flat place. 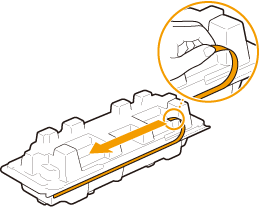 |
2 | Pull out the toner cartridge. 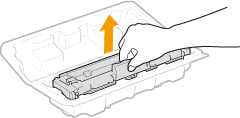 |
5
Shake the toner cartridge 5 or 6 times as shown below to evenly distribute the toner inside the cartridge.
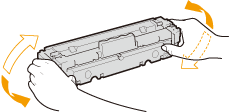

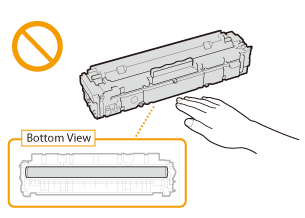
Do not touch the surface of the drum on the bottom of the toner cartridge.
6
Install the toner cartridge.
Each toner cartridge color has its own slot in the toner cartridge tray, and this tray is indicated with a corresponding color label ( ). Place the toner cartridge into the slot that corresponds to its color.
 ). Place the toner cartridge into the slot that corresponds to its color.

The bottom surface of the toner cartridge is exposed; therefore, be careful not to bump the toner cartridge against the slot frame when inserting it into the slot.
7
Push the toner cartridge tray back in, and close the front cover.
Immediately after the front cover is closed, the quick adjustment (Quick Adjust) starts. To perform adjustment for higher quality, perform full adjustment (Full Adjust).