
Other Network Settings
Configure the following items according to your network environment.
Configuring SNTP
Simple Network Time Protocol (SNTP) enables you to adjust the system clock by using the time server on the network. If SNTP is used, the time server is checked at the specified intervals; therefore, the correct time can always be maintained. The time is adjusted based on Coordinated Universal Time (UTC), so specify the time zone setting before configuring SNTP (Setting the Date/Time). SNTP settings can be specified via the Remote UI.
|
The SNTP of the machine supports both NTP (version 3) and SNTP (versions 3 and 4) servers. For more information about the basic operations to be performed when setting the machine from the Remote UI, see Setting Up Menu Options from Remote UI. |
1
Start the Remote UI and log in to System Manager Mode. Starting Remote UI
2
Click [Settings/Registration] on the Portal page. Remote UI Screen
3
Select [Network Settings]  [SNTP Settings].
4
Click [Edit].
5
Select the [Use SNTP] check box and specify the required settings.
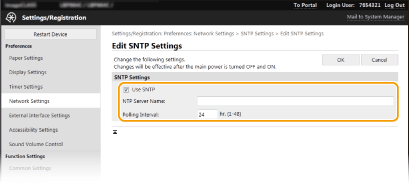
[Use SNTP]
Select the check box to use SNTP for synchronization. If you do not want to use SNTP, clear the check box.
Select the check box to use SNTP for synchronization. If you do not want to use SNTP, clear the check box.
[NTP Server Name]
Enter the IP address of the NTP or the SNTP server. If DNS is available on the network, you can enter a host name (or FQDN) consisting of alphanumeric characters instead (example: ntp.example.com).
Enter the IP address of the NTP or the SNTP server. If DNS is available on the network, you can enter a host name (or FQDN) consisting of alphanumeric characters instead (example: ntp.example.com).
[Polling Interval]
Specify the interval between one synchronization and the next.
Specify the interval between one synchronization and the next.
6
Click [OK].
7
Restart the machine. Restarting the Machine
|
Testing communication with the NTP/SNTP serverYou can view communication status with the registered server by clicking [Settings/Registration] 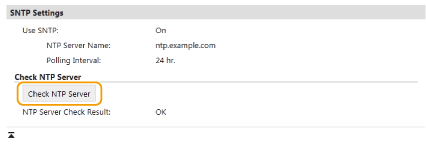 |
Monitoring the Machine from the Device Management Systems
You can facilitate the collection and management of various information about networked devices by implementing device management software, such as imageWARE Enterprise Management Console*, into the network. Information such as device settings and error logs is retrieved and distributed via the server computer. If the machine is connected to such a network, imageWARE Enterprise Management Console searches the network for the machine by using protocols such as Service Location Protocol (SLP) to gather information from the machine, such as power supply status information. SLP settings can be specified via the Remote UI. This section also describes the procedure to configure settings for communication between the machine and plug-ins for imageWARE Enterprise Management Console.
*For more information about imageWARE Enterprise Management Console, contact your local authorized Canon dealer.
|
To use imageWARE Enterprise Management Console plug-insYou need to enable the settings of the dedicated port and the SNMP settings. As for the SNMP settings, set [MIB Access Permission] to [Read/Write] for both SNMPv1 and SNMPv3. <Use Dedicated Port> Monitoring and Controlling the Machine with SNMP Remote UI OperationsFor more information about the basic operations to be performed when setting the machine from the Remote UI, see Setting Up Menu Options from Remote UI. |
Configuring SLP Communication with Device Management Software
1
Start the Remote UI and log in to System Manager Mode. Starting Remote UI
2
Click [Settings/Registration] on the Portal page. Remote UI Screen
3
Click [Network Settings].
4
Specify SLP settings.
 Specifying multicast device discovery
1 | Select [Multicast Discovery Settings] |
2 | Select the [Respond to Discovery] check box and specify the required settings. 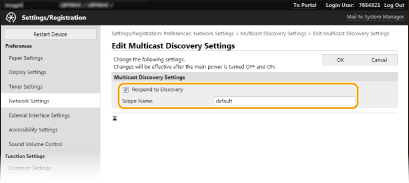 [Respond to Discovery] Select the check box to set the machine to respond to device management software multicast discovery packets and enable monitoring by device management software.  To change the port number for multicast discovery, see Changing Port Numbers. [Scope Name] To include the machine into a specific scope, enter alphanumeric characters for the scope name. |
3 | Click [OK]. |
Notifying a device management software of the power status of the machine
1 | Select [Sleep Mode Notification Settings] |
2 | Select the [Notify] check box and specify the required settings. 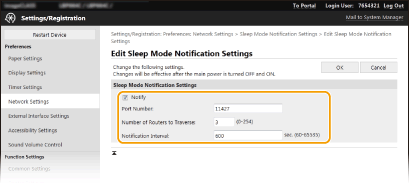 [Notify] Select the check box to notify a device management software of the power status of the machine. When [Notify] is selected, you can expect the machine to avoid unnecessary communication during sleep mode and reduce the total power consumption. [Port Number] Change the port number for this function according to the network environment. [Number of Routers to Traverse] Specify how many routers the notification packets can pass through. [Notification Interval] Specify how often the machine notifies a device management software of its power status. |
3 | Click [OK]. |
5
Restart the machine. Restarting the Machine
Configuring Settings for Communication between the Machine and Plug-ins
You can specify the settings to enable communication between the machine and imageWARE Enterprise Management Console plug-ins. Use of plug-ins allows you to manage the machine's settings from imageWARE Enterprise Management Console.
<Menu> <Preferences> <Network> <Device Settings Management> <On> 